What does “working from home” look like for conservators?

Working from home – this is not a foreign concept for many of us since the outbreak of the novel coronavirus in the US earlier this year. But how do conservators – museum staff who regularly work in close contact with museum artifacts – work from home?

It turns out, there are a lot of things we can do. We are, after all, creative people, and adaptable, and often experienced in working in less-than-ideal circumstances. We also always have a backlog of job-related tasks that are easy to push aside while we are working at the Museum, like labeling and archiving photos and improving our documentation standards. To give you a glimpse into how some of us in the Conservation Department have been working from home, I asked several of my colleagues to weigh in:

From conservator Julie Lawson:

As was the case for many, working from home began with a “crash course” in navigating new (to me) adventures in virtual meetings, guest-lecturing, remote desktops, and remote IT colleagues. The pause in an often relentless exhibit schedule has given me a chance to catch up on some old record-keeping, and many current resources that would likely have been missed such as international web presentations of conservation projects. More lately, I’ve been engaged in what it means to be personally anti-racist, the impacts of racism on museums fields and individuals, and what I can and should do about it. Listening online to Black museum directors, curators, and archaeologists, for instance, is giving me a new and necessary perspective to take to work in an anthropology museum and beyond.

Of course, a thread running through the last several months has been presentations, documents, protocols, questions and updates on Covid-19’s effect on our and other museums, the Penn campus and life in general. To take breaks from all that and take advantage hours spent not commuting to the Museum, I’ve been expanding my garden beds and trying out new things like growing 6 foot tall sunflowers from seeds, followed by some outdoor ‘conservation treatment’ with a recycled spray bottle of homemade insecticidal soap solution.  Turns out that spotted lantern fly nymphs are a major agent of garden plant deterioration!  

A goldfinch perched atop one of Julie’s impressive sunflowers

From conservator Tessa de Alarcón:

Like everyone I have been entering old treatment reports into KE EMu, our collections database, and doing a lot of data clean-up. Some of the data clean-up included making sure X-ray images in EMu have the proper metadata (the red arrows in the images below indicate a metadata fix that I made to one image). Without this fix, these images were not pushing to the public website properly.

Same image, before (left) and after (right) a metadata fix

Another project I worked on from home was processing some RTI data. In my examination of this ancient Egyptian bronze plaque (E11528), I observed that it has modern paint over the ancient inscription. In weighing a decision about whether or not to remove the modern paint, I told the curators that I could do RTI on the plaque to better understand how legible the inscription would be without the paint. The RTI images do seem to show where the paint does not line up well with the actual incised inscription.

An RTI image of the bronze plaque, E11528, showing the object’s surface topography

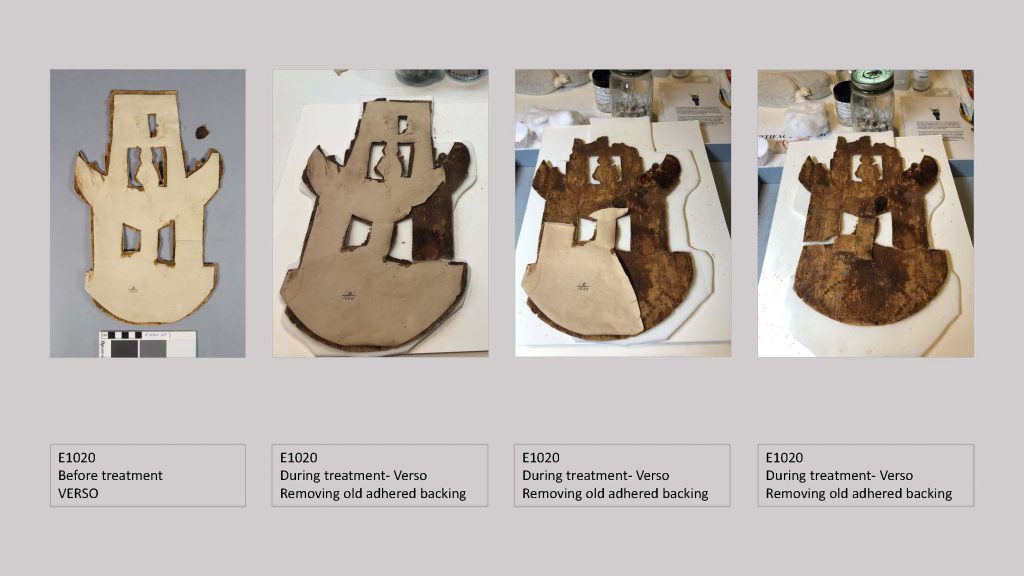
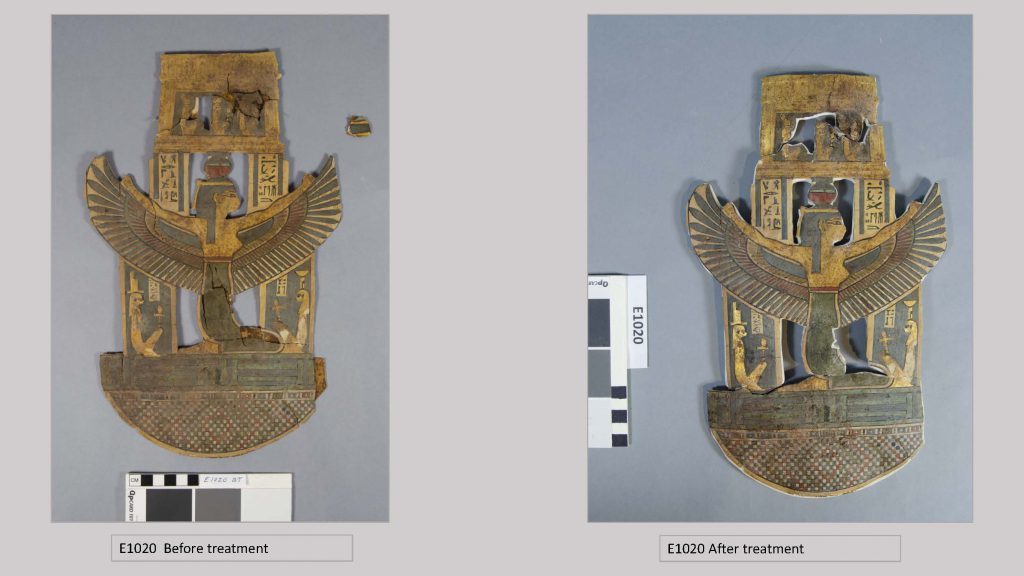
From conservator Julia Commander:

Working from home is a great opportunity to dive into materials from related fields – even aerospace design! Webinars and videos like this one, showing how to trim carbon fiber components with an oscillating multitool, help as we develop protocols for making large-scale interfaces for Ancient Egyptian column drums.

Some of our family members don’t care what we’re working on, as long as we can do it from home!

From conservator Jessica Betz Abel:

During the quarantine, I’ve mostly been striving to make perfectly symmetrical Hungarian pizzelles using my grandmother’s handwritten recipe. When I wasn’t gently tapping off the excess crust around the sides of the pizzelles, I spent the early part of the summer on my presentation concerning the desalination of Egyptian limestone using agarose gel for the American Institute of Conservation‘s 2020 virtual annual meeting.

I’ll take the pizzelle, but I’ll pass on flaking limestone.

From Head Conservator Lynn Grant:

During the time the Museum was closed, I got to go in several times to check on the condition of the artifacts on display and in storage (this was just an extra check: our Security staff did regular rounds all through the time we were closed). With lights off to protect the artifacts, it was a spooky flashlight experience in places.  

Lynn’s flashlight illuminates a case of ancient Egyptian animal mummies in the Museum’s Secrets and Science gallery

Of course, the Penn Museum is now open to the public, and many of us are getting back into a routine that takes us to work in person several days a week! So we have less time for baking and gardening, but we are happy to be back with the collection and we look forward to continuing to update the blog with our ongoing work.

Picture (im)perfect

Hello again from CLA (or at least from our home offices)! As we’ve mentioned before, conservators love to look at records relating to the objects we’re treating. It helps us to gain insights into the artifact’s history and gives us context for what we see on the bench in front of us. While we don’t always have exhaustive information about every single piece, it’s always interesting to do a little research when we can. One of our recent blog posts discussed how we’ve used archaeological renderings to understand traces of colors on our objects; this post will take a look at how photographic records can inform us about the current condition of the pieces.

Photograph of the Penn Museum Archives
A view of the Penn Museum Archives.
Each of these boxes is filled with a treasure trove of information.

Before the CLA team dove into the hands-on work last fall, we took a trip to the museum’s extensive archive collection to do some digging into the history of Merenptah’s palace. With the help of Alex Pezzati, Senior Archivist, we were able to read through the records of the excavation, led by Clarence Fisher from 1915-1920. Our research was also guided by the work of Dr. Kevin Cahail, whose own forays into the archives have revealed a lot of missing details about the site. He was able to provide a lot of insights into what we were seeing in the photographs.

One of the things that impressed us most about the excavation images is the sheer scale of the architecture. While we’re very familiar with our columns and doorways by now, it’s quite another thing to see them in situ. The picture below shows columns and pylons (trapezoidal gateways) from Merenptah’s Coronation Chapel. These objects were previously exhibited at half height because the ceilings in the downstairs gallery were too low, but they’re about 25 feet tall. Part of our project for the new galleries is to figure out how to display these columns at their full height so museum visitors can experience them the way the Egyptians would have. In the meantime, it’s a useful reminder to look at images like this to remind ourselves that they stood for several thousand years!

Site image of the Coronation Chapel during excavation
The Coronation Chapel mostly excavated. The columns would have had capitals, but otherwise are at their full height.

Another thing you might notice in that image is all the water on the ground. The site is in the Nile flood plain and experienced several very wet seasons. We could tell from the current condition of the stone that it had been waterlogged. Stone is often thought of as being hard and unchangeable, but this particular Egyptian limestone contains a lot of clay, so it becomes very soft when wet. Fisher’s notes talk about how fragile the stone was, and ultimately how they made the decision to bring the pieces back to Penn before they deteriorated even more. The stone was still damp when it was wrapped in linen and packed into wooden crates – which explains the fabric impressions we see in the surface of some of the pieces.

Workers preparing columns for shipping and stone with textile impressions
(Left) Workers preparing the column pieces for shipping. (Right) An example of the stone surface with impressions of the textile weave.

Images from the site are incredibly useful tools when we’re looking at damage to an object and trying to determine the cause – whether the damage occurred before excavation or due to more recent changes. They’re also helpful when we’re trying to figure out the extent of old repairs. When the pylon pieces were installed in the gallery in the 1920s, they were extensively restored with plaster and paint. We could also tell that some lost stone had been replaced with bricks and cement, but it was difficult to tell where the restoration ended and the stone began. Fortunately, there were a lot of pictures taken of the coronation chapel while it was being excavated.

Coronation Chapel pylon
(Left) The left pylon during excavation. Notice that the row of figures second from bottom is almost completely lost. (Right) The same object with plaster reconstruction. The detail was based on the other pylon, which is much more intact.

Looking at the original photographs of the left pylon, we could tell that it had already suffered significant surface loss to the bottom and middle sections. We could also see that even though it was still standing, the middle part had broken into several pieces. Using that knowledge during the deinstallation process, we were able to rig around the damaged areas and to remove the old restoration material so the pieces could be separated. When the pylons are reinstalled in the renovated galleries, they will be safely displayed on custom steel support structures. We’re working on how to replicate the decoration, but we’ll make it clear what is original and what is new.

During our time in the archives, we discovered one thing that hasn’t changed much – archaeologists love site dogs.

Site animals
Some pictures of very good dig dogs over the years… and one very cute baby fox (bottom left)!

The right tools for the (monumental) job

Greetings from the Penn Museum’s Conservation Lab Annex (CLA)! You may remember from our first post the scale (large!) and types of objects we are going to be working on over the next few years. We are mostly working on architectural elements like doorways, windows, and columns that were part of the palace complex of the Pharaoh Merenptah, who ruled Egypt from Memphis from 1213–1203 BC. To put things in perspective, the doorway we are currently working on is over 12 ft tall and many of its fragments weigh hundreds of pounds. That means we have had to add a few new tools that are not typically found in a museum’s conservation lab. Most recently we’ve started utilizing a lot of new tools including a forklift, a gantry, and large-scale sandboxes.  

  • Forklift – A few weeks ago, the whole Ancient Egypt and Nubia Galleries Team attended a certification workshop in forklift operation. The certification course taught us the basics in how to safely operate our electric forklift. Having our own forklift onsite allows us to easily move some of the large stone fragments in and out of the lab, reorganize the layout of the warehouse to create space for rigging and lifting, and organize all of the Merenptah Palace pieces into one area.   
Egyptian Section Curator Dr. Jennifer Wegner smoothly maneuvering the forklift during our training session.
  • Gantry – At CLA we have a gantry crane in the warehouse which allows us to rig and lift some of the heaviest objects and fragments. This is especially important when we are trying to dry-fit pieces together before making more permanent joins. There are lots of different ways to rig or strap a fragment for lifting, but we’ve found that using shorter straps with a choke hitch is the safest way to lift our artifacts. In the photo below you can see that’s exactly what we’ve done. Once we have the straps secured and fully supporting the object, we begin to slowly lift, making sure the straps settle and don’t slip or re-adjust, dropping the object.  
CLA team using the gantry to lift part of the lintel from Doorway 1.
  • Sandbox – Sandboxes are often used in conservation to support objects during joining. Using a sandbox, we can place an object inside at whatever angle we need to in order to support the object on top with nothing but the weight of gravity. At CLA, our objects are quite large, so we are using old shipping crates and converting them into large sandboxes to accommodate our needs. In the photos below you can see the process of moving a fragment into the sandbox and then in the second photo you can see that fragment has been placed in such a way that it can now support the weight of the second, joining fragment on top of it. The blue tape serves as a guide to help us know exactly how the two pieces fit together once we have applied the adhesive and are ready to do the final joining. 
CLA team moving part of the lintel from Doorway 1 into a sandbox.
Fragments of Doorway 1 lintel being dry-fit together in the sandbox prior to joining.
  • Dremel – Lastly, and on a much smaller scale, we’ve been using a few different power tools. The most helpful so far has been the Dremel. While the Dremel is not a completely foreign tool to many conservators, it is most often used for making mounts or sanding fills and/or cross-sections. In this case we are using the Dremel to cut and remove all restoration pins that have become heavily corroded over the years, expanded, and are causing damage to the stone.   
Corroded ferrous pins from a previous restoration being cut and removed from Doorway 1 fragments.

As with any job, having the right tools is really important, for success and safety! We look forward to continuing to share the progress we’ve made on this project from our home offices, as we continue to work from home.

Papyri Project

By Jessica Byler

This fall, I started a survey of our Egyptian papyrus collection thanks to an ARCE (American Research Center in Egypt) grant. The goals of the survey include preparing and rehousing the collection to be moved to a new storeroom, identifying unstable papyri that need to be treated, and getting some of the papyri ready for exhibit. The Penn Museum is in the process of redesigning the Ancient Egyptian and Nubian Galleries, and the curators have identified around 70 papyri they would like to include. Part of my job is treating and rehousing these papyri and making recommendations on their display.

E16423, a private letter in Arabic

What is Papyrus?

The papyri in our collection are mostly manuscripts. A sheet of papyrus is made of two cross-laminated layers of thin fiber strips made from the stems of the papyrus plant (cyperus papyrus). One layer of fibers is laid vertically, and the other is laid on top horizontally, creating a sheet with a grid pattern. Individual sheets were then overlapped and joined to create rolls. These rolls could be used as a single, long sheet or could be cut down as needed. The side with the horizontal fibers is called the recto (think “right side”), and the side with the vertical fibers is called the verso (think “reverse”). Scribes often wrote on the recto along the horizontal fibers, though some scribes wrote against the fibers or on both sides of the sheet.

A piece of modern papyrus through transmitted light
E2751, some vertical fibers are missing, revealing the horizontal fibers from the other side

Looking for a join helps identify the recto. Most joins are horizontal fibers to horizontal fibers, though some are horizontal to vertical. Look along the horizontal fibers and see if they continue across the sheet. If they do not line up or if there is a clear overlap, that’s likely a join.

E16323, horizontal to horizontal join. The red lines indicate the direction of the fibers and join.
E16411B, vertical to horizontal join. The red lines indicate the direction of the fibers and join.

Scribes used brushes or reed pens to write on the papyrus sheets. Inks were made from mixing ground up pigments into a binder. The most common ink was carbon black or soot bound with gum to make black ink. Scribes also sometimes used red ink made from red ochre, iron gall, and sepia, among other pigments. Some papyri are thickly painted with gypsum, metal oxides, and earth pigments.

E3068, a painted papyrus manuscript
83-1-1I, a manuscript with both carbon black and red ink

Penn Papyrus Survey

The Penn Museum has around 1200-1800 papyri featuring a wide range of personal, legal, administrative, literary, and religious texts in six languages: Arabic, Greek, Coptic, Hebrew, Demotic, and Hieratic. The collection spans around 4000 years, from the Old Kingdom to Islamic Egypt. These include Books of the Dead, Homer’s Iliad, and the Gospel of St. Matthew. There are also groups of small fragments which have not been reconstructed or studied. The Penn Museum’s collection of papyri has never been the subject of a concerted conservation campaign – until now.

Most of the collection is currently encapsulated in Mylar and stored flat in manila folders or sandwiched between two glass plates. I am surveying the collection at the object-level, one by one. I examine, measure, and record each piece, noting the structure of the papyrus, how it is housed, old mends or treatments, condition issues, and if it needs to be rehoused or conserved. I follow the examination and documentation with photography. Images are available on our Digital Collections webpage.  Hopefully with the new photos and documentation, this collection will be more accessible to papyrologists and scholars around the world.

Photographing papyrus using a copy stand

More Information

Eventually, the information on the Penn Museum papyri collection documented in this survey will be included in the Advanced Papyrological Information System (APIS) database, where only a small fraction of our collection is represented today. There are a number of great resources if you would like to know more about the structure and conservation of papyrus. The University of Michigan, which holds the largest collection of papyri in North America, is active in papyrological research and education. The Brooklyn Museum and NYU have both recently done similar projects and have great blogs about their collections as well.

This project is funded by the  Antiquities Endowment Fund (AEF).  The AEF is supported by an  endowment  established  with  funds  from  the  United  Stated  Agency  for  International Development (USAID).

Shades of the Past

By Julia Commander, Jessica Betz Abel, and Anna O’Neill

We’ve shared a few insights into the monumental limestone we’ve been treating at our Conservation Lab Annex (CLA). You may have noticed a consistent color scheme: tan. The surfaces of the doorways are intricately carved and decorated with faience inlay, although we mainly see a variety of neutral tones.

Doorway 1 in the lab

To get a sense of how these architectural elements would have looked when they were made in Memphis, Egypt around 1213–1203 BCE, it helps to understand the materials and their state of deterioration. Luckily, the Penn Museum Archives has extensive records from the 1920’s Memphis excavations, which provides some further clues about these objects.

Searching through archival materials, we found detailed notes about each object as it was excavated, as well as extensive watercolor illustrations. We can see brilliant colors in the drawings and notes referencing traces of paint and inlay material.

Archival illustrations of Merenptah columns

We even see that the doorways are illustrated with brilliant blue and teal colors.

Archival illustrations of Merenptah palace doorways

Some of the illustrations appear to extrapolate data from small traces of material. Do these colorful illustrations line up with what we’re seeing now in the material itself?

To explore a little further, we brought the Crimescope out to CLA to investigate using multispectral imaging. This technique has been discussed on the blog before, and we were particularly interested in infrared (IR) imaging of the faience inlay. While there are different types of faience material, some types related to Egyptian blue pigment produce the same luminescent response induced by visible light.

Searching for IR luminescence pointed us to a tiny area of inlay in the upper corner lintel fragment. The tip of one stripe glowed brightly, which corresponds to a pale green color that’s visible in normal lighting.

Visible light (VIS)
Visible-induced infrared luminescence (VIL)
Detail with VIS/VIL overlay

This result suggests that we’re seeing a deteriorated state of formerly bright blue/green/teal faience. While we did not see every trace of the degraded inlay light up in infrared imaging, this small hint corroborates what we’re seeing in the archival illustrations.

We plan to continue using multispectral imaging to explore decorated surfaces when we’re back at CLA. Stay tuned!

Beloved Objects

be Tessa de Alarcon

Like most other Philadelphia residents, the Penn Museum staff are adapting to working from home. As part of this, the Museum staff have recently been posting on the museum’s Instagram feed info on their favorite objects (pennmuseum #VisitFromHome). This got me thinking about the relationship between people and the things we interact with every day. The objects in the museum’s collection, while loved and cared for by the staff, also bear evidence of love and care from before they were in the museum’s collection. One such object recently came across my desk for treatment, E7517A and E7517B, a Nubian wooden box and lid from Karanog. I am not going to talk about the treatment today, so that I can focus on the care it received before it entered the museum.

E7517A and E7517B after treatment.

In the pictures above and the details below you can see that this wooden box has a variety of metal components, including copper alloy straps and a lock plate on the box, and staples on the lid as part of a repair to cracks and breaks through the wood.

The detail of E7517A, the box, on the left shows the lock plate and one of the metal straps, and the detail on the right of E7517B shows the staples on the lid.

Staples like these are a common repair both in antiquity and historically for a variety of materials and are not an unusual feature on objects in the museum’s collections (here are just a few other examples of both types of staples: AF5211, B9220, 2006-15-41, B20014). If you look closely though, you can see that the metal straps and the lock plate go over the inlays on the box. This suggests that these elements were not part of the box originally and were a later addition.

These components are also made from a variety of metals. I tested them using both a magnet to check for iron, and a portable X-ray fluorescence spectrometer (pXRF) and found that they are a range of metals including iron, copper tin alloys (bronze), and copper zinc alloys (brass). Also, parts that appear similar, like the straps are not made up of the same alloying components, some contain lead in addition to the copper and tin, and some have no lead. The staples are also a range of metals including iron, brass, and bronze.

When I started working on the box, I wanted to tease out when these metal components were added as they could have been either ancient or modern. With this type of question, I typically set up an appointment with our archives to look at the original field notes and field photography. However, in this case, much of the data on the excavations at Karanog is online, including pdf’s of the excavation publications. In the museum’s database I found that the box was from a burial: tomb G 445. Going through the publication, I was able to use the context information to find not only a description of where it was found within the tomb, but also a sketch of the burial, a photo of the box, and a detailed description of it in a catalogue of the finds. The box had been found in the burial with two individuals buried one above the other and was found next to their legs.

Drawing of tomb G 445 from Woolley, Leonard, and David Randall-MacIver. Karanòg: The Romano-Nubian Cemetery. Vol. 3. University museum, 1910: 44. The blue highlighting is an addition to point out the location of E7517A and E7517B in the burial.
Plate 22 from Woolley, Leonard, and David Randall-MacIver. Karanòg: The Romano-Nubian Cemetery. Vol. 3. University museum, 1910.

The textual information from the publication includes some important pieces of information: first that, “it had been considerably restored before being deposited in the tomb, brass binding had been added at the corners and the broken lid had been rudely mended with bronze rivets” (Woolley and Randall-MacIver, 44) and that “it remains in the condition in which it was found, no repairs to it having been necessary” (Woolley and Randall-MacIver, 71).  While the language used to describe these metal components seems to me a bit harsh, not only is it described as “rudely mended”, the lock plate is described as “a perfectly useless lock plate”, it does make it clear that these metal components are from when it was in use (Woolley and Randall-MacIver, 44, 71). It should also be noted that the metal identifications given in the publication were not done through analysis, so don’t match with the results I have from pXRF.

Because of the detailed information in the publication, I also know what was in the box when it was excavated: another smaller box (E7510A and E7510B) and two wooden spindle whorls (E7506 and E7507).  These are all shown in the image below.

Objects found inside E7517A: a box and its lid (E7510A and E7510B) and two spindle whorls (E7506 and E7507)

So, all together what does this information tell me about the history of this box? First, the repairs and modifications to this box happened during its use before it was put in the burial of the two individuals in tomb G 445. The fact that the metal components, even similar ones, have different compositions could mean a few things. It could be that it was repaired and modified using scrap metal with the components being made from different scraps, that the repairs occurred at different times and so with different metals, or both. If they were not made using scrap metal, it is possible that some of the straps may have had to be replaced at some point and that may be why some are leaded bronze and some are not. These straps do not appear to have a function and may instead reflect changes in taste. The function of the box may have also changed, and this may be why they needed to add the lock plate. The various metals for the repairs to the lid almost certainly resulted from various treatment campaigns, meaning that it was repaired, used, broken, and repaired again. In any case these modifications and repairs tell a story of care and use and suggest that this box was loved and treasured by the people who owned it. This may also be why it eventually was placed in a burial, perhaps as a particularly prized possession of one or both of the individuals in the burial.

This project was made possible in part by the Institute of Museum and Library Services.

Lessons Learned: You Cannot Treat Dry Wood Like Wet Wood

by Tessa de Alarcon

Documentation of conservation treatments undertaken in the lab is a very important part of what we in the conservation department do at the museum. One of the main reasons we document our treatments is so that conservators in the future don’t have to try to figure out what was done to an object. Instead those future conservators can read our reports and start off knowing the treatment history.  

An array of treatment reports, and log book entries, from the conservation department at the Penn Museum

We are also sometimes those future conservators, looking back at previous treatments. This means that not only can we see an object’s treatment history, we have the opportunity to evaluate and learn from the decisions made by conservators decades ago. Some of these treatments were successful, and some were not. Now we know to avoid those treatments that clearly did not work.

I recently completed a treatment on an object that is a good example of this process. E11151 is a carved wooden figure from Nubia. It was treated before I worked on it by a conservator in the 1970’s. The photo below is how the object looked when it entered the lab at the end of last year.

Before treatment image of E11151 taken in 2019

In the case of this object, it was noted in the 1970’s as having a slightly powdery surface. The conservator conducting the treatment decided to apply a consolidation method that is frequently used on waterlogged wood: immersion in a solution of PEG (polyethylene glycol). PEG treatments are still done today and are very effective at consolidating and stabilizing waterlogged wood before it dries out. But because of this treatment and others done at the museum around this same time period, we have learned that consolidation with PEG is not effective on dry wood, even if it once was waterlogged. E11151 was dry wood and did not come from a waterlogged context.

E11205, E11187, E11203, E11151
E11151 is on the far right.
This publication photo was taken before the object was treated in the 1970’s.

The photo above is a publication photo of the object before it was treated in the 1970’s. While there is no photography with the 1970’s treatment report, there is a sketch which suggests that the object looked similar to this photo when it entered the lab at that time. As you can see there are quite a few differences in the object’s appearance as it entered the lab in 2019 and how it looked before it was treated in the 1970’s.

Before treatment photo of E11151. The red arrow is pointing to an area of thick, white, and hard high molecular weight PEG and the blue arrow is pointing to soft and sticky low molecular weight PEG

Two different molecular weights of PEG were used on this object, a hard high molecular weight one that was used to consolidate the powdery wood and looked white on the surface where it was very thick, and a low molecular weight one that was used to join pieces of the object together and left the surface tacky and sticky. The sticky PEG also trapped a lot of dirt and dust on the surface of the object.

After treatment detail of the top of E11151

The detail above shows the top of the head of the object. The report from the 1970’s states that during treatment the object began to crack and fragment. PEG is typically dissolved in water or ethanol. Both solvents were used in the PEG treatment of this object. These two solvents can be mixed together and during a normal PEG treatment the wet wood starts with PEG in water and then moves to PEG in ethanol: this helps start the drying process. As the waterlogged wood is also already wet, the PEG can penetrate fully into the swollen wood. However, in the case of dry wood, these solvents (ethanol typically has some water in it) introduce moisture into the object, and it starts to swell as wood is very responsive to moisture. It then has to dry out again after the treatment, causing the wood to shrink. This is stressful for the object. This stress is what likely caused the cracking documented in the report and visible in the image above.

E11151, after treatment photo from the treatment completed in 2020

Here you can see what the object looks like now that I have finished my treatment. Consolidation is a very permanent and tricky to reverse treatment, even when adhesives that remain soluble, like PEG, are used. There is currently no way to remove the PEG from this object. All I have done is reduce the PEG on the surface by cleaning it with ethanol. I also used the previous documentation to figure out where small detached fragments went so that it looks more like it did originally. While the treatment that was undertaken in the 1970’s seems to be over-treatment as it caused new problems, some more severe than the problems the object had to begin with, I do also want to recognize that it is because of past experiments like this one that I know not to use PEG on dry wood.

Because wholesale consolidation is a fairly permanent and risky treatment, I think long and hard when I choose a consolidant. I also remain aware that there is a chance that someday, some future conservator, will deem some of my treatments mistakes as well. Hopefully my mistakes will be ones that they can learn from too.

To learn more about PEG treatments for waterlogged organic materials, check out these links:

Ellen Carrlee Conservation blog: High Molecular Weight PEG for basketry

Queen Anne’s Revenge blog: Waterlogged wood – Gotta bulk it up!

Cardiff University Conservation: Newport Ship Workshop

This project was made possible in part by the Institute of Museum and Library Services.

Monumental but gentle

by Anna O’Neill, Julia Commander, and Jessica Betz Abel

Hello from the Penn Museum Conservation Lab Annex (CLA)! Since Lynn’s introduction, we’ve had a little bit of time to settle into our new, off-site facility and get started on some seriously big projects. Our primary task here is working on architectural elements that were part of the palace of the Pharaoh Merenptah, who ruled Egypt from Memphis from 1213–1203 BCE. We have doorways, windows, and other objects from the palace which will be displayed in the new Ancient Egypt & Nubia Galleries to give visitors the experience of being in an ancient Egyptian building. But first, we have to put them together!

The warehouse section of CLA, with pallets of fragments from the Merenptah palace complex.

We have four doorways that will go into the galleries, all of which are very large and in many pieces. They are made of limestone and intricately carved, with traces of inlay and paint. Our first project is Doorway 1, which will be about 12 feet tall once it’s all together. It’s never been displayed before, but it was partially treated in the past. Some fragments are joined together with adhesive and metal pins, and we can tell that some of the decorated surfaces were coated with a consolidant. The fragments are also very dark and dirty from almost 100 years in storage.

Doorway 1 is in thirteen major pieces, which were all on different pallets when they were moved to CLA. With a little bit of effort and a lot of maneuvering with pallet jacks, we grouped the fragments together. It was very satisfying to figure out how all the pieces fit together and form a door!

Doorway 1 coming together on pallets in the lab section of CLA.

Since we’re using Doorway 1 as our pilot project to figure out how we’ll treat the rest of the palace objects, we’ve spent a lot of time testing different conservation approaches. Since the doorway is discolored with dirt and one or more old coatings, we’ve been experimenting with gel cleaning and found two methods that work well for what we need – hot agar and Nanorestore gels® Peggy. We’ve talked about using other kinds of gel before.

Agar is a product of red seaweed and contains a polysaccharide called agarose. When it’s dissolved in water and heated, agarose forms long molecular chains – that means that when it sets, agar becomes a rigid gel that can be peeled up as a sheet without leaving problematic residues behind. The long agarose chains create pockets that hold solvents on the surface of the object, allowing them to work on grime or coatings without soaking in too deeply. You can add different cleaning solutions to agar, but plain deionized water gave us the results we wanted. We dissolved agar in deionized water and heated it in the microwave to form the solution, then poured it directly onto the surface of the stone and allowed it to cool. Applying it as a liquid means that the gel conforms well to the irregularities in the object and lets us get into all the nooks and crannies.

Action shots showing the application of agar to the surface of Doorway 1.

The Peggy 6 gel is made of poly (vinyl acetate) and comes as a thin polymer sheet. It feels a little like the gummy hands you can stick on windows – stretchy and flexible but strong. Like agar, the Peggy gel can be used with different cleaning solutions but we stuck with deionized water. The gel is laid on the surface of the stone to let the water do its work on the grime. Because the Peggy is a stretchy sheet, it can skim right over delicate carvings that might contain pigment. Another advantage of the Peggy gel is that it’s reusable – we just rinse it out in deionized water and use it again.

The Peggy 6 gel in action.

To clean Doorway 1 we used a combination of the agar and Peggy gels. Both gels soften the dirt and coating, and often looks pretty grimy when they’re peeled up. Once the gel is removed, the stone is wiped with cotton and more deionized water to remove even more dirt. We were pretty pleased with the difference between the cleaned and dirty surfaces, and using the gels meant that the process was much more efficient and gentler on the stone than using swabs.

Other parts of the treatment include reversing old repairs (or deciding when to leave them be), assembling fragments, and figuring out how to display the doorway in the gallery. We’ll check back in later with more monumental updates!

El cartonaje finalmente se relaja

por Teresa Jiménez-Millas

Durante el pasado mes, he tenido el privilegio de poder trabajar en un cartonaje egipcio, y ¡no menos es la suerte que tengo de poder escribir este artículo en mi lengua materna! Me han consentido mucho en este equipo.

Poco o nada sabemos de la procedencia de la obra, fue una donación a la colección egipcia del museo por parte del Sr. Thomas A. Scott en el siglo XIX, y es un estupendo ejemplar para estudiar tanto la técnica del cartonaje como el tipo de intervenciones que se hacían en el pasado.

La nomenclatura es una derivación del francés “cartonnage”, término usado en egiptología para hacer referencia a la técnica en la que finas capas de yeso se aplicaban sobre un soporte que podía ser fibra (lino) o papiro, permitiendo la flexibilidad suficiente para moldear y obtener las formas deseadas de la silueta del difunto, algo parecido al papel maché para que os hagáis una idea. Sobre este aparejo de yeso se elaboraban la policromía y el dorado.

Esta pieza ocupaba la zona pectoral de la momia. La imagen representa una figura alada con el disco solar sobre la cabeza, posiblemente Nut, quien junto a su hermano Geb eran los padres de Isis, cuya historia es central en la resurrección de los extintos.

En cuanto al proceso de restauración de esta obra, lo primero que nos llamó la atención fue el soporte adherido al reverso, que no formaba parte del original, y por otra parte el gran número de fracturas y pérdidas que presentaba el anverso.

Por la tipología de esta obra sabemos que no era plana y que tenía cierta curvatura, pues su función era decorar y descansar en el pecho de la momia. En este caso, parece que la persona que intervino la pieza en el pasado no tuvo en cuenta esto y añadió un cartón con mucho adhesivo en el reverso, de manera que la pieza ¡quedó completamente aplanada!

En este tratamiento de conservación lo fundamental era eliminar ese soporte trasero para relajar la obra, pese a que esto supusiera que los fragmentos antes unidos quedaran sueltos y desprendidos. Este paso se hizo mecánicamente con la ayuda de un bisturí y bajo las lentes del microscopio.

Se quiso evitar cualquier contacto con un medio acuoso, pues ante una obra tan frágil cualquier fluctuación de humedad podría afectar negativamente al soporte, a las capas pictóricas y al dorado.

Con el paso de los días se pudo observar cómo cada fragmento iba recuperando su forma primigenia, recobrando cierta curvatura y relajándose. Esto determinó el resto del proceso, pues se decidió no forzar la unión de las diferentes áreas. Cada una presentaba en este momento un diferente perfil y tratar de reunirlas provocaría mucha tensión innecesaria.

Se consolidaron y protegieron todas las zonas por el reverso y se estudió la mejor manera de realizar un soporte para cada una de ellas que permitiese también su futuro montaje y exposición.

Tras muchas pruebas, preguntas y mucha paciencia de mis colegas, se decidió que lo mejor sería hacer tres soportes para las tres áreas con resina epoxídica de madera; de esta manera cada uno soportaría un fragmento, un planteamiento respetuoso para la obra que nos hace entender que el paso del tiempo y las intervenciones del pasado dejan su huella.

Photos showing various trials for constructing a support for the fragile cartonnage pieces. The support in the third image (far right, made of wood epoxy) was the winner.

Tengo que agradecer a Jane Williams, jefa de conservación y restauración del “Fine Arts Museum of San Francisco” por sus consejos y su ayuda inestimable para el tratamiento de esta obra que tanto respeto me causaba.

Con mucha gratitud por haber tenido la suerte de trabajar con tan generosas personas y haber aprendido tanto en este fantástico proyecto, ¡espero algún día poder ver este cartonaje expuesto en el museo!

Este proyecto ha sido posible en parte por el Instituto de Servicios de Museos y Bibliotecas.

Should one strike when the solder is hot?

By Tatiana Perez

I am an undergraduate Classical and Near Eastern Archaeology student at Bryn Mawr College and this past summer, I began as a conservation intern within the Penn Museum’s Museum Practice Program. I am continuing this work through an independent study in the Museum’s Conservation Department this Fall. During my time here, I have treated a group of Egyptian faience shabtis.

Egyptian faience shabti prior to treatment.

Shabtis are statuettes that were made to be placed within ancient Egyptian burials for the purpose of assisting the deceased in the afterlife. The shabtis I worked on are made of Egyptian faience, a material made from silica, alkaline salts such as plant ash or natron, lime, and metallic colorants. The faience could be hand-shaped or pressed into molds, that when fired, would self-glaze. Although faience was made in many different colors, it is most often associated with a bright blue/turquoise color (using a copper colorant) as seen in many amulets, beads, and figurines.

The specific group of shabtis I worked with this summer differed in size, shape, and color. Many were previously repaired and some of these old repairs were failing. Unfortunately, these objects had become disassociated from their accession numbers and records, so there is no information on their provenance or previous conservation treatments. I was tasked with documenting their condition, and treating those that were broken or in need of re-treatment, either to remove failing old adhesives or remending those that were previously mended but now broken. As adhesives age, especially those used in the early 20th century, they can become discolored, may shrink or expand, or may become stronger. All of these conditions pose problems to the objects that can affect their future stability and ‘health’.

Since no record of the treatments existed, I used various methods to determine what worked best to remove the adhesives that were used. First, I used UV light to identify the type of adhesives. After observing that it was possibly shellac or animal glue, I spot-tested the adhesives using a variety of solvents. I found that acetone, ethanol, and deionized water worked best, so I left the shabtis in acetone vapor chambers for a few hours to allow the adhesive to dissolve.

After the old joins were taken down, one particular shabti caught my eye immediately. This lighter green-blue shabti had metal adhering one of the joins, with some adhesive underneath as well. After consulting with various conservators about this unexpected find and with help from the handheld pXRF instrument, we found that it was lead solder that was used to join these pieces. This is a very unusual (and outdated) technique for mending pottery and as head conservator Lynn Grant said, it’s likely whoever treated it last “struck when the solder was hot”.  In other words, the person who last treated this object might have used the solder because it was nearby and ready to use. This conservation method was not the best way to mend the shabti and doesn’t reflect current methods we use. The body, or core, of faience objects is very porous and absorbs whatever adhesive is applied. When the solder was applied it seeped into the body of the body of the object, and made it very difficult to remove.

Lead solder between first and second fragment (top). 60X magnification of the lead solder (bottom).

Though this conservation treatment doesn’t affect our understanding of the shabti, it got me thinking about how conservation ethics and practices have changed over time. As stewards of cultural heritage, conservators have the important job of fixing objects in a way that is reversible and that doesn’t compromise the object’s cultural integrity or future use. Conservators do their best to maintain the integrity of objects, for both research purposes and to preserve a piece of the culture these objects came from for future study and display. This means that conservators must also apply these ethics to objects that were treated before these standards were enforced, and take caution to prevent any further loss of information no matter how small.

With the shabti group I worked on, I used a technique that is commonly used to repair porous or low-fired ceramics. Before using an adhesive to repair the fragments, I applied a low concentration adhesive solution on the break edges to create a less porous surface and to prevent the adhesive from seeping into the body of the faience. I then used a higher concentration adhesive to put the pieces together. This specific treatment is reversible and will ideally last a century or more!

Mending artifacts can be a slow process in which a conservator attaches one piece a day. While working on this small group of shabtis for many weeks, I’ve grown very attached to them. They are all unique pieces with their own quirks, and I can’t wait to see them back together and ready for future use.

Shabti group after treatment (left). Shabti after treatment (right).