Conserving a child mummy

A couple weeks ago, I introduced you to our child mummy Tanwa, and now I’m happy to report that I’ve completed her conservation treatment.

Tanwa before conservation treatment

Tanwa before conservation treatment

Tanwa has been in our collection since 1898; she was collected through the American Exploration Society, an organization founded by Sarah Yorke Stevenson, the museum’s first curator of the Egyptian section.

Tanwa was exhibited in the museum early on, but she has not been on display for a long time. When she came up to the Artifact Lab, we could see that she was generally in good condition, expect for the fact that some of the narrow bandages wrapped around her body, especially those around her feet, were fragile, torn, and partially detached. Many of the strips on the underside of her body were also damaged – although these aren’t usually visible since Tanwa is always lying on her back, they are at risk of detaching with any movement or handling.

Details of damaged linen around the feet (left) and on Tanwa's back (right)

Details of damaged linen around Tanwa’s feet (left) and on her back (right)

After fully documenting Tanwa’s condition, I first removed excess dust and grime from the surface of her wrappings using a soft-bristled brush and a HEPA-filtered vacuum. Cleaning the exterior surface significantly brightened the linen, and I think at this point Tanwa was already looking much better.

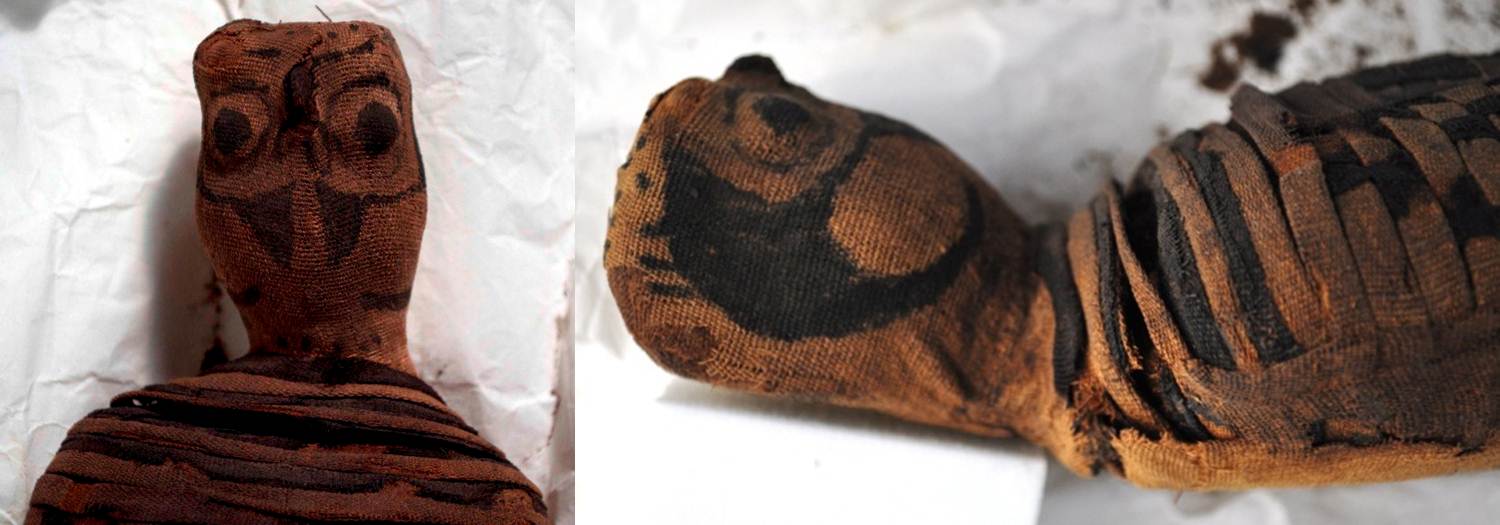
Tanwa had a few straight pins stuck into her wrappings in areas, apparently as a measure to temporarily secure some of the fragile linen. I removed all of these pins and adhered the linen in place as necessary with small amounts of methyl cellulose adhesive.

A pin stuck into the bandages on Tanwa's head (left, indicated by red arrow) was removed and the linen was secured to prevent further loss (right, after treatment)

A pin stuck into the bandages on Tanwa’s head (left, indicated by red arrow) was removed and the linen was secured to prevent further loss (right, after treatment)

I then proceeded to repair the linen around her feet and in all other places where the linen was fragile and at risk of detaching or becoming further damaged. All repairs were carried out using similar materials and methods to those I used to repair our falcon mummy. Distorted linen was relaxed and reshaped by humidification with either a damp blotter and Gore-tex sandwich, or using the Preservation Pencil. Detached linen was tacked down using a 6% solution of methyl cellulose adhesive, and fragile areas of linen were backed/supporting using Japanese tissue paper toned with acrylic paints.

Backing a fragile area of linen with toned Japanese tissue paper - the blue clamp is holding everything in place while the adhesive dries

Backing a fragile area of linen with toned Japanese tissue paper – the blue clamp is holding everything in place while the adhesive dries

Here are some after treatment details to compare to the before treatment shots seen in the second image on this post:

After treatment details of the linen around Tanwa's feet (left) and on her back (right)

After treatment details of the linen around Tanwa’s feet (left) and on her back (right)

All of Tanwa’s linen wrappings are now fully stabilized and she is ready to be exhibited for the first time in decades!

An overall view of Tanwa, after treatment

An overall view of Tanwa, after treatment


Salvaging PUM I’s chest wrappings

This week, I started to work on the treatment of our mummy PUM I‘s linen wrappings. Poor PUM I – not only is his body quite deteriorated and in multiple pieces, but his linen wrappings are also fragmentary and very fragile. Some of linen in the worst condition are the pieces that once covered his chest, which were cut off during the 1972 autopsy.

This rectangular section of textiles was cut away as a single unit during the 1972 autopsy.

This rectangular section of textiles was cut away as a single unit during the 1972 autopsy.

In addition to the mechanical damage caused by the autopsy, the linen has suffered from insect damage and it is significantly stained and embrittled in areas, likely due in part to deterioration of the human remains they were once in contact with.

Removing the wrappings (left) and the chest wrappings after removal (right)

Removing the wrappings (left) and the chest wrappings after removal (right)

While this linen is in poor condition, it can be moved as a single unit, so we removed it for treatment. The goal of the current treatment is to keep the linen layers in this section together; to prevent them from slipping out of alignment and to prevent the linen from continuing to tear and deteriorate even more.

After vacuuming the linen thoroughly, I got to work relaxing distorted areas and realigning tears.

Local humidification of the linen in progress, using damp blotter and Gore-Tex

Local humidification of the linen in progress, using damp blotter and Gore-Tex

To realign tears, I bridged these areas from behind with small pieces of Japanese tissue paper, adhered in place with methylcellulose adhesive. The methylcellulose works well because it sets very quickly with only a small amount of pressure from my finger or a spatula.

One side of the wrappings before (left) and after (right) humidification and tear repair

One side of the wrappings before (left) and after (right) humidification and tear repair

The other side of the chest wrappings before (left) and after (right) tear repair

The other side of the chest wrappings before (left) and after (right) tear repair

This is only the beginning of the treatment on PUM I’s wrappings, but I think they are already looking better!


Bobblehead no more: finishing the falcon mummy treatment

As you’ve seen in one of my latest posts, I have been working on the treatment of our falcon mummy, but of course I saved one of the most challenging parts for last. I couldn’t capture a great photo of this, but one of the biggest condition problems with the falcon is that he had a seriously floppy head. This was caused by tears, breaks and losses of the linen fabric in both the front and the back of the body, just below the neck.

Two detail shots of the falcon mummy before treatment, showing breaks and separation of the textile near the neck

Actually, one of the best images showing this is in our online collections database found by following this link. It is evident that there was nothing supporting the falcon’s head in this photo, allowing it to fall backward.

To stabilize this area, I filled the gaps using Japanese tissue paper and methyl cellulose, the same adhesive I used to repair the textile on the feet of this mummy. Japanese paper is commonly used in conservation for the repair of artifacts and paper-based materials. As the name implies, this is paper made in Japan, usually from kozo fibers, which come from the inner bark of the Kozo, or Paper Mulberry tree.

Gap in back of the falcon’s neck during (left) and after (right) filling and mending with Japanese tissue paper.

In areas where the Japanese tissue paper would be visible, I toned the paper beforehand using Golden acrylic paints. I made most of the fills from the back, which allowed the separated area in the front to join together nicely, requiring little additions in this area.

Two views of the falcon mummy after treatment

Many of the dark-brown dyed linen elements were also very fragile and actively detaching, so I consolidated them using a 2.5% solution of Acryloid B-72 in a 50:50 solution of acetone/ethanol. Finally, I created a storage support for the falcon – even though the head is no longer floppy, this will provide important support under the head to reduce stress in this area and to avoid continued damage or failure of the repair.

Falcon mummy after treatment, with new storage tray

The falcon mummy is now ready for transport over to the hospital later this year for CT scanning. CT scanning will be able to tell us if there is a falcon inside the wrappings, and will also provide important information about how these animal mummies were made. Additionally, the CT images will be an important part of my conservation documentation – I will be able to annotate which materials I added as part of the treatment process, to eliminate confusion over what is original and what is not.

Our falcon mummy will also be going on display later this year – and you can visit him anytime by stopping by the Artifact Lab!