PLATE I. Reconstruction of the Meydûm Pyramid Site, looking northwest and showing Seneferu’s pyramid, parts of the mastabah tomb of, perhaps, the queen; and of the mastabah of a member of the royal family, perhaps a princess; the Pyramid Temple, Enclosing Wall, and Causeway. The Valley Temple at Meydûm has not yet been found but is here restored after that of Kha-ef-Ra at Giza. On the right front of the pyramid is the large brick mastabah, Number 17, doubtless belonging to a member of the royal family, and the smaller mastabah, 293, is shown near by. Constructional ramps for both Mastabah 17 and the pyramid itself are shown; the latter originally extended to the top of the pyramid. Drawing by I. Reich.
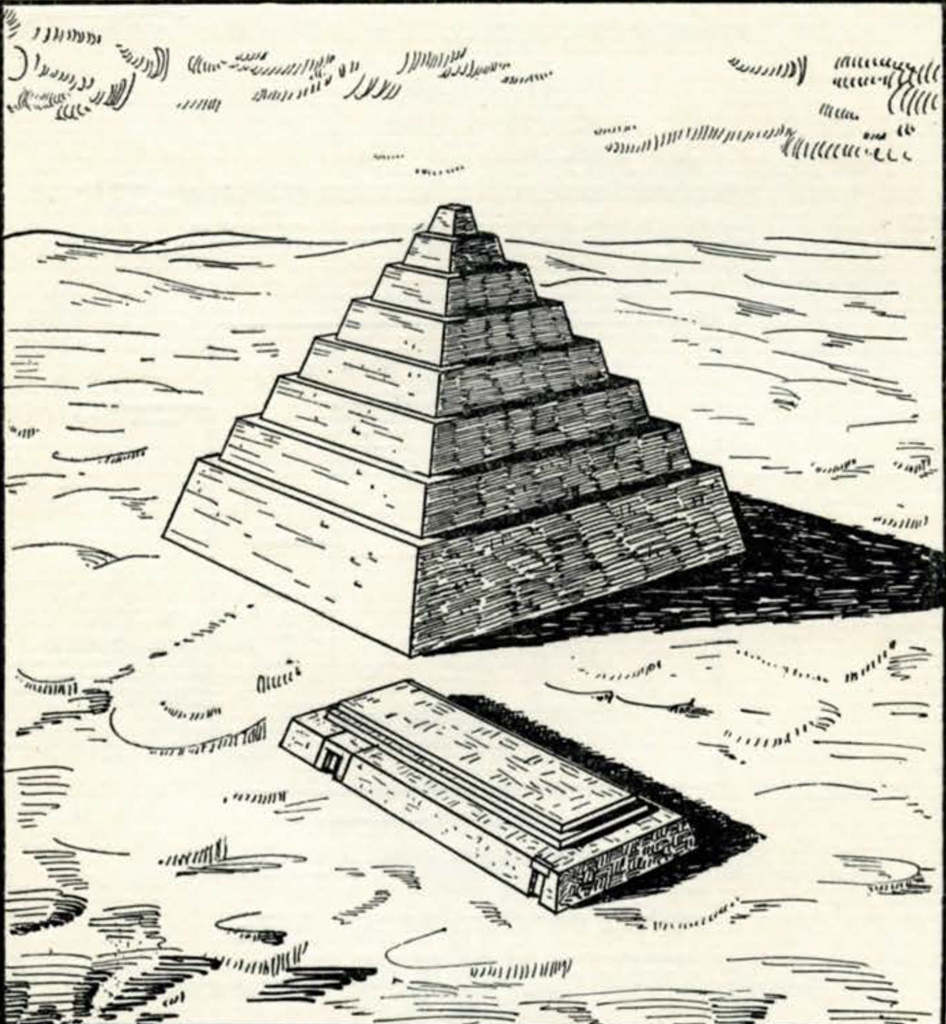
PLATE II. The Meydûm Pyramid and Mastabah 17 before the outer casings were added. In this drawing, looking from the southwest, the constructional ramps are not shown.
PLATE III. Plan and section of the Meydûm Pyramid and its surroundings. Restored from details published by Petrie, with modifications by the Coxe Expedition.
PLATE IV. Plan and sections showing stages in construction of the Meydûm Pyramid. Adapted by permission from Borchardt.
PLATE V. Details of staged and similar buildings from the First to the Sixth Dynasty. The numbers of the Pyramid Texts are from Sethe [63]; for Number 1 see Petrie [47 : I, 22]; for 2, [50 : I, Plate VII, 5]; for 3, [50 : 1, Plate VIII, 7]; and for Numbers 4 to 7 see Plate IX of the present article.
PLATE VI. Quarrymen’s Gang Names on Fourth Dynasty Stones at Meydûm. Numbers 1 to 6 and 10 to 16 were found in loose limestone blocks in the debris against the pyramid’s sides. Numbers 7 and 8 are from blocks in situ in the tunnel made by Petrie under the east side of the pyramid; 7 was on the right side, 8 on the left side of the tunnel [see 43 : Plate V, 8]. Numbers 10, 11, and 12 were also found on blocks in the great western tombs.
The stone on which Number 3 appears has also the name of the “Vigorous” gang.

Image Number: 32781
Number 8 has the word settees superimposed [see 43 : Plate V, 7, 8]. Number 9 is on the roof of the Pyramid Temple [see Plate XI, 2, and Plate XXXVIII, 1]. Number 13 has two signs for “north” [compare Numbers 14 and 15, and Plate XIV, 24].
Number 16 is hardly a aperw, “gang” [see Plate XXXVI, 3]. All signs are in red paint, except Number 9, which is incised.
PLATE VII. Map of Egypt showing relative position of Meydftm and other pyramid sites of the Ancient and Middle Empires, about 3000-1800 B. c.
PLATE VIII. Composite map of Meydûm before 1929-30 excavations of the Coxe Expedition. Prepared by the staff of the Coxe Expedition after Petrie [42; 43; 44] and Borchardt [6]. The immense tomb three furlongs northwest of the pyramid and not yet excavated has been numbered 200 by us.
PLATE IX. The Meydûm Pyramid compared with the other royal tombs of Egypt, arranged chronologically. After Vyse and Perring, Petrie, Reisner, and Barsanti [compare Plates XVI—XXI].
PLATE X. Plan and section of Pyramid Passage and Chambers. The ancient level lines are self-explanatory. The hieroglyphs give the name of Seneferu’s southern pyramid. See description in Section IV and photograph in Plate XVIII, 1.
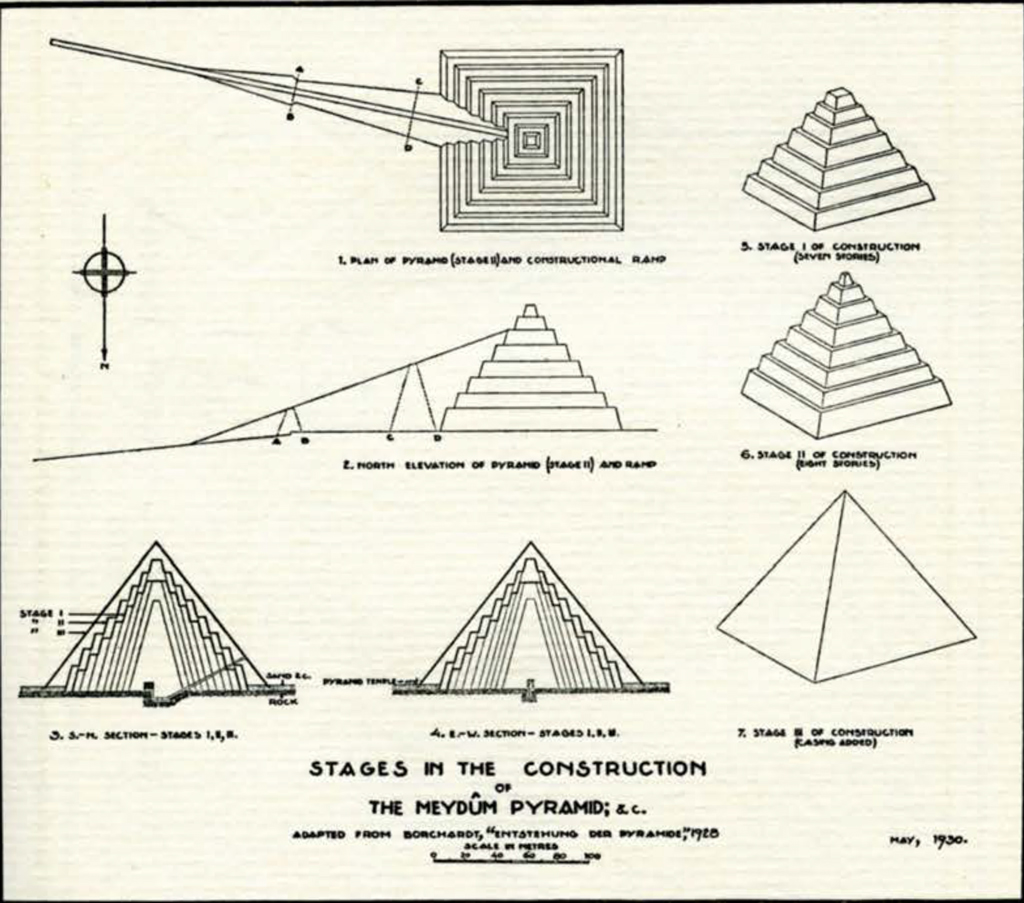
Image Number: 45649
PLATE XI. Plans, sections, and elevations of the Pyramid Temple. See description in Section V and compare Plates XXVI-XXX. The plan of the Pyramid Temple (Number 1) is made at the third course from the base as lower courses are undressed. Number 2 is a plan of the roofing and coping stones with the name of the temple written as found on a hieratic graffito of the Eighteenth Dynasty in the temple passage. Number 3 is a front elevation of the temple; Number 4, elevation of the south side; Number 5, an east to west section through A-B, looking north; and Number 6 a north to south section through C—D looking east. Number 7 is an east to west section through E—F of the later site found near the Pyramid Temple.
PLATE XII. Plans and section of the Pyramid Causeway. See description, Section V. Number 1 is section west to east through A—B, looking north; Number 2, plan; Number 3, enlarged plan of west end of causeway at Pyramid Temple; Number 4, enlarged plan of east end at Valley Temple; Number 5, south to north section, through E—H, of west end of causeway looking west; Number 6, south to north section, through C-D, at centre of causeway, looking west; the tops of the walls being restored after a coping stone found in the causeway [see Plate XXXIV, 1]; Number 7 is a south to north section through K-L of east end of causeway, looking west; Number 8, west to east section, through E—F of west end of causeway, looking north; Number 9, west to east section, through I-J of east end of causeway, looking north.
PLATE XIII. Brick furnace, situated two metres above the south wall of the east end of the Pyramid Causeway, is made entirely of brick; same lumps of slag were found in it. Date uncertain. [See Plate XXXIV, 2.]
PLATE XIV. Objects from debris against the west and north faces of the pyramid. Numbers 1 to 16 found against the west face; Numbers 17 to 24, against north face. Numbers 1 to 3, 5, 6, wood combs with incised decoration; Number 4, plain comb; Numbers 7 and 8, wood hoe-blades; the notches and holes are for connecting cords [see Petrie, Tools and Weapons, Plate LXVIII, 58, 62, and others]. Number 9, wood kohl-stick; Number 10, red-brown pottery jar-handle, with incised signs; Numbers 11, 12, and 18, blue faience sacred eye amulets, with plain backs, pierced; Number 20, same, dark green faience, found on skull of baby; Number 13, faience scarab, pierced, bearded lion with uræus, emblematic of the king. [See Petrie, Riqqeh and Memphis, Plate XVIII, 117, Nineteenth to Twenty-fourth Dynasties.] Number 14, rosette, black stone, white inlays, yellow centre. Number 15, faience scaraboid, incised on both sides, pierced. Number 16, wood implement, use uncertain.
Number 17, wood Ankh emblem, perhaps from side of chair or from coffin. Number 19, red pottery lamp, black slip, Hellenistic about 500-200 B. C. See British Museum Catalogue of Lamps, page 40, Number 282, also from Egypt. Number 21, wood spindle; Number 22 and 23, bronze arrowheads. Number 24, limestone block from above pyramid passage entrance, emblems of the “North” quarry gang and so forth painted in red; the three signs on the Ieft are incised [see Plates VI and XXXVIII, 1].
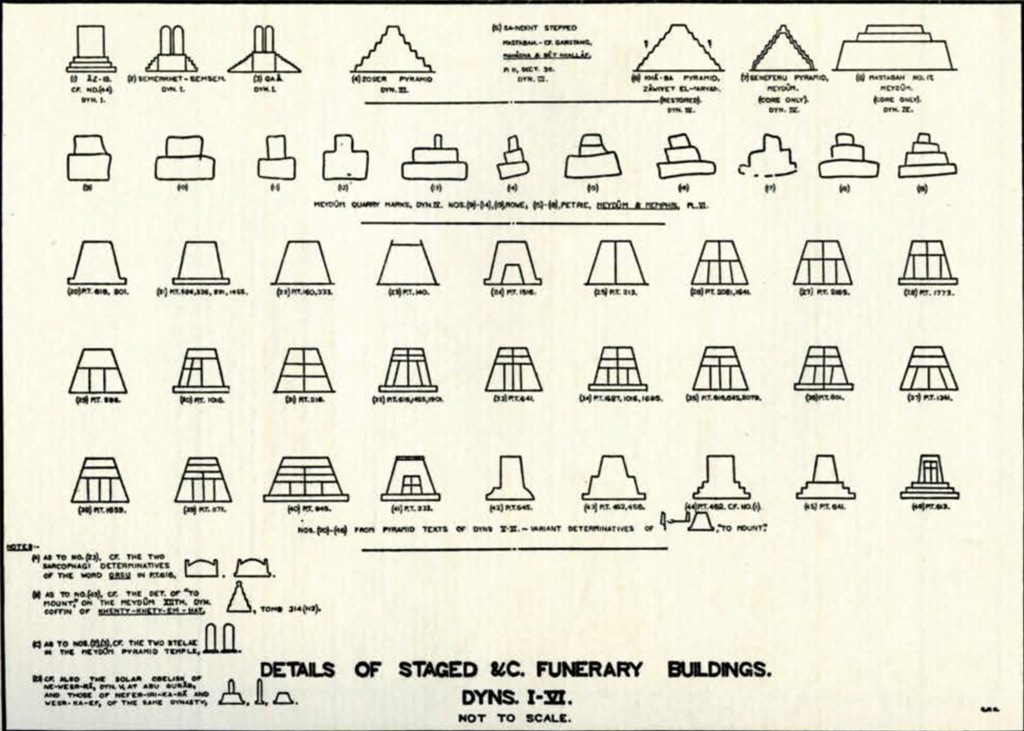
PLATE XV. Objects from débris against the east face of the pyramid, in pyramid passage, near pyramid temple, causeway and east perliboIous wall. Numbers 1 to 9 found in débris against the east face: Number 1, limestone weight for drill, used as shown in Number 2, a temple scene of the Fifth Dynasty from Abusir, with a man drilling out a stone vase. See Clarke and Engelbach [3 : 203]. Number 3, pale blue steatite scarab, half missing, pierced. Number 4, light blue faience seal, pierced ; on one side cartouche of Sheshonk IV, Twenty-second Dynasty; other side, sacred eye with pupil and three crocodiles in centre. Amulets with figures of crocodiles enabled their owners to overcome the bites of evil influence of the reptiles. Number 5, bronze arrowhead; Number 6, wood spindle-whorl; Number 7, red-brown pottery three-handled jar; Number 8, wood hoe-blade with original cords. Number 9, white alabaster vase, in the shape of a hippopotamus, head and legs missing; this perhaps represents “The White One,” a hippopotamus goddess of the Fayyûm [see 81 : III, 212].
Numbers 10 to 16, from the débris in the pyramid passage; Number 10, red-brown pottery model offering pot, mouth missing, Fourth Dynasty; Number 11, red-brown pottery model offering dish, upper part missing, Fourth Dynasty. Numbers 12, 13, and 14, jar-necks with strainers, of buff pottery with darker slip; Number 12 has two incised lines under ridge, Number 13 has traces of lines; Iron Age, apparently of foreign, perhaps Cypriote, origin. Number 15, red-brown potsherd, Fourth Dynasty. Number 16, shell, used for cosmetics.
Numbers 17 to 20, 22, from debris east of and near pyramid temple; Number 17, crystal bead, bored from ends; Number 18, bronze disc, perhaps part of a pendant; Number 19, blue faience scaraboid, plain, pierced; Number 20, wood fragment, perhaps base of statuette; Number 22, two-handled red pottery jar, with darker slip, contained mummy of baby. Number 23, two-handled, red-brown pottery jar, contained bones of a baby (Burial Number 243); Number 24, two-handled, red-brown pottery jar, contained bones of a baby (Burial Number 249).
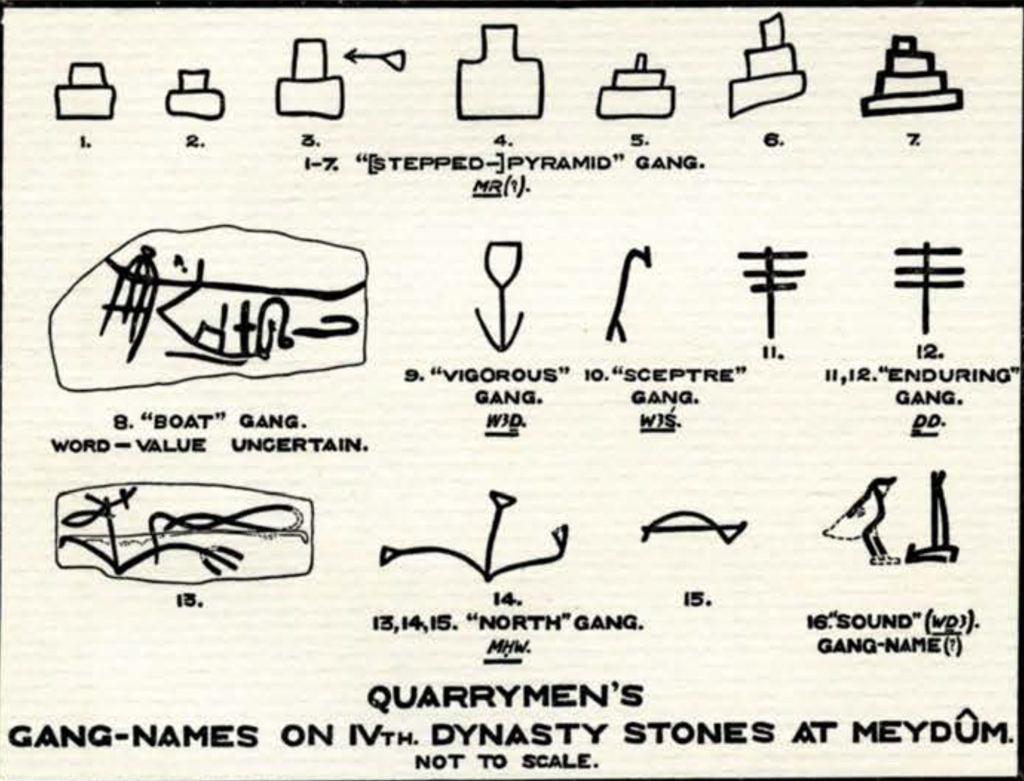
PLATE XVI. The Meydûm Pyramid before the 1929-30 excavations were begun.
Figure 1. Southwest angle.
Figure 2. Southeast angle.
PLATE XVII. The Meydûm Pyramid.
Figure 1. Northwest angle, taken after the commencement of excavations.
Figure 2. Northeast angle, taken before excavations were begun; the entrance is visible on the right side; the debris in the foreground are from the west side of Mastabah 17.
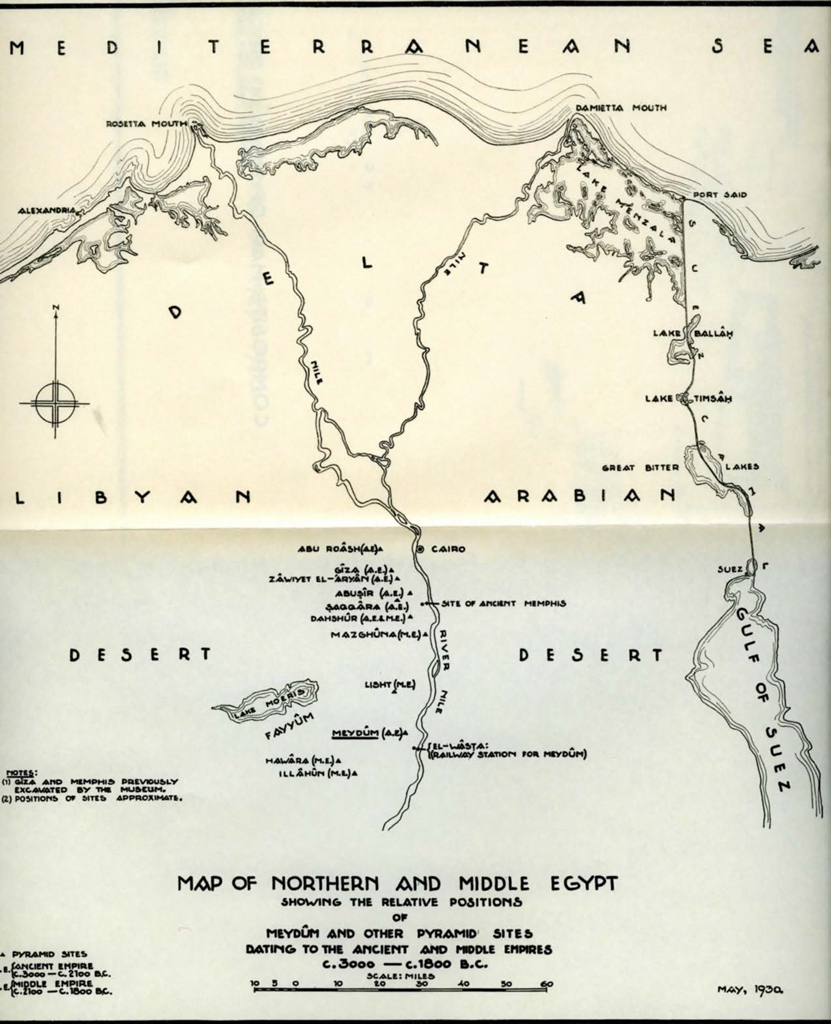
PLATE XVIII. The Meydûm Pyramid.
Figure 1. North side, looking southeast. A marks the casing of the 8-story constructional stage; B, the casing of the 7-story stage; C, the platform of the former stage; D, the core of the outer sloping casing. The section in Plate X runs through this part of the pyramid.
Figure 2. West side, looking southwest. A marks the casing of the 8-story stage; B, the casing of the 7-story stage; and C, the core of the outer sloping casing.
PLATE XIX. The Meydûm Pyramid.
Figure 1. South side looking southwest. A marks the casing of the 8-story stage; B, the casing of the 7-story stage; and C, the core of the outer sloping casing.
Figure 2. East side, looking west. A marks the casting of the 7-story stage, and B, the roughly dressed core-stones of the 8-story stage; these stones rest upon a platform of the former stage.
PLATE XX. The Meydûm Pyramid.
Figure 1. North side looking south. A marks the part of pyramid
shown in Figure 2.
Figure 2. North side looking southwest. A marks the stones over the entrance passage, see section in Plate X, which runs through this part of the pyramid; B marks the face of the outer sloping casing; C, the core of the outer sloping casing; D, the casing of the 8-story stage; and E, the platform of the stage, seen also in Plate XVIII, 1, there marked C, and in Plate XXII, 1, marked D.
PLATE XXI. The Meydûm Pyramid.
Figure 1. North side, looking southwest; a close-up of the lower part of the casing shown in Plate XX, 1.
Figure 2. Model of the pyramid. This was made prior to the present excavations and hence certain details do not agree with those on later plans. The model shows the pyramid temple, the head of the causeway, the smaller pyramid on the left, perhaps of the queen, and on the right the mastabah tomb of a member of the royal family. The structures are inclosed by the peribolous wall. Model by Miss M. Bentwich.
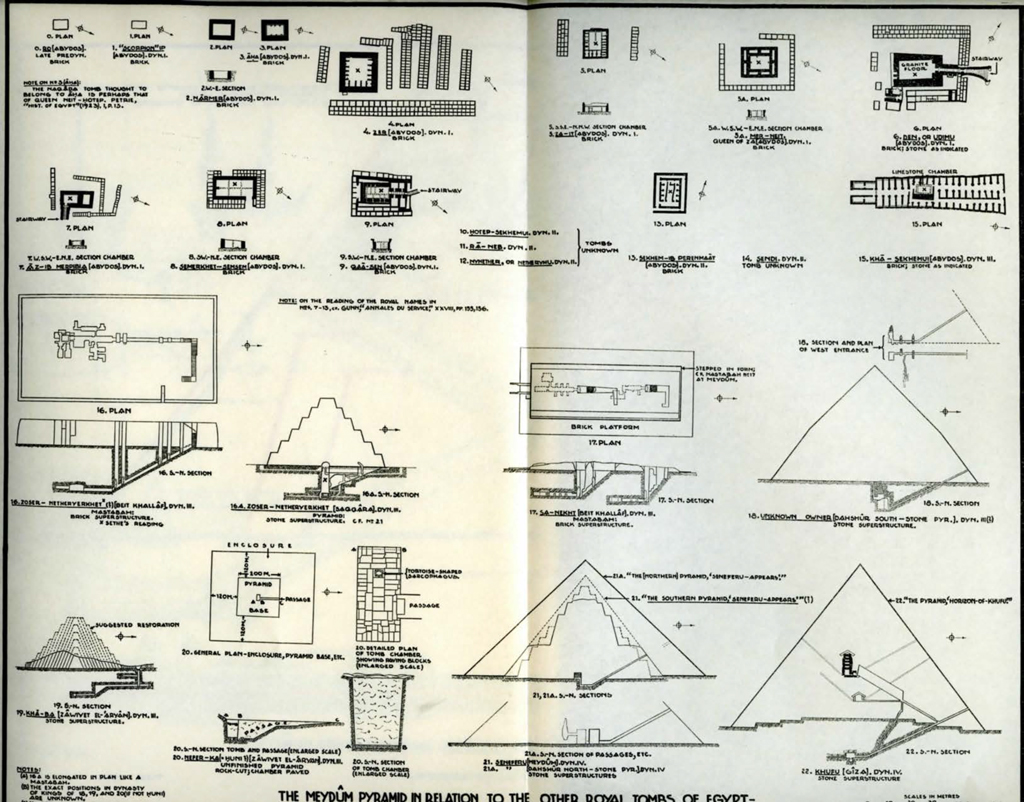
Image Number: 32780
PLATE XXII. The Meydûm Pyramid.
Figure 1. The pyramid entrance. Looking southeast. D refers to the same point as D in Plate XX, 2; X marks débris lying against the side of the Pyramid.
Figure 2. The pyramid passage, looking south and down to the first ante-chamber; compare the section on Plate X.
PLATE XXIII. The Meydûm Pyramid.
Figure 1. First ante-chamber, looking northeast from entrance to
second ante-chamber; in left background can be seen the end of the descending passage.
Figure 2. Second ante-chamber, looking southwest from inner entrance of first ante-chamber; the bottom of the shaft leading up to sarcophagus chamber is seen in the left background.
PLATE XXIV. The Meydûm Pyramid.
Figure 1. Passage from the second ante-chamber to bottom of shaft ascending to the sarcophagus chamber; looking south; the ladder is modern.
Figure 2. The Queen of the Belgians about to enter the pyramid, on March 31, 1930. The Queen is attended by Sadik Pasha Wahabi, representing His Majesty King Fuad of Egypt, by M. Capart, Director of Les Musées Royaux Cinquantenaire, Brussels, and by the present writer. The pyramid was lit by electric light for the occasion.
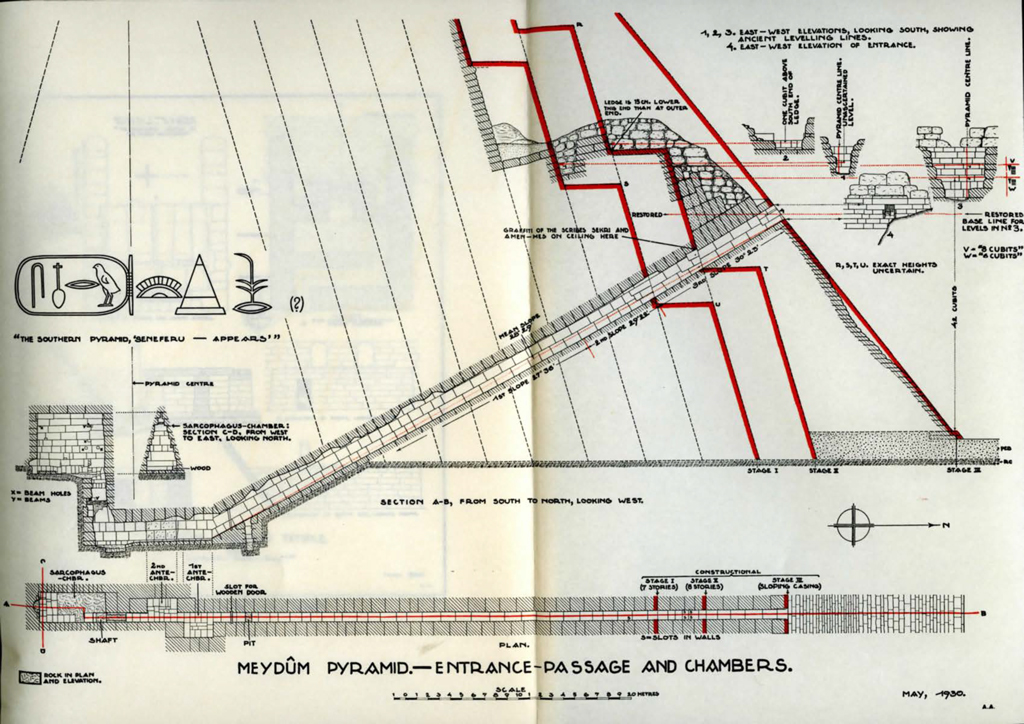
PLATE XXV. The Meydûm Pyramid.
Figure 1. Upper part of the north end of the sarcophagus chamber.
Figure 2. Lower part of the north end of the sarcophagus chamber.
In both figures, the ancient wood beams and slots for beams can be seen; these were probably used for hauling objects up to the chamber. Maspero, who opened the pyramid in 1881-1882, writes: “An apparatus of beams and ropes still in place above the orifice shows that the robbers took the sarcophagus out of the chamber back in antiquity.” [L’Archeologie Egyptienne, page 143.] The top of the shaft with the upper end of a modern ladder is seen in the right lower corner.
PLATE XXVI. The Pyramid Temple.
Figure 1. Front view, looking west, showing entrance door; the tops
of the two great stelæ can be seen projecting above the roof. [Compare Plate XXVII, 1, and Plate XI.]
Figure 2. Detail of the roof; see also the plan of the roof in Plate XI.

PLATE XXVII. The Pyramid Temple.
Figure 1. The temple courtyard with stelæ and altar. The door opening into the inner chamber can be seen behind the stelæ; in front of the altar in the left foreground there originally stood a great false door, but no traces of it have been found. Looking northeast. See Plate XXXVI for inscriptions on one of these.
Figure 2. The temple and the silo; looking northwest. Plan of silo in Plate XI.
PLATE XXVIII. The Pyramid Temple.
Figure 1. South end of entrance passage, looking south. The wall to the right is covered with hieratic graffiti, shown in Plate XXXV, 1, 2.
Figure 2. North end of entrance passage, looking north, with door leading to inner chamber.
PLATE XXIX. The Pyramid Temple.
Figure 1. Southern end of inner chamber, looking south.
Figure 2. Northern end of inner chamber, looking north.
This inner chamber contains a few scratched graffiti, two of which
mention the name of Seneferu.
PLATE XXX. The Pyramid Temple.
Figure 1. Foundations of the outer east wall with the entrance in the
center.
Figure 2. Libation altar in the courtyard, with base of the pyramid in the background.
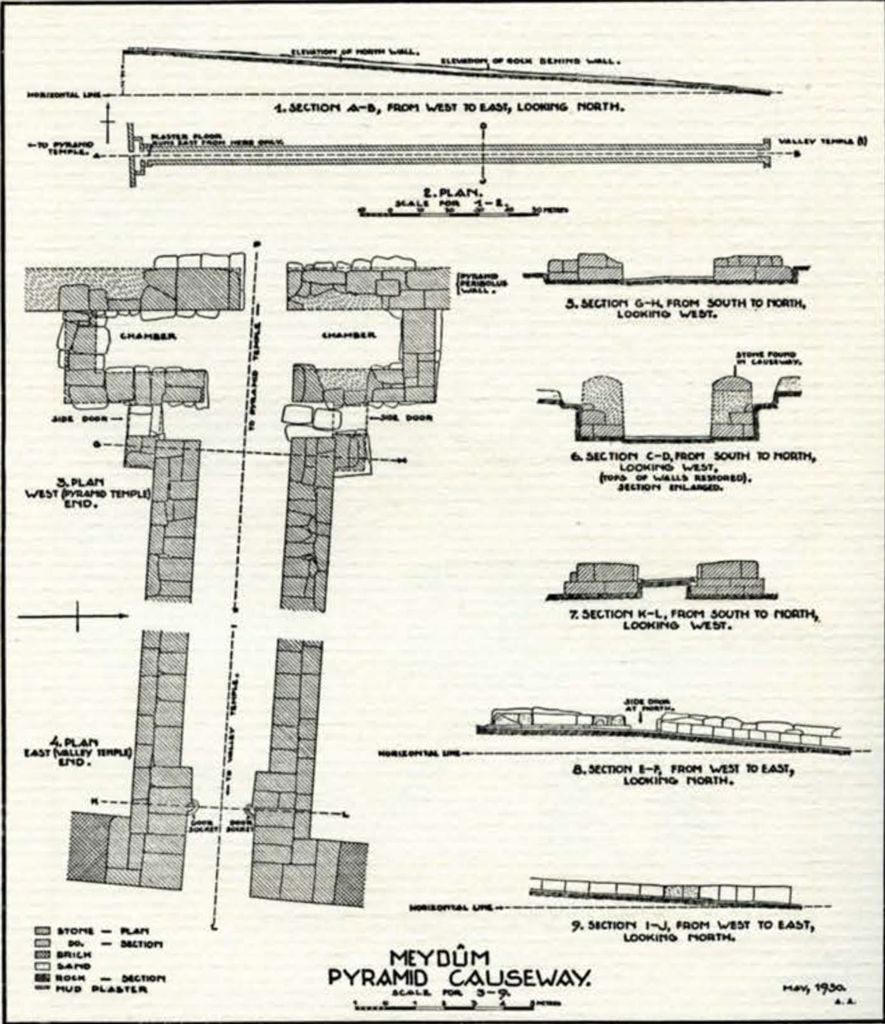
PLATE XXXI. The Causeway. Compare the plans in Plate XII. Figure 1. Looking southeast and showing pyramid temple.
Figure 2. Looking west, with pyramid in background; the pool of water partly covers the site of the valley temple, not yet excavated.
PLATE XXXII. The Causeway. In both figures, A marks the upper part of the Causeway; B, the side doors; C, the small chambers which once may have held statues; and D, the peribolous wall.
Figure 1. South side of upper end, looking south. The top of the Fourth Dynasty tomb can be seen beyond the peribolous wall.
Figure 2. North side of upper end, looking north. E marks the entrance in the peribolous wall leading to the temple; in the rock below the statue-chamber are seen the two holes shown in Plate XXXIII, 2.
PLATE XXXIII. The Causeway.
Figure 1. Details of foundations of double door at valley temple end.
See Plate XII for plans.
Figure 2. Holes in the rock below the floor of the north statue-chamber.
PLATE XXXIV. The Causeway.
Figure 1. Coping stone of causeway wall. The dimensions of the stone are: length, 130 centimetres; maximum height, 50 centimetres; maximum thickness, 42 centimetres. It was found on the causeway floor near the western end. Compare the restored section of the wall on Plate XII, 6.
Figure 2. Brick furnace containing slag, found above the south wall at the lower end of the causeway. The furnace was obviously built later than the causeway, but its actual date is uncertain. See Plate XIII for plan and section.
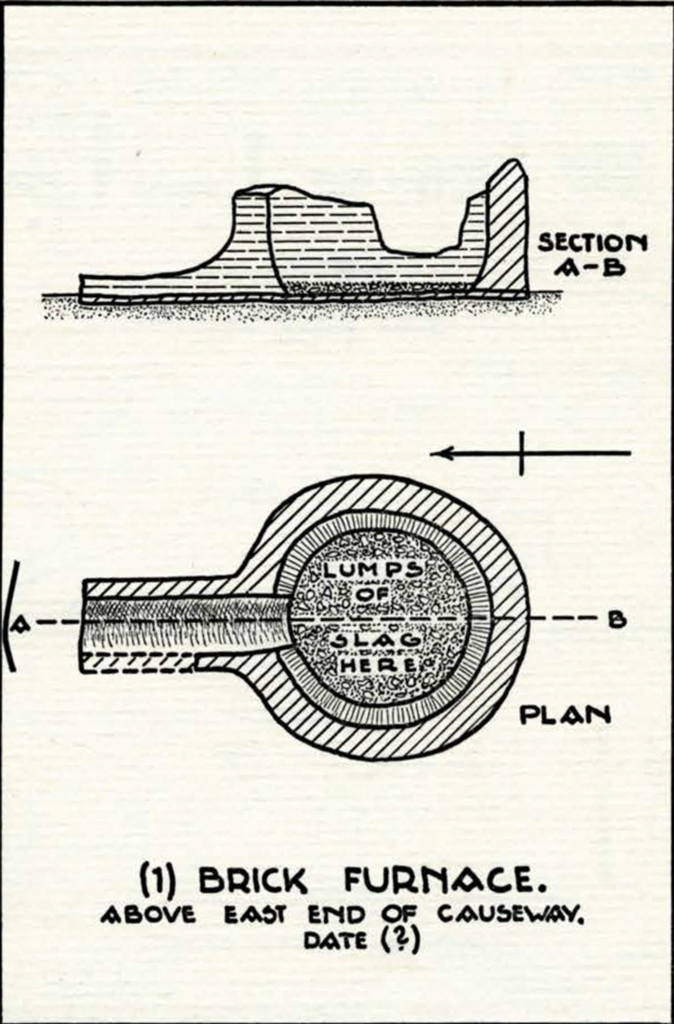
PLATE XXXV. Various inscriptions.
Figure 1. Hieratic graffiti in black ink on west wall of passage. The name under the hawk appears to read Mey (?). The text on the left (above the seated figure and solar disk) reads, according to Mr. Gunn, “The jeweller (?), Ter.” Date, according to M. Cerný, Nineteenth Dynasty. See 42 : Plate XXXIV, 11, page 41.
Figure 2. Hieratic graffito in black ink on west wall of passage, dated in the year 30 of Amenophis III. The text reads: “Regnal-year 30 under the majesty of the king of the South and North Neb-Maat-Ra, son of Rd, Amenophis, ruler of Thebes; may he live forever as a beneficient king in the whole of this land I The scribe Mey came to see this very great pyramid of the Horus . . . Seneferu . . .” (Adapted from Mr. Gunn’s translation.) See 42 : Plate XXXVI, 17, page 41.
PLATE XXXVI Various inscriptions.
Figure 1. The character w (quail chick) incised on stela in temple court-yard, shown in Plate XXVII, 1.
Figure 2. The character m (owl) on the stela.
Figure 3. Emblem of the “Sound” quarry gang, found in débris.
PLATE XXXVII. Various inscriptions.
Figure 1. Fragment of a private stela of an early dynasty, found near temple.
Figure 2. Bread stamp(?) with corrupt text in Greek characters (Coptic?), found in debris.
Figure 3. Architect’s sketch in black paint on limestone fragment,
found in debris.
PLATE XXXVIII. Various inscriptions.
Figure 1. Emblem of the “Vigorous” quarry gang on temple roof. Figure 2. Quarrymen’s inscriptions on stone from debris. The whole
text reads: “Year 16, month 4 of inundation season (akhet), day 14.”
Figure 3. Architect’s sketch in black paint from area southwest of
pyramid.
PLATE XXXIX. Various inscriptions.
Figure 1. Hieratic graffito in black ink on ceiling of the entrance pas-sage. This reads: “The scribe Sekri.” Nineteenth Dynasty, according to M. Cerný. See 31 : I, 149, 150; and 39 : XXVII, 102, 103.
Figure 2. Hieratic graffiti in black ink on ceiling of the entrance pas-sage. They read: (A) “The scribe Amen-mes”; (B) “The scribe Amen-mes came.” First half of Nineteenth Dynasty, according to M. ferny. See 31 : IV, 127, 128, footnote 4.
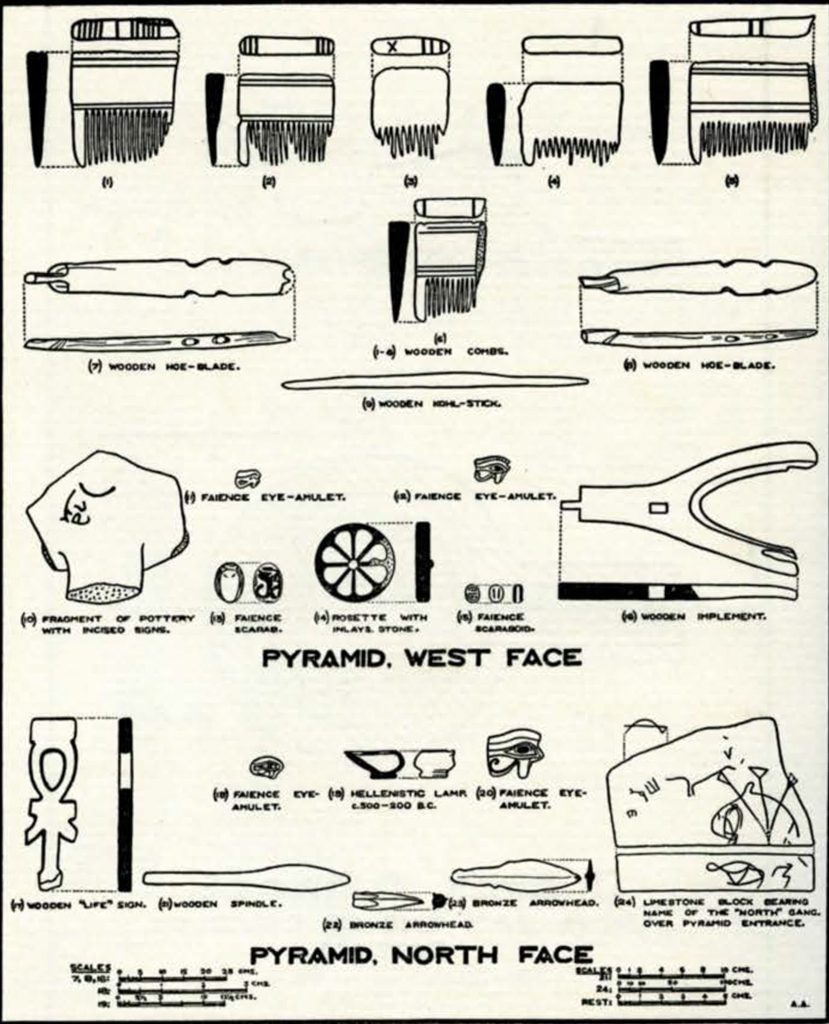
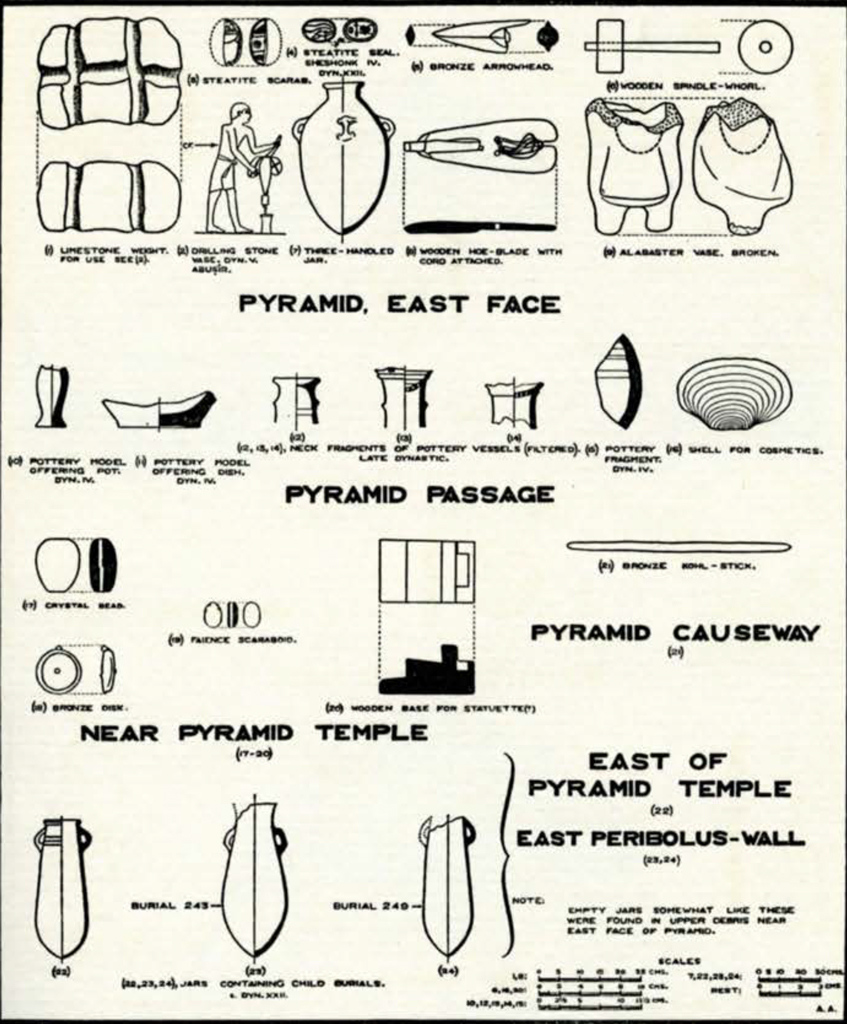

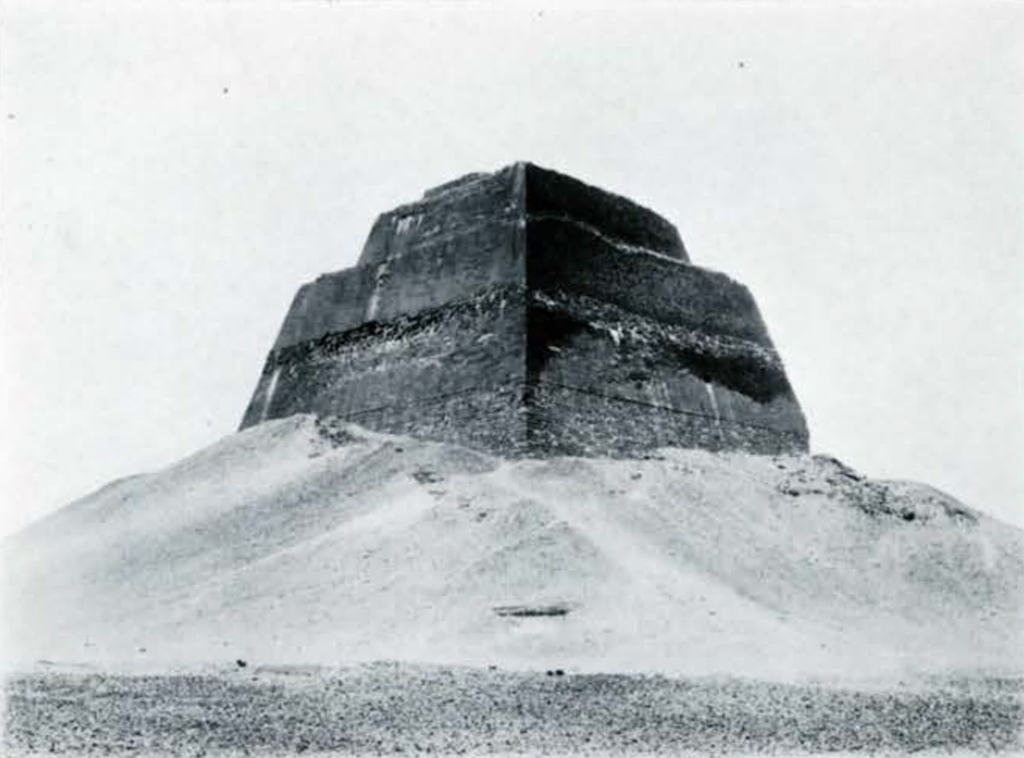
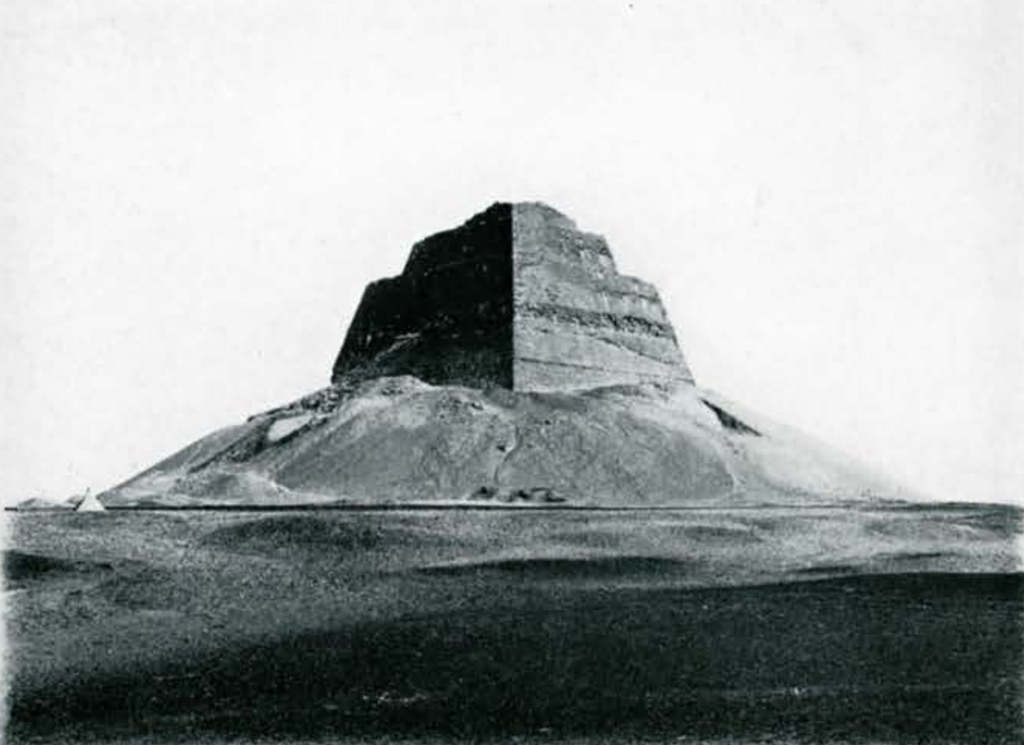
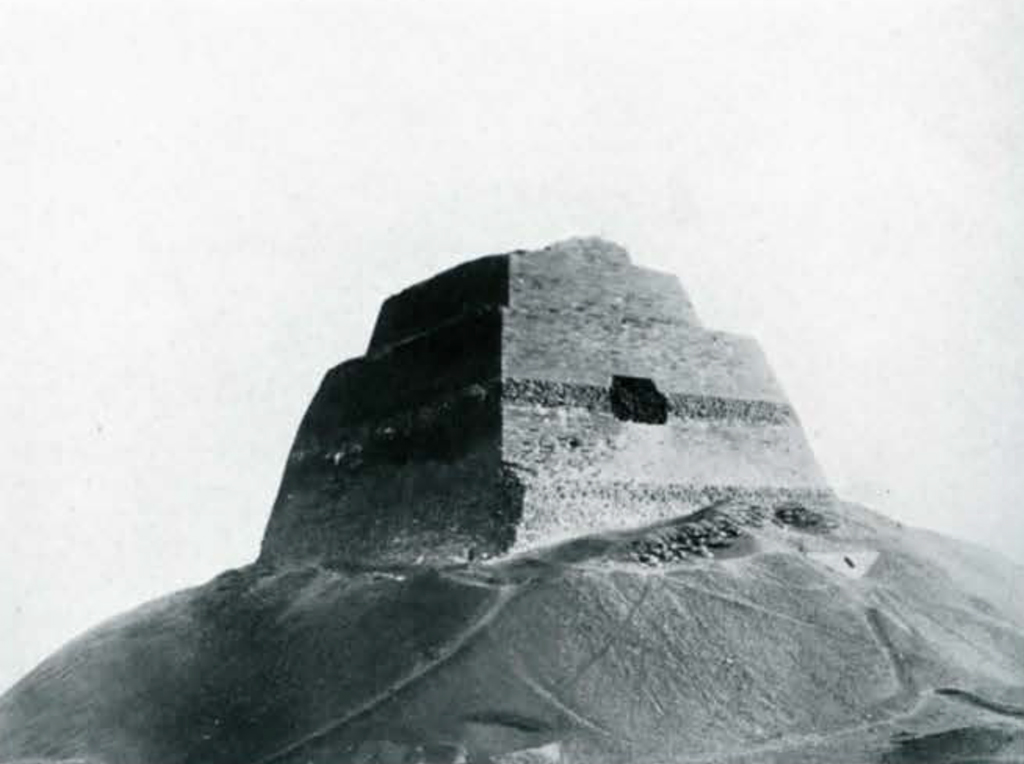
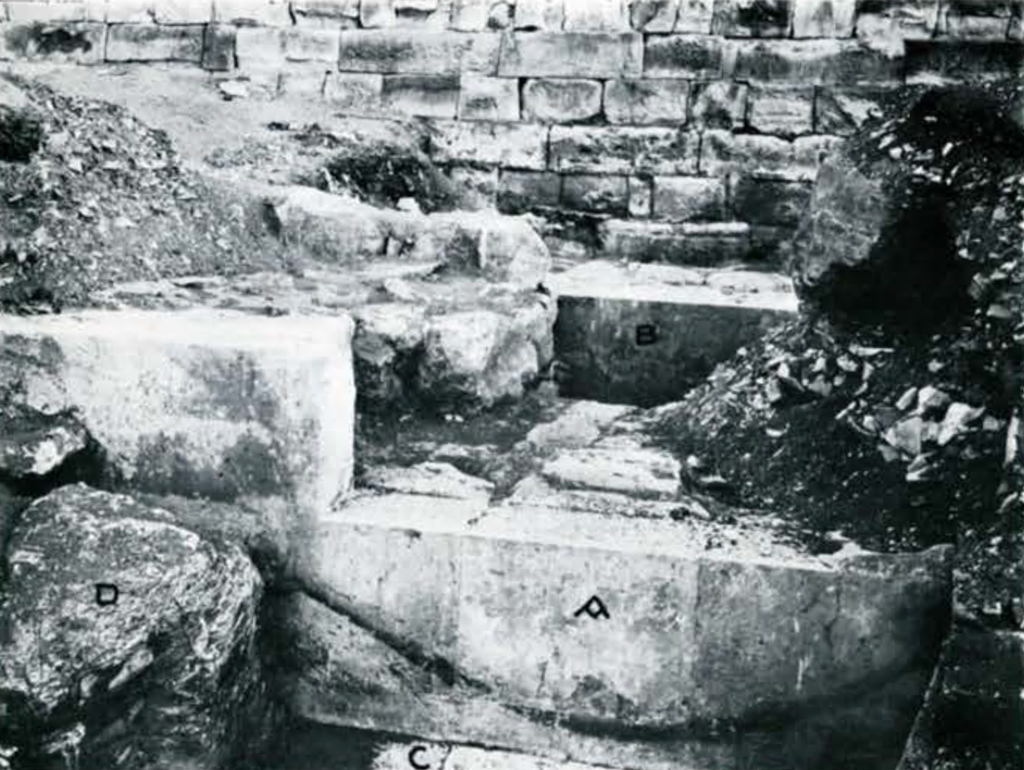

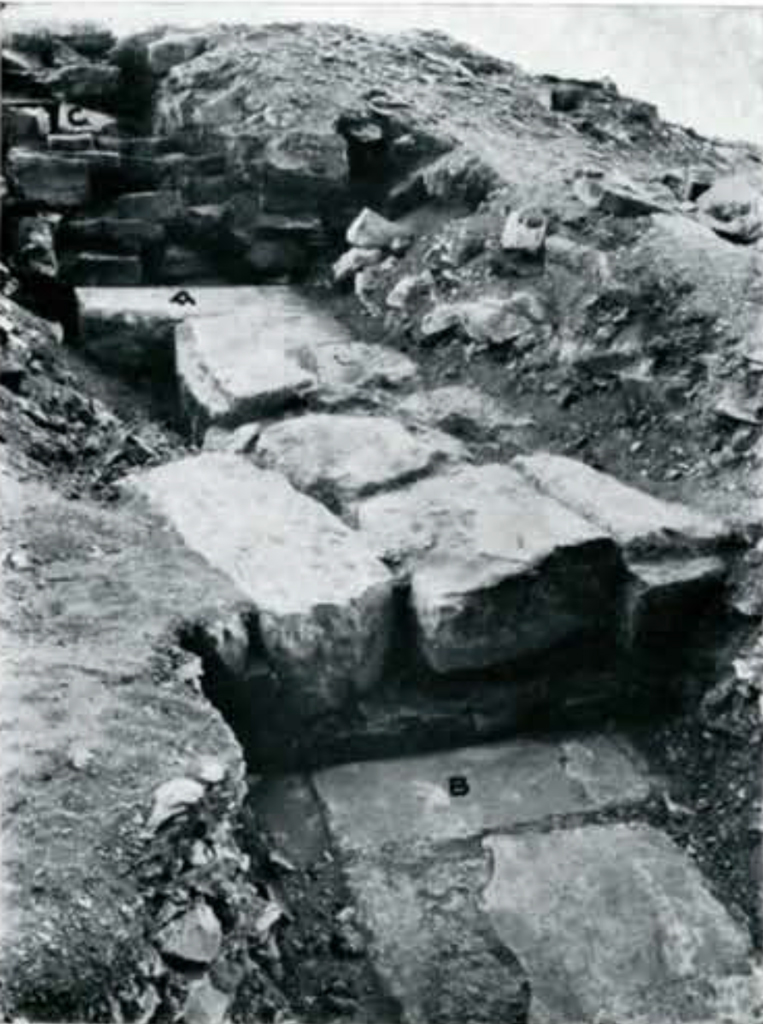
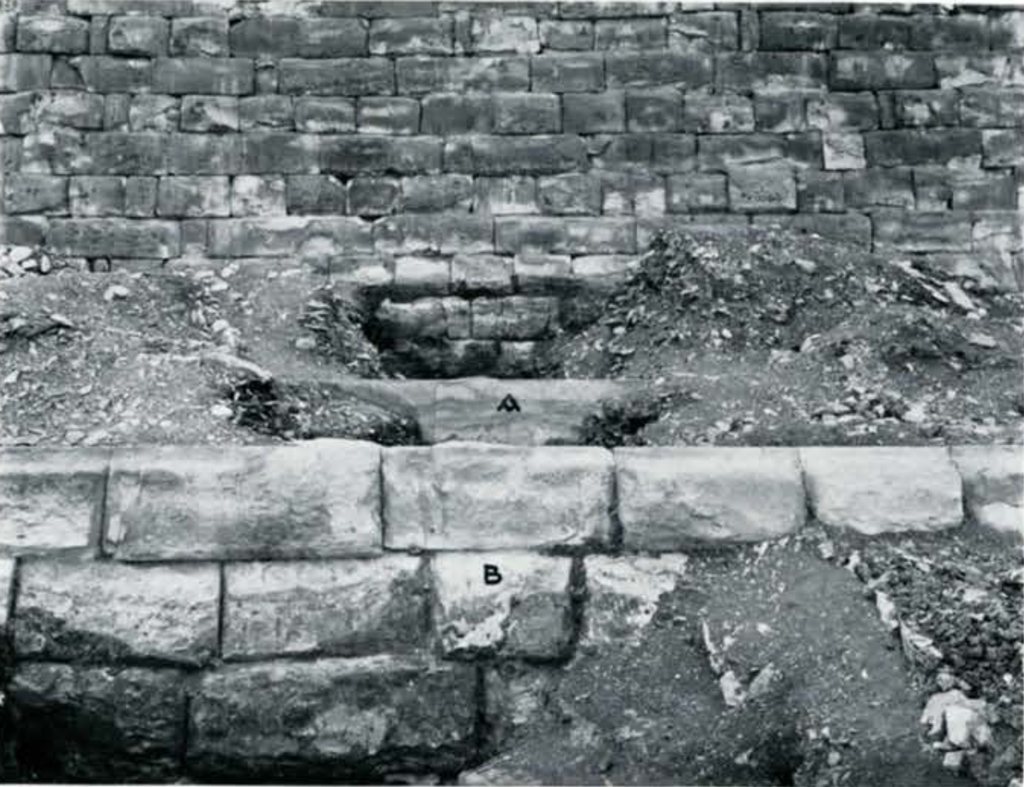

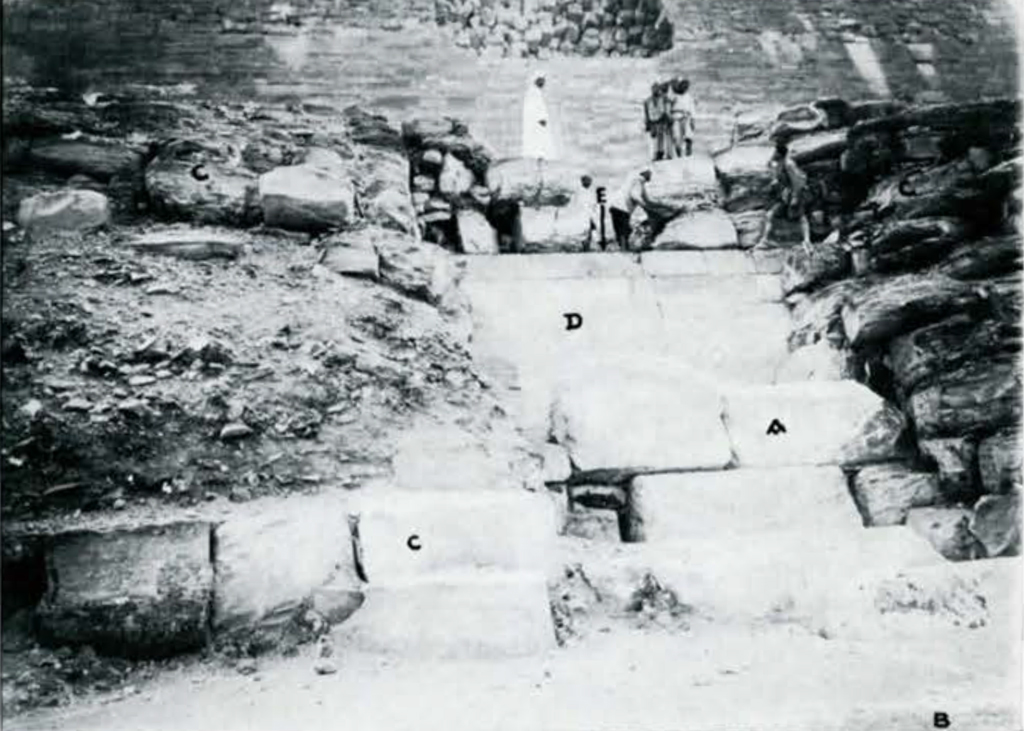
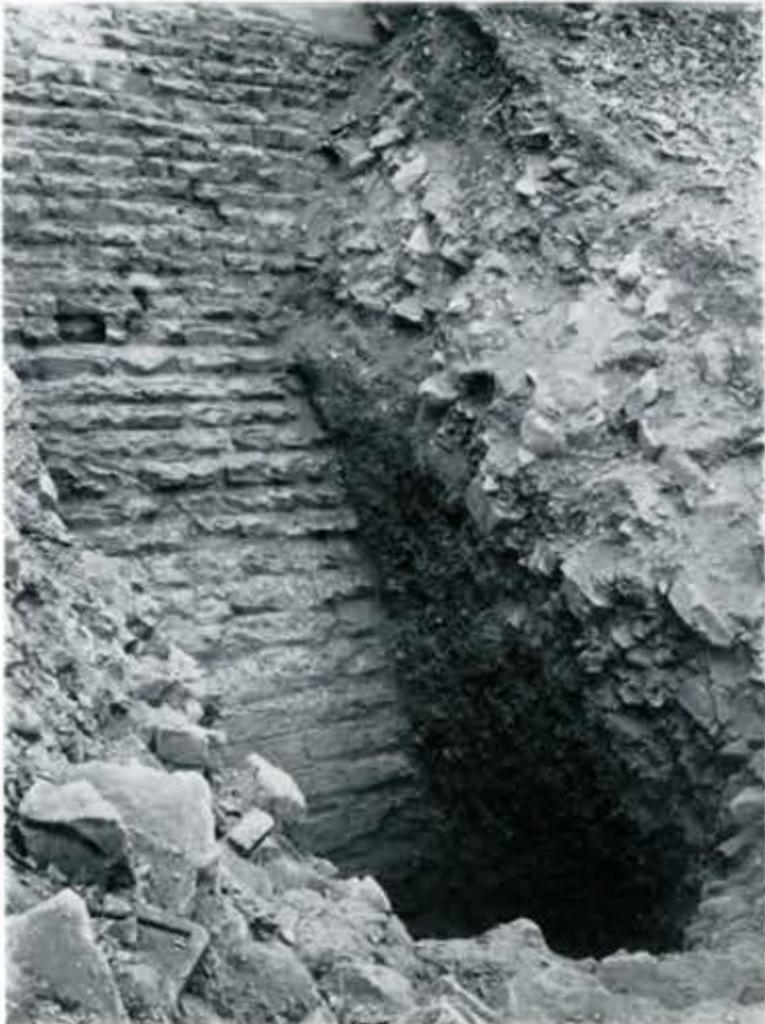
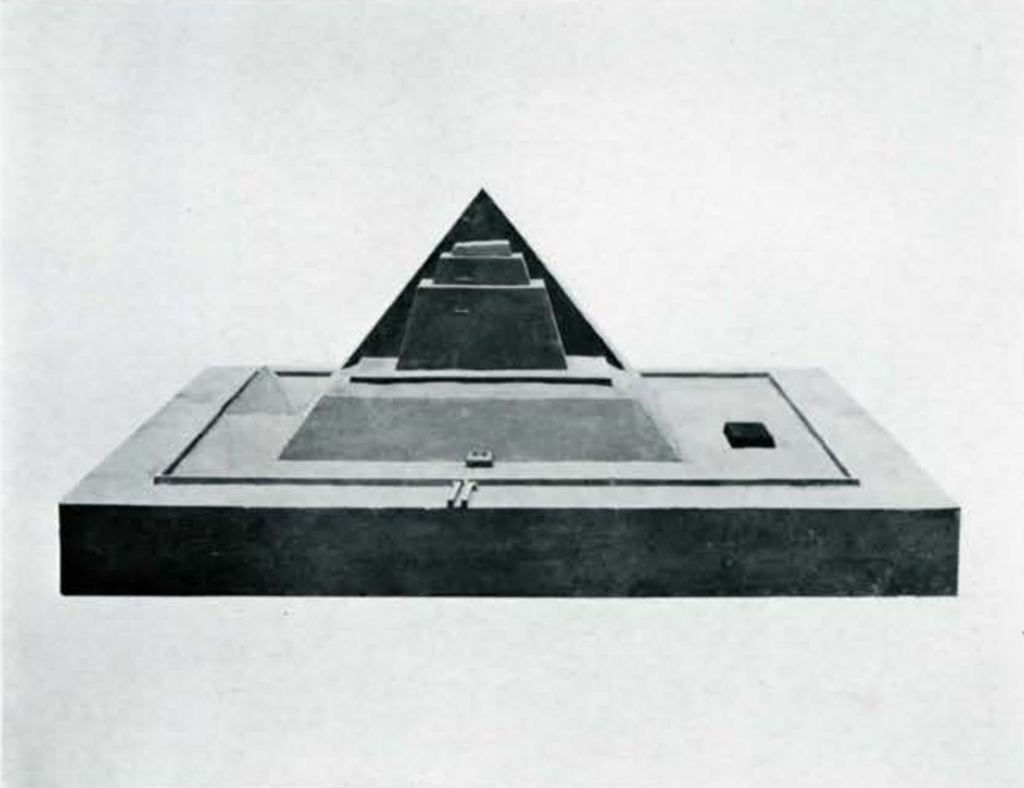
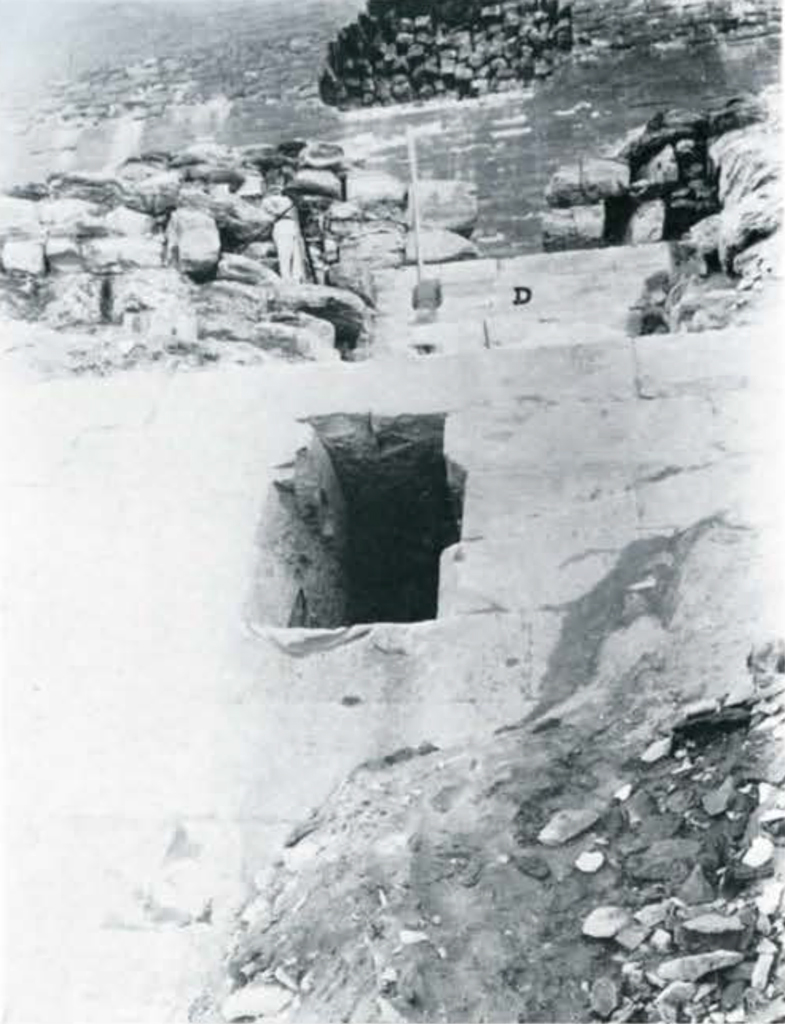
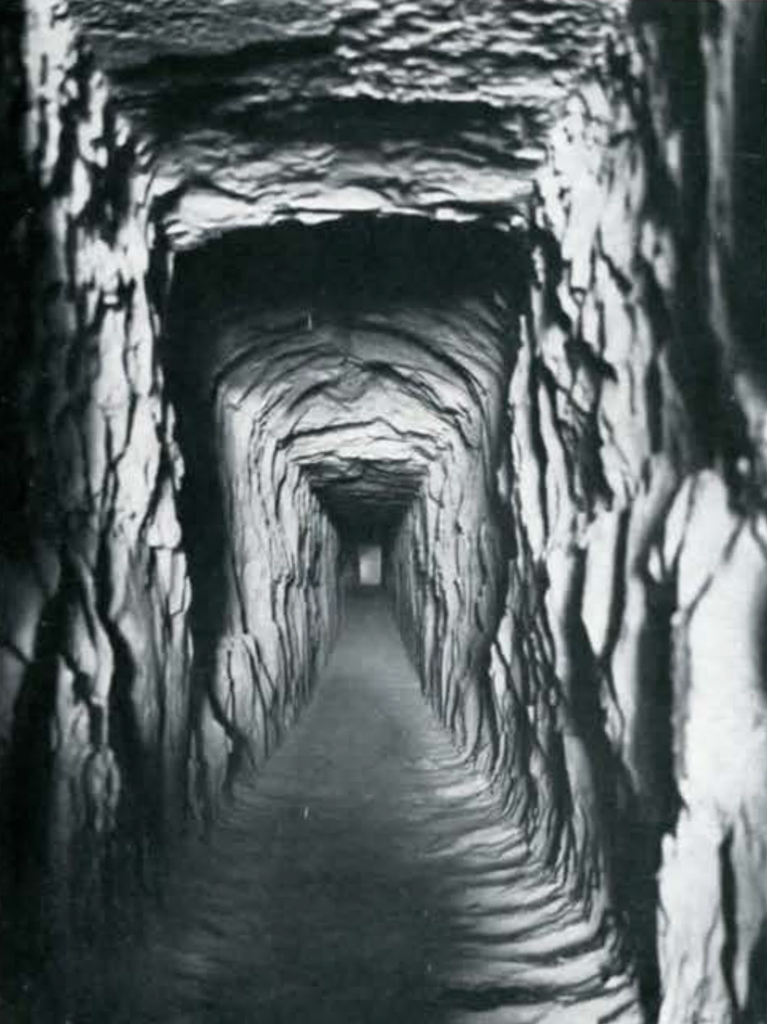
Image Number: 36103
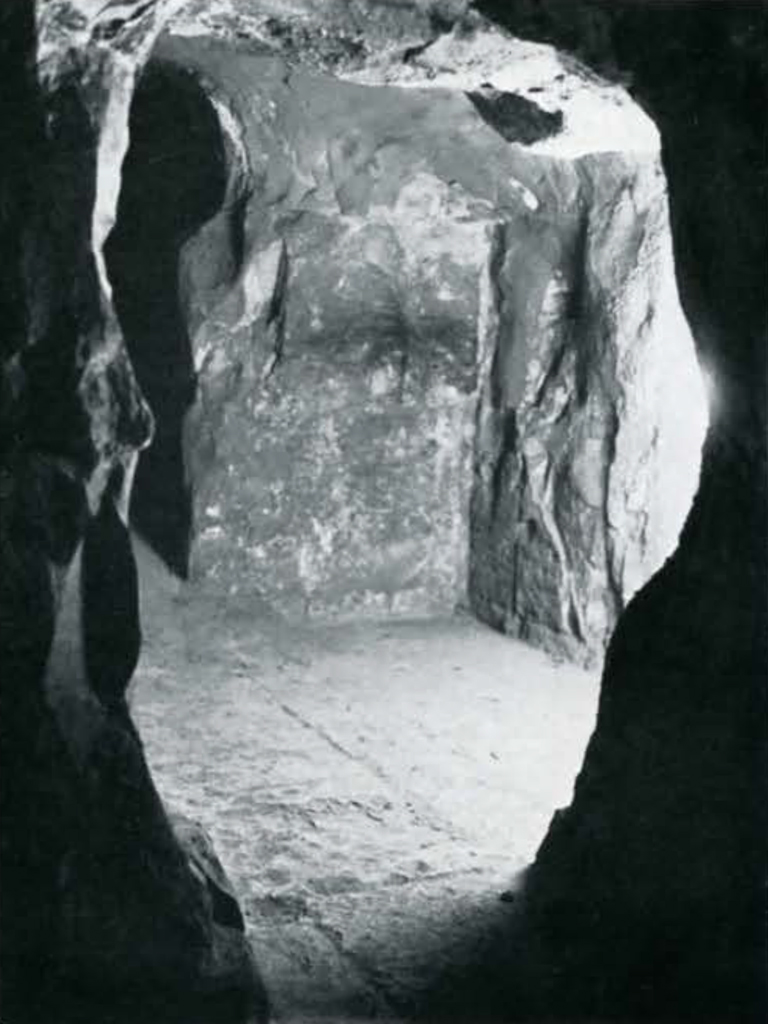
Image Number: 36104
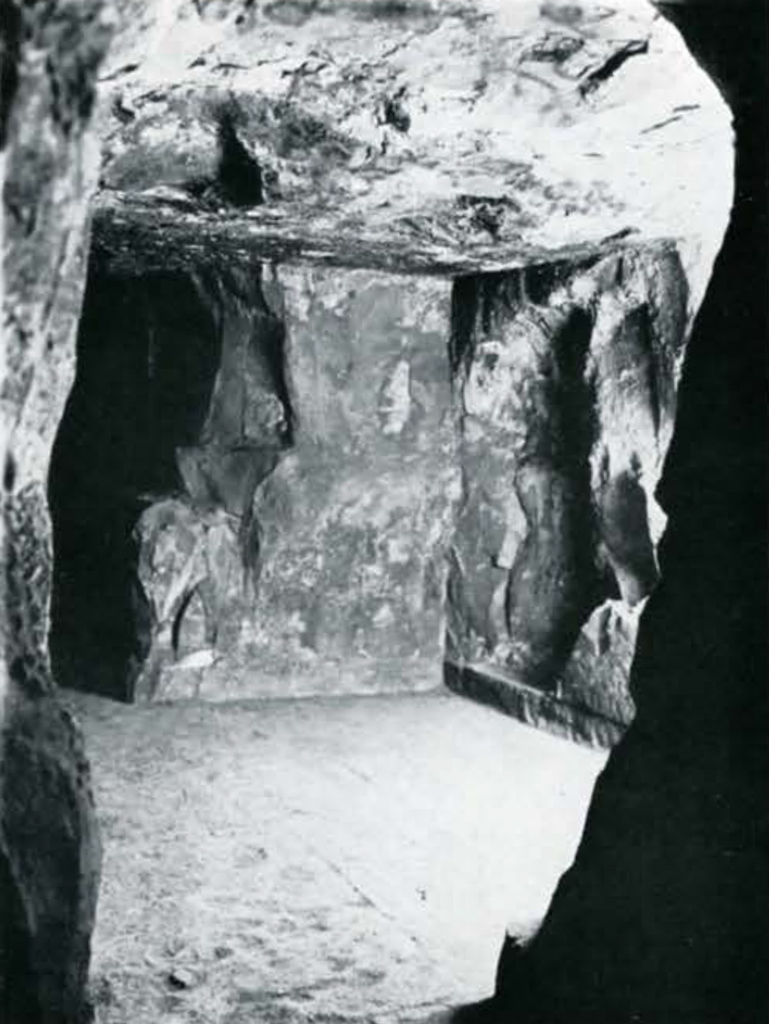
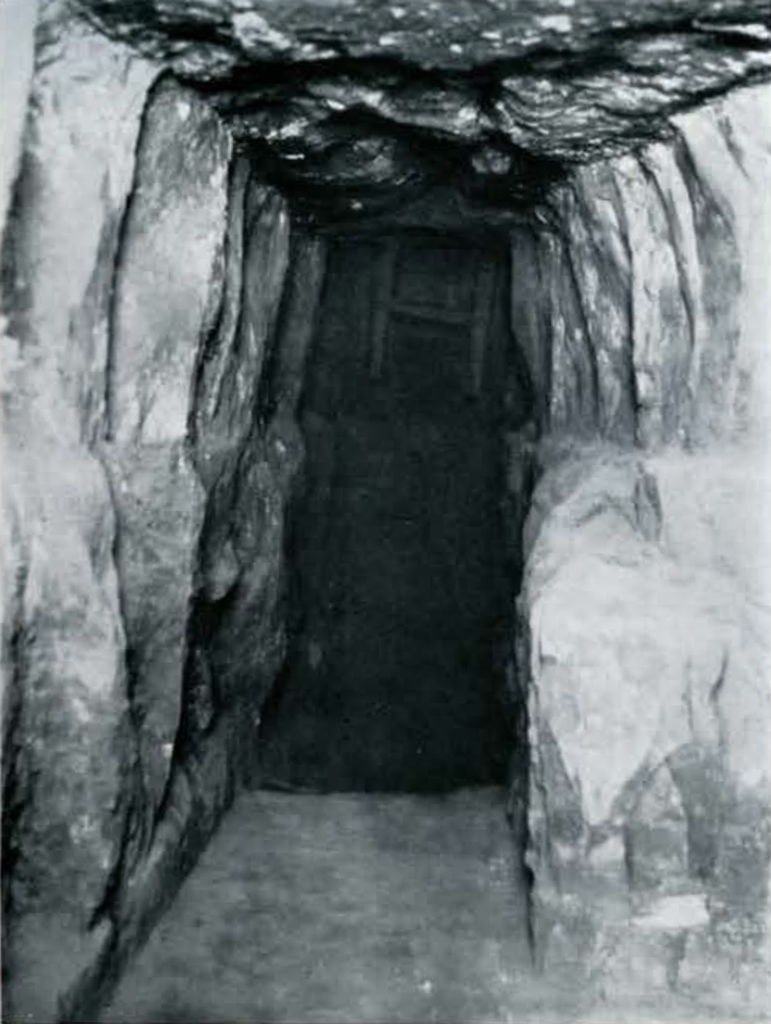
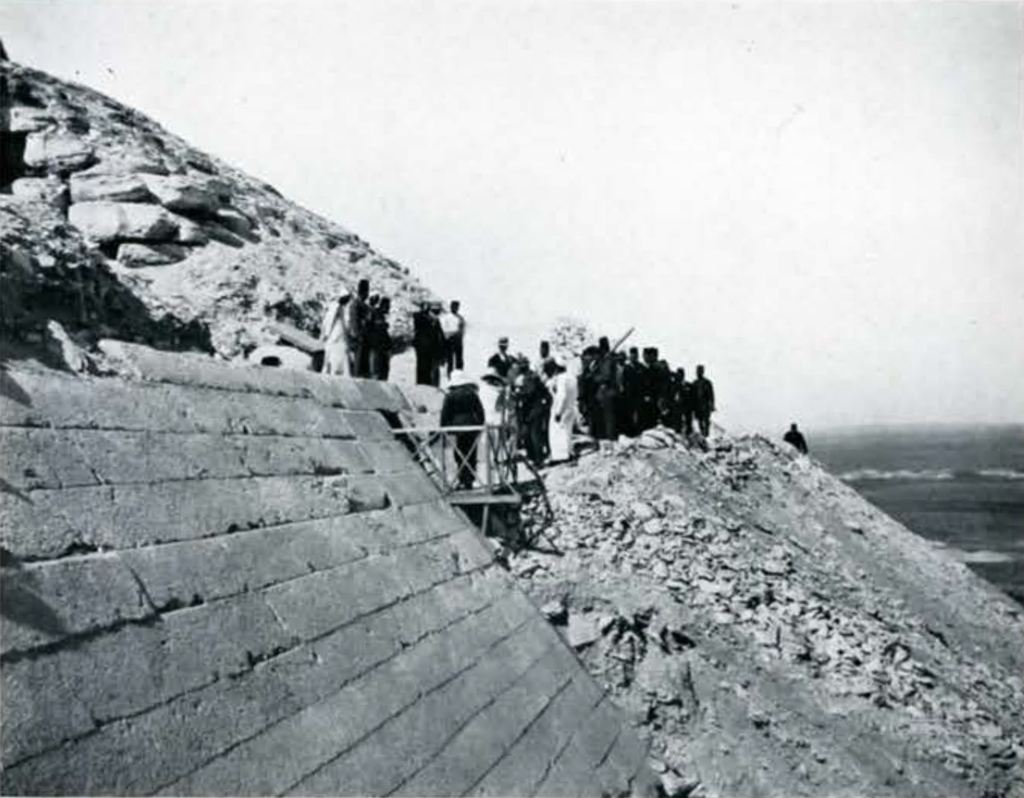
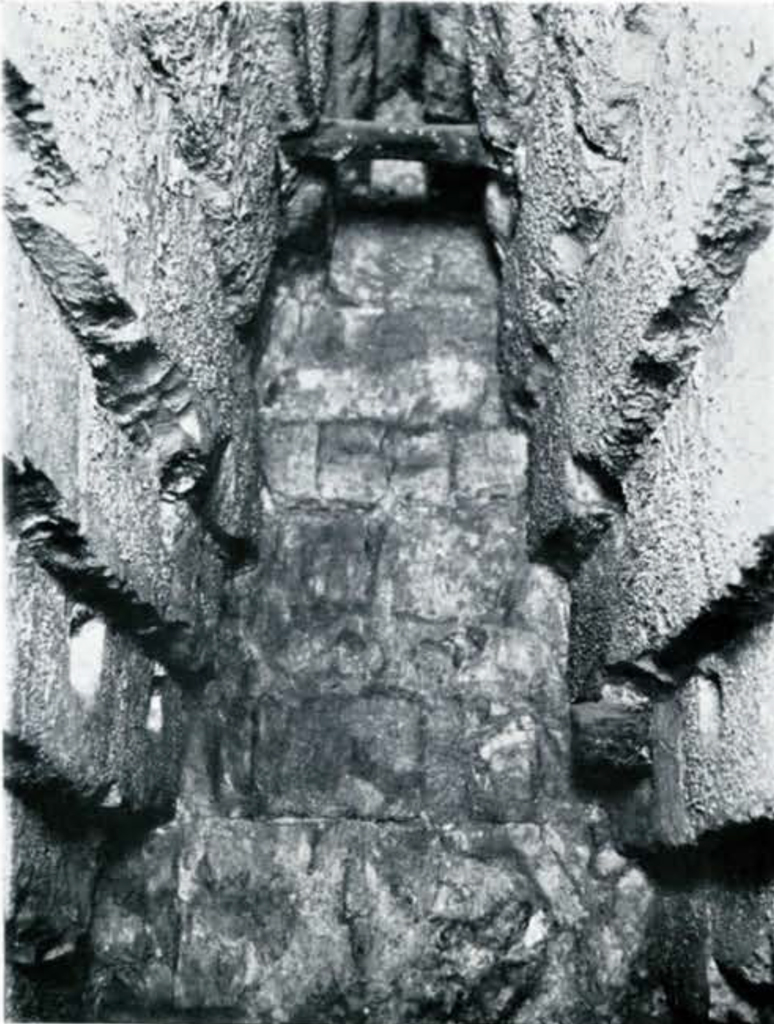

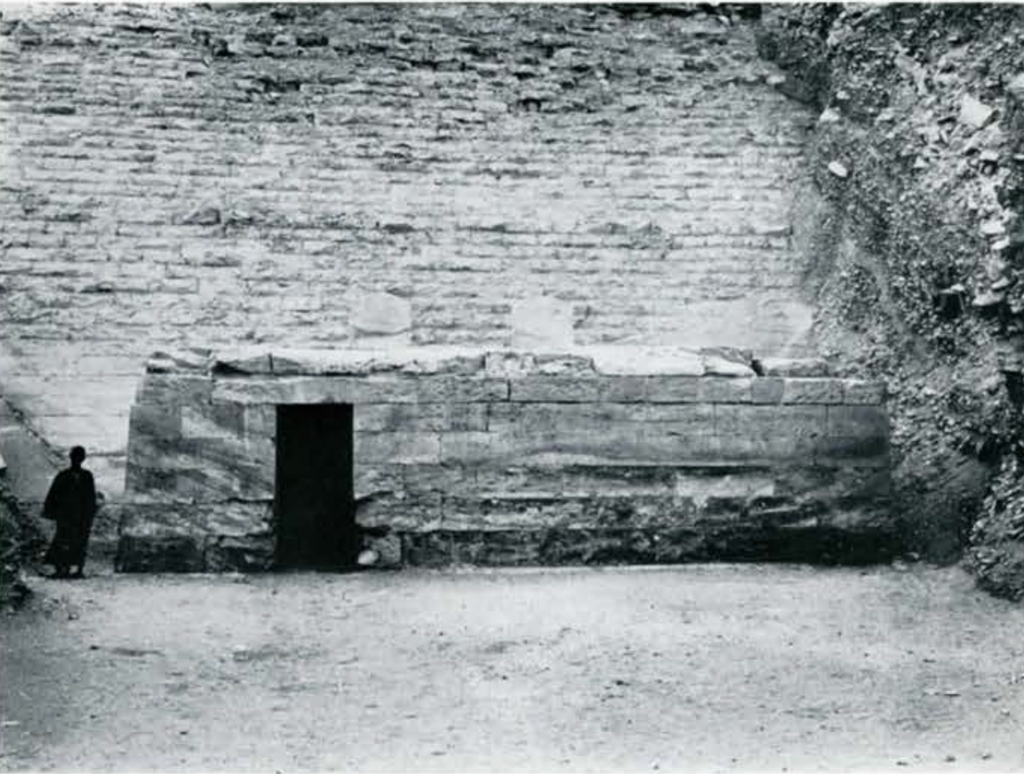
Image Number: 36177
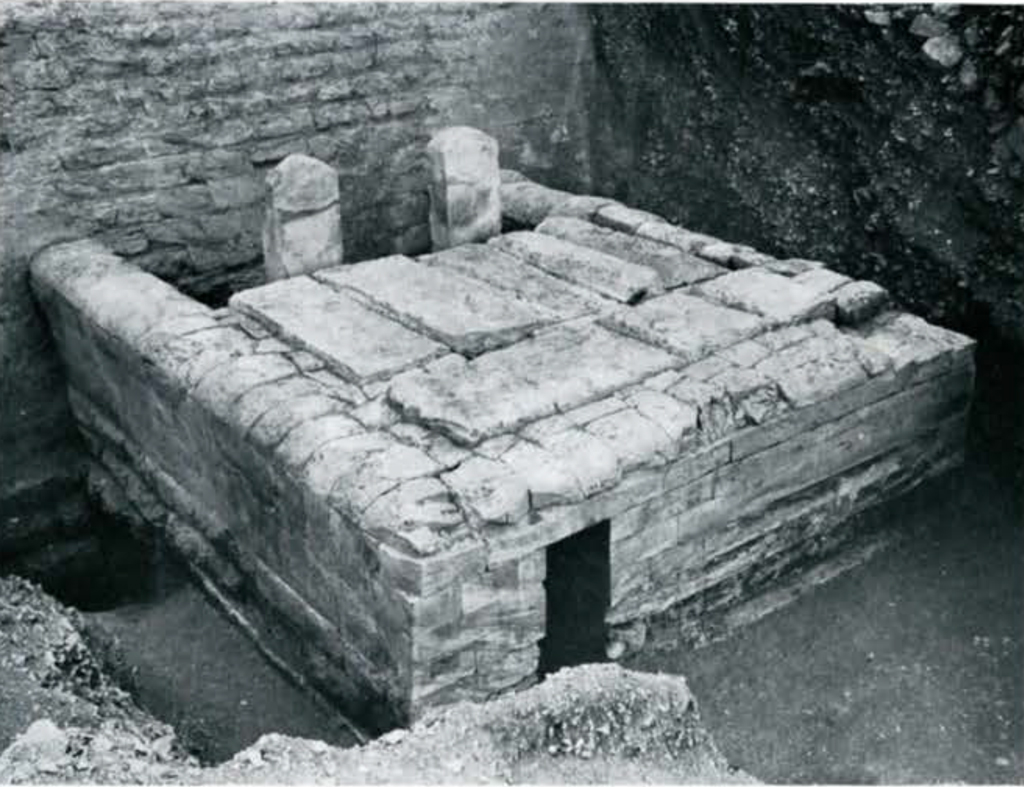
Image Number: 36190
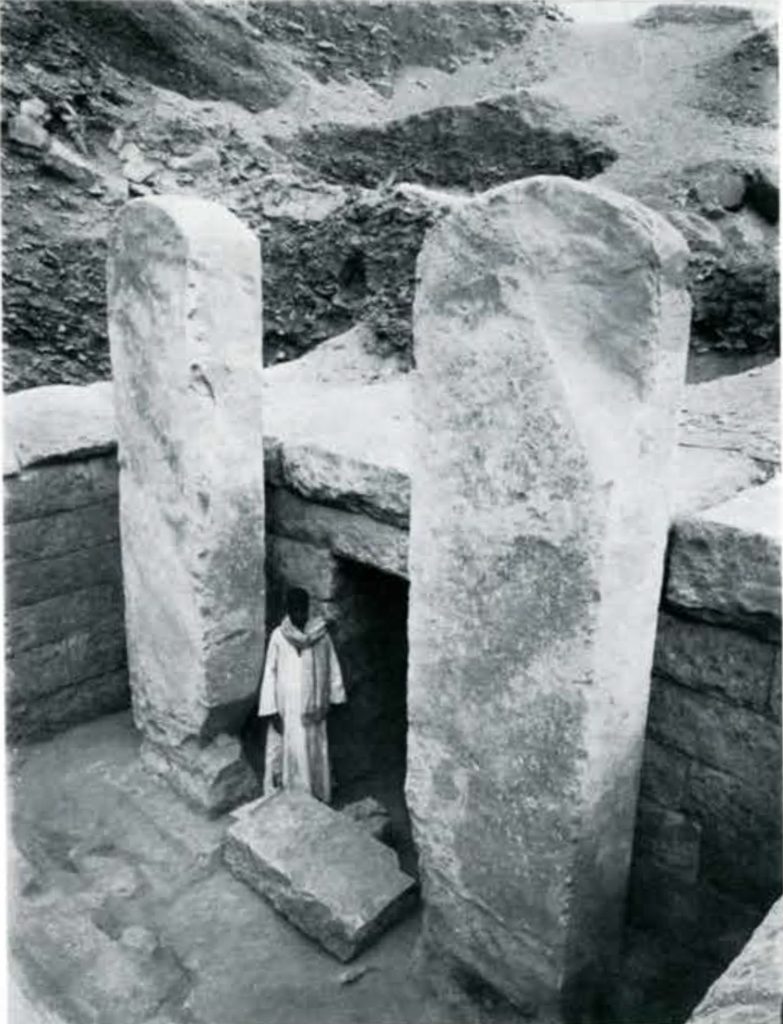

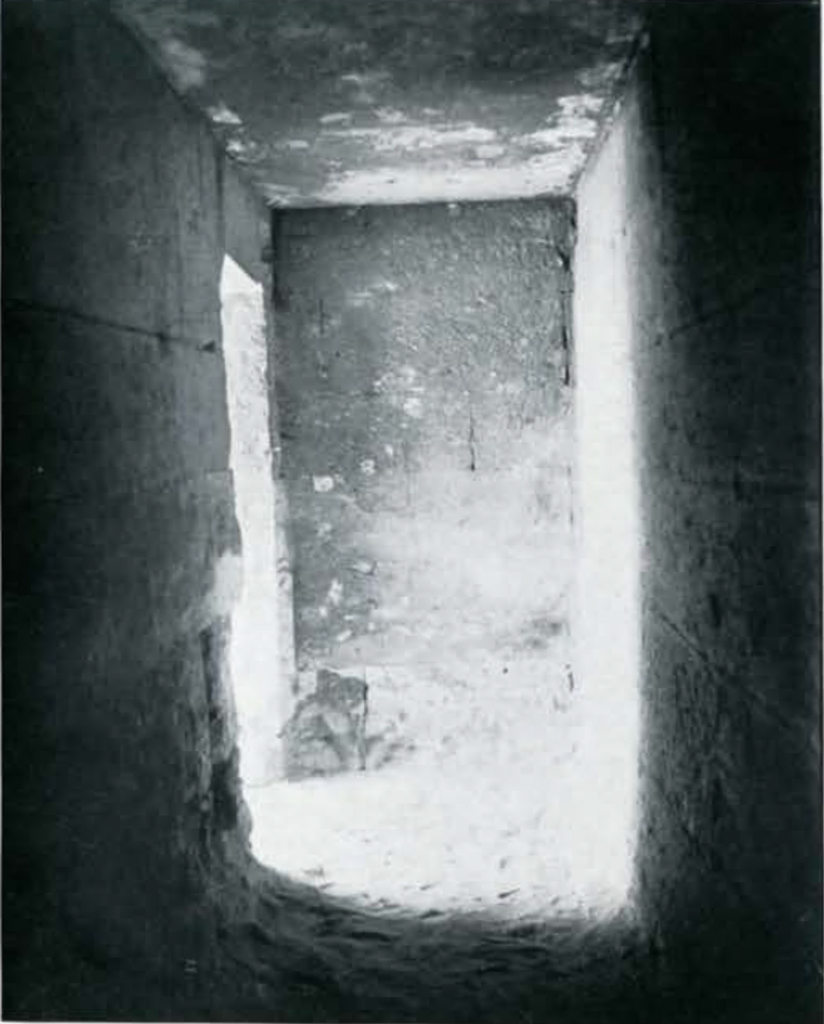
Image Number: 36177

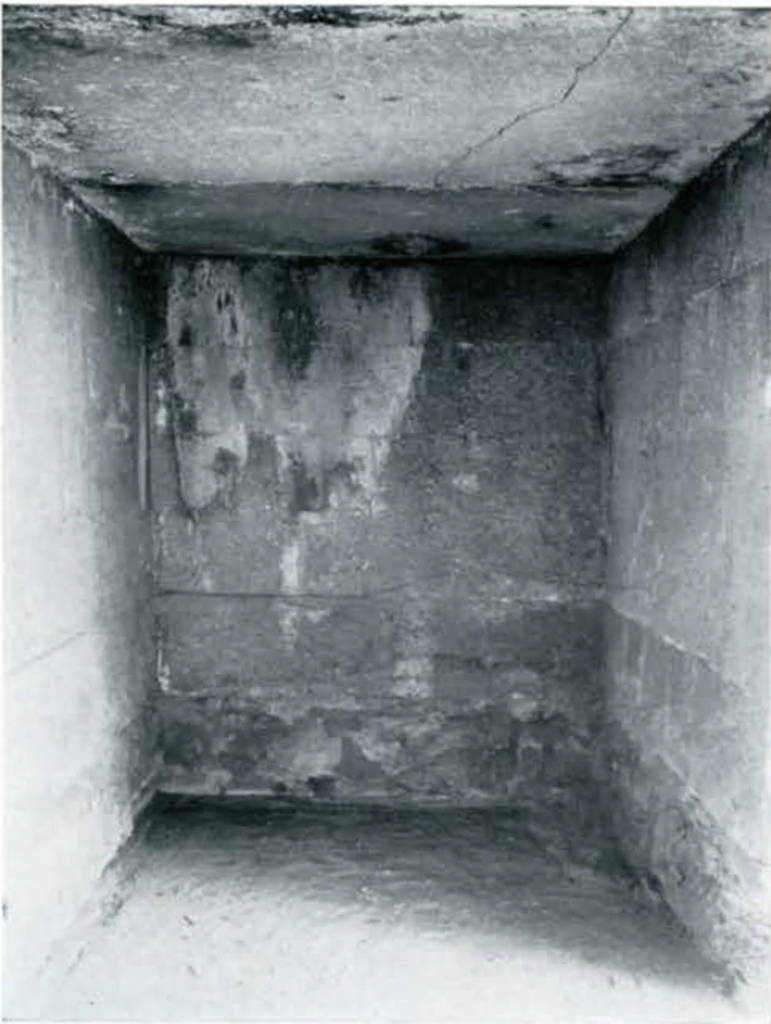
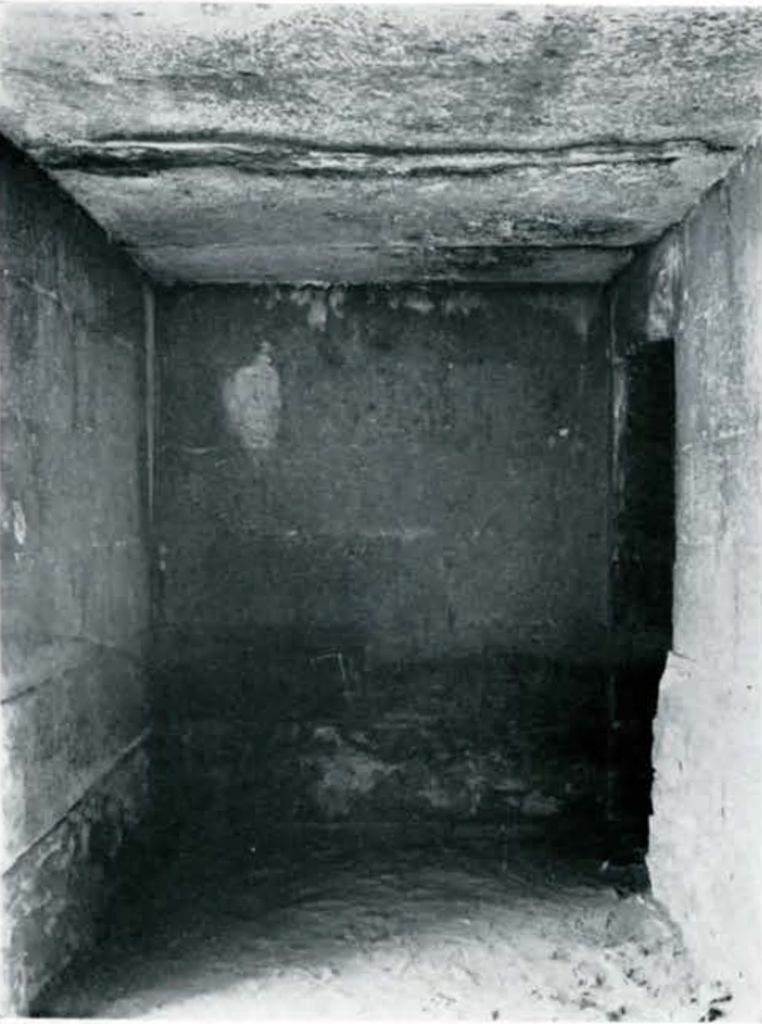
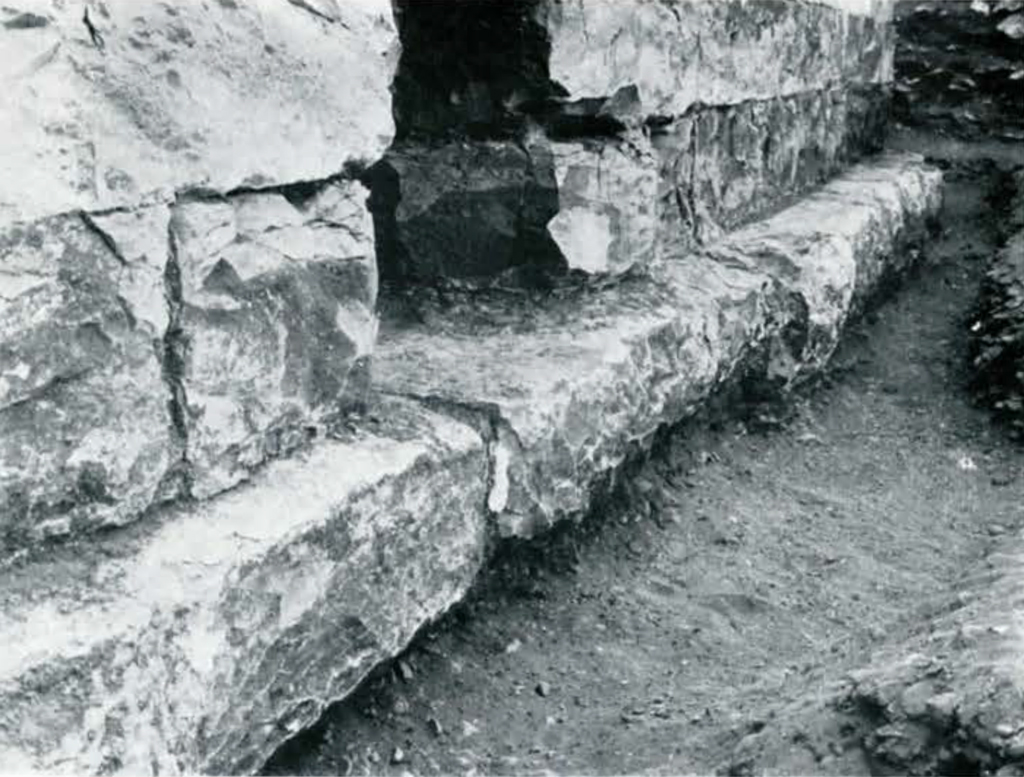
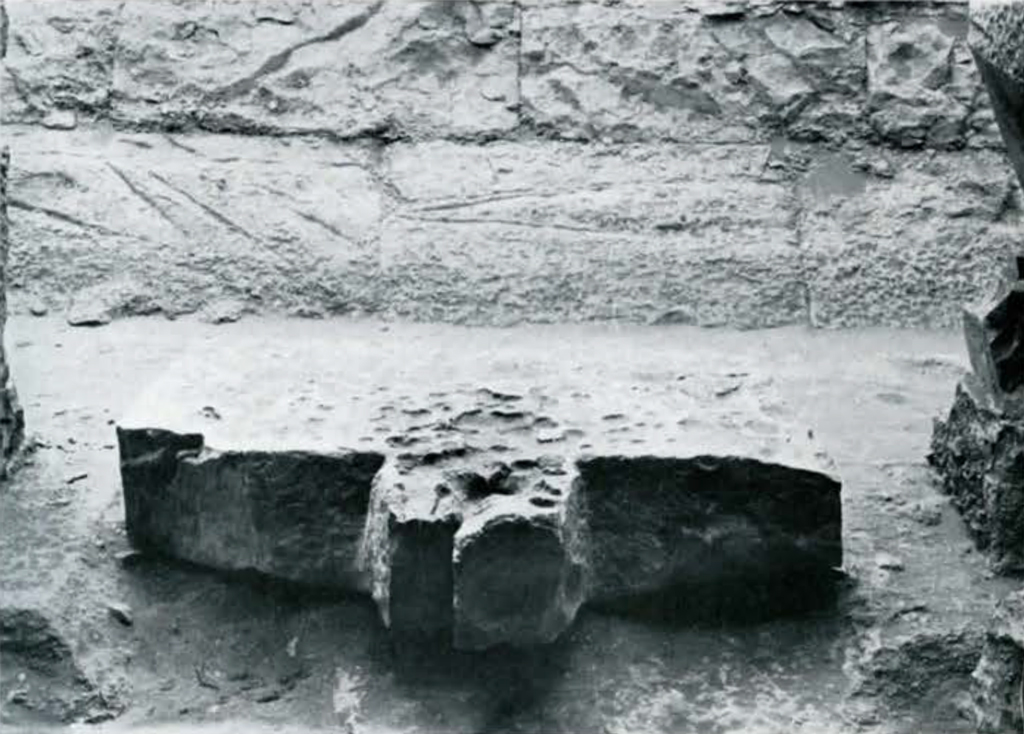
Image Number: 36180, 36181
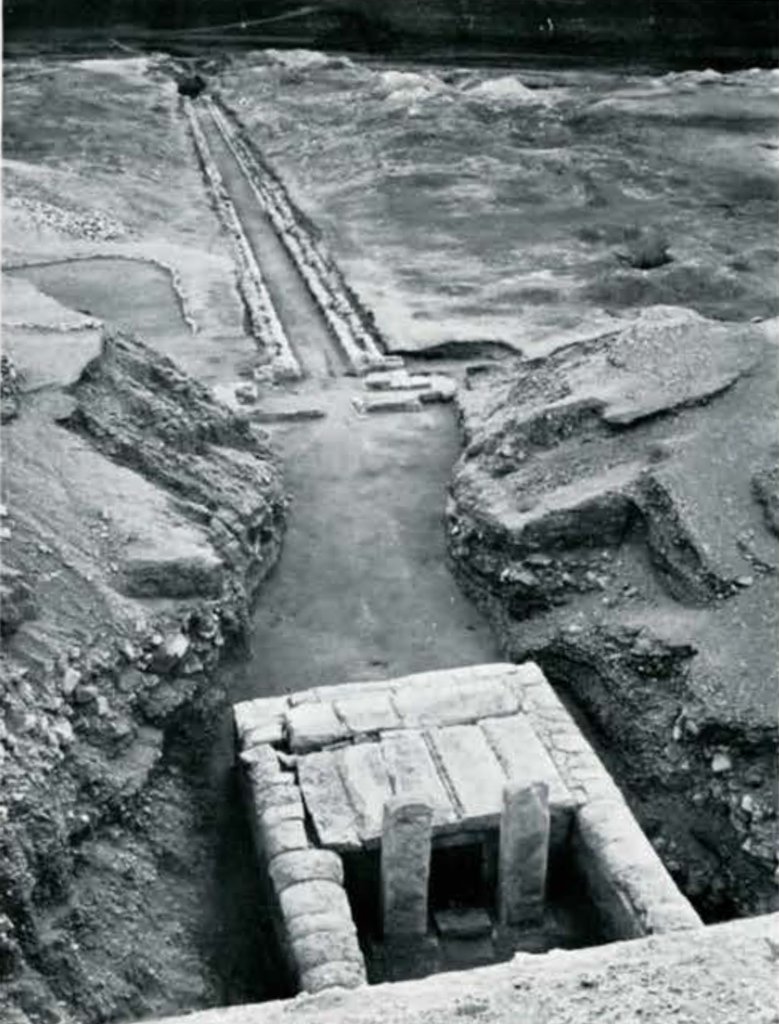
Image Numbers: 32748, 36188

Image Number: 34494
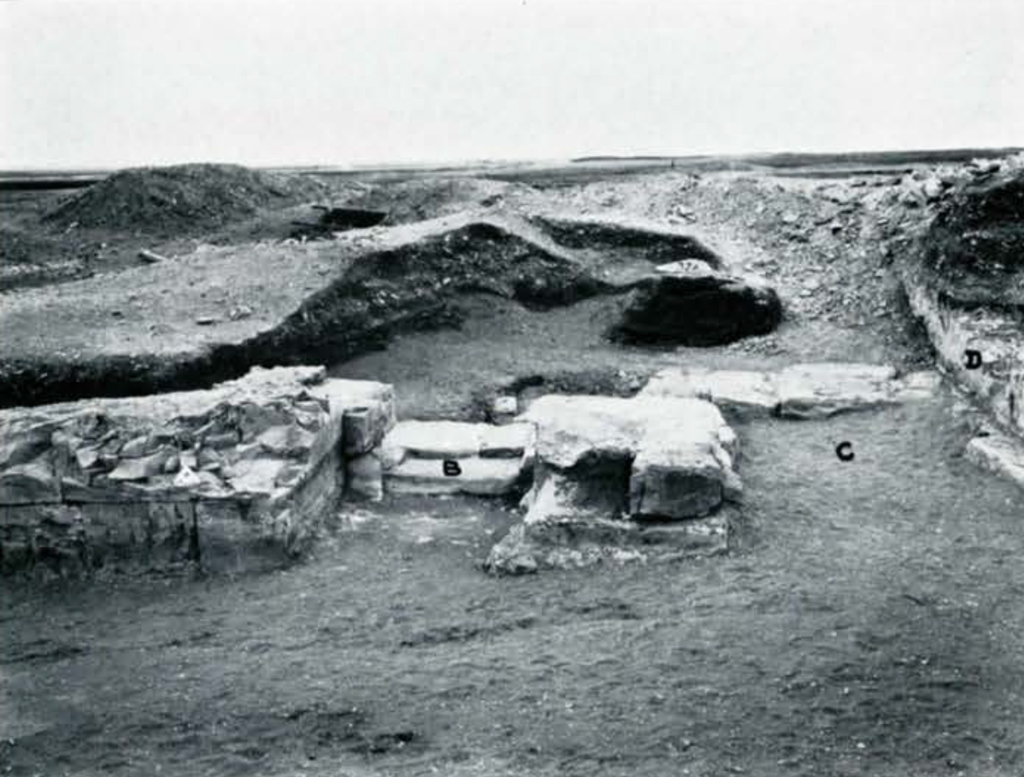

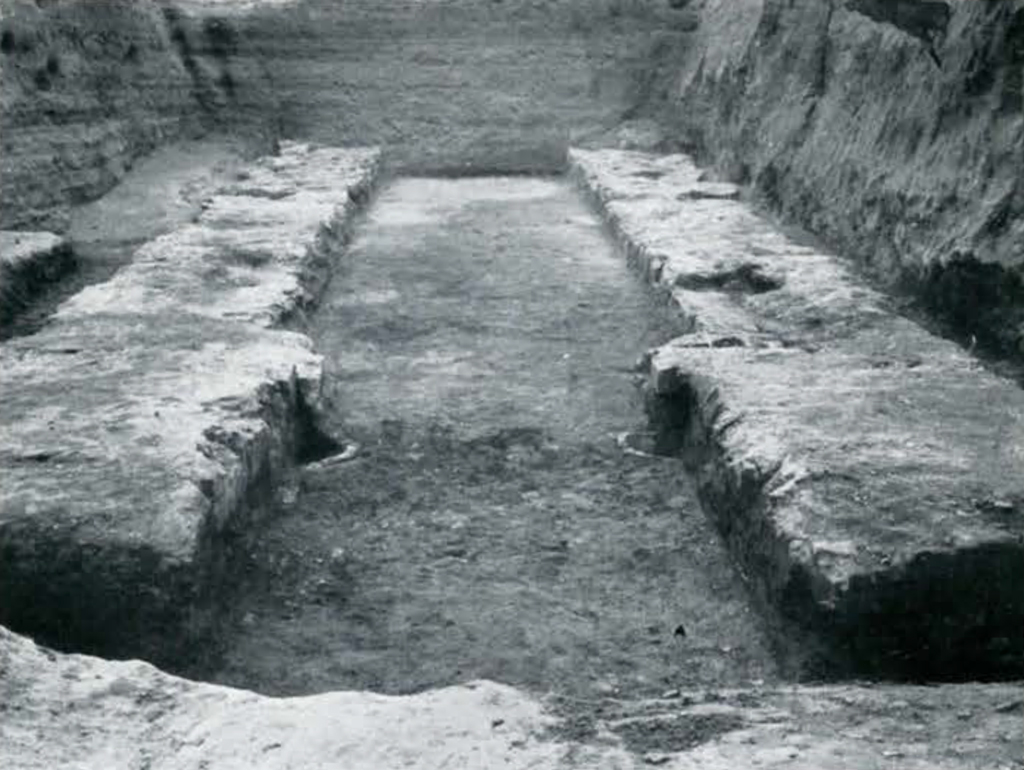
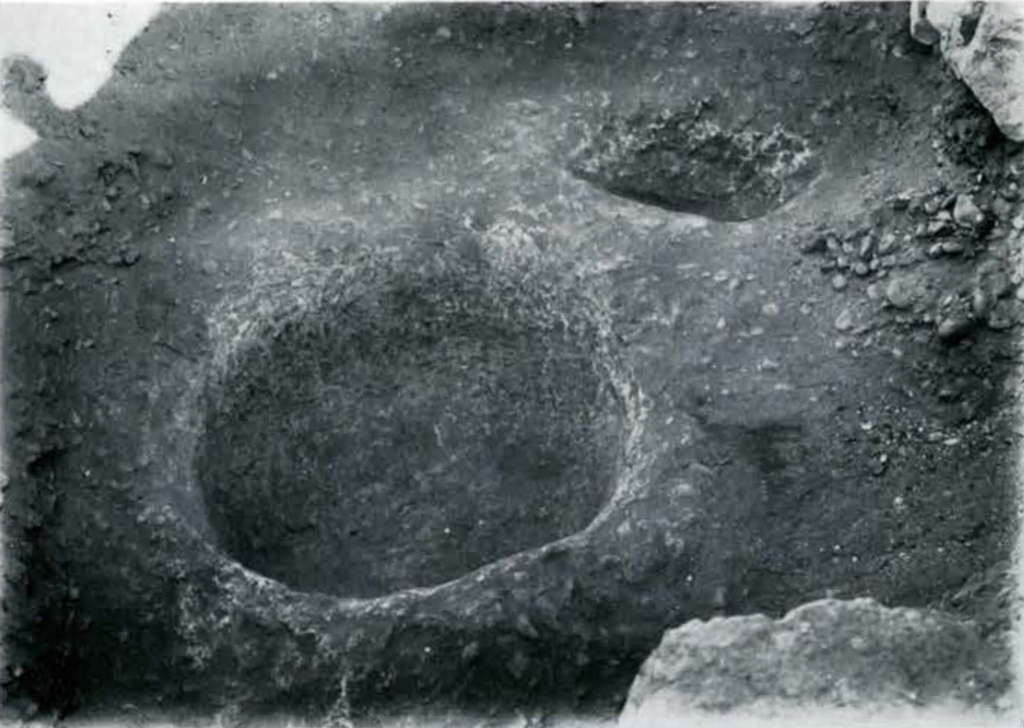
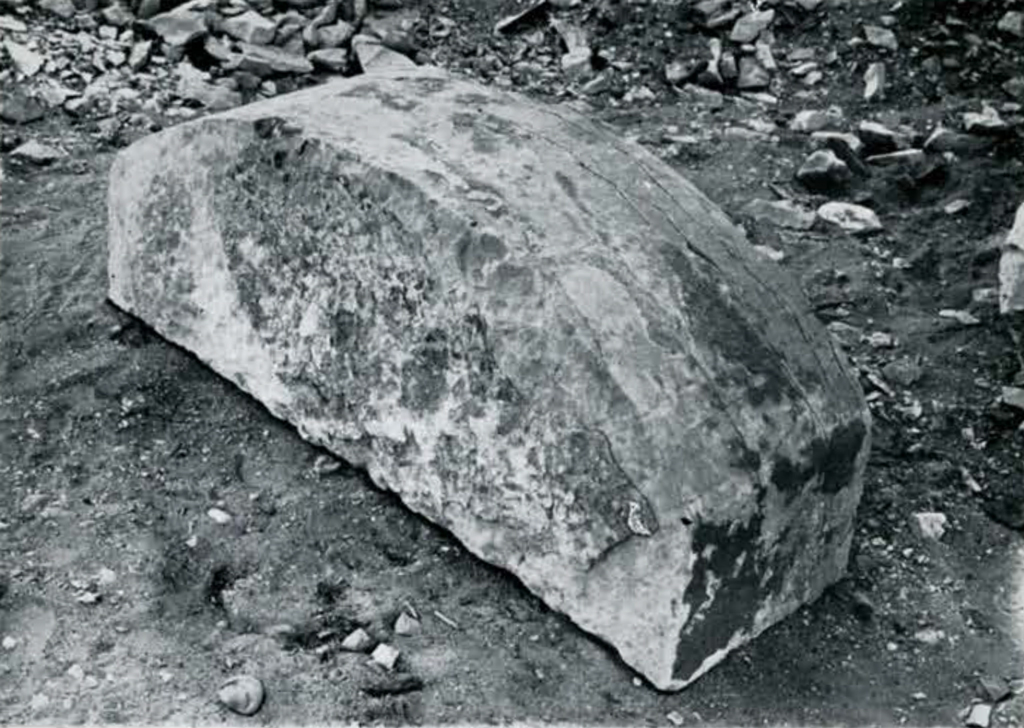
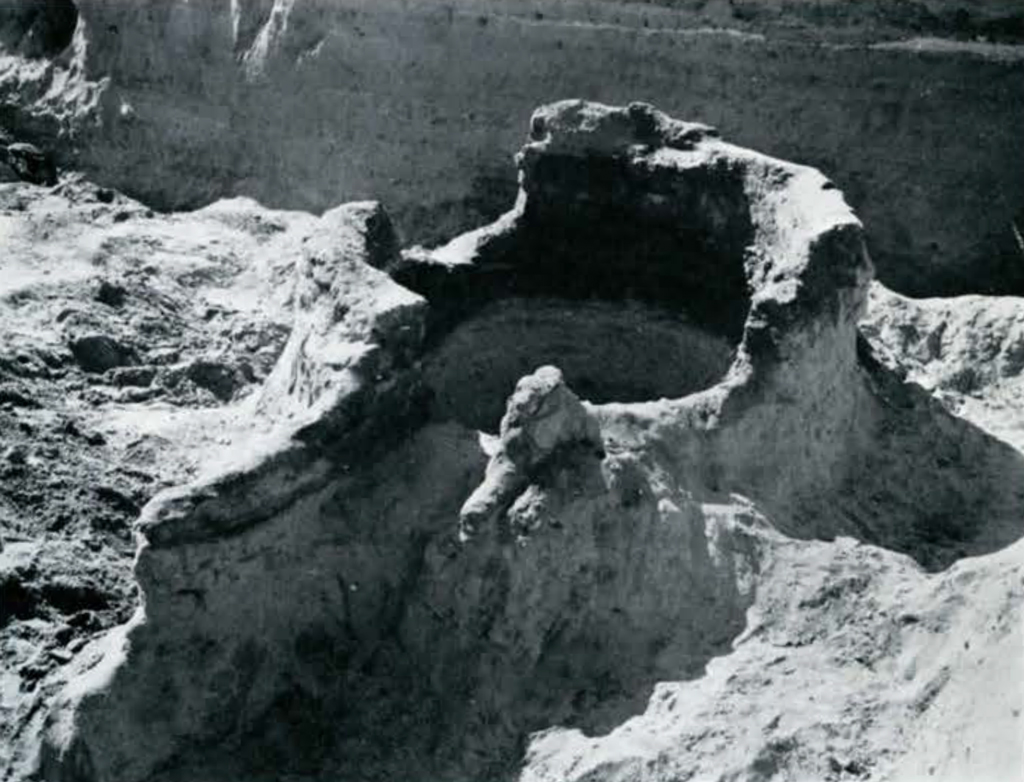
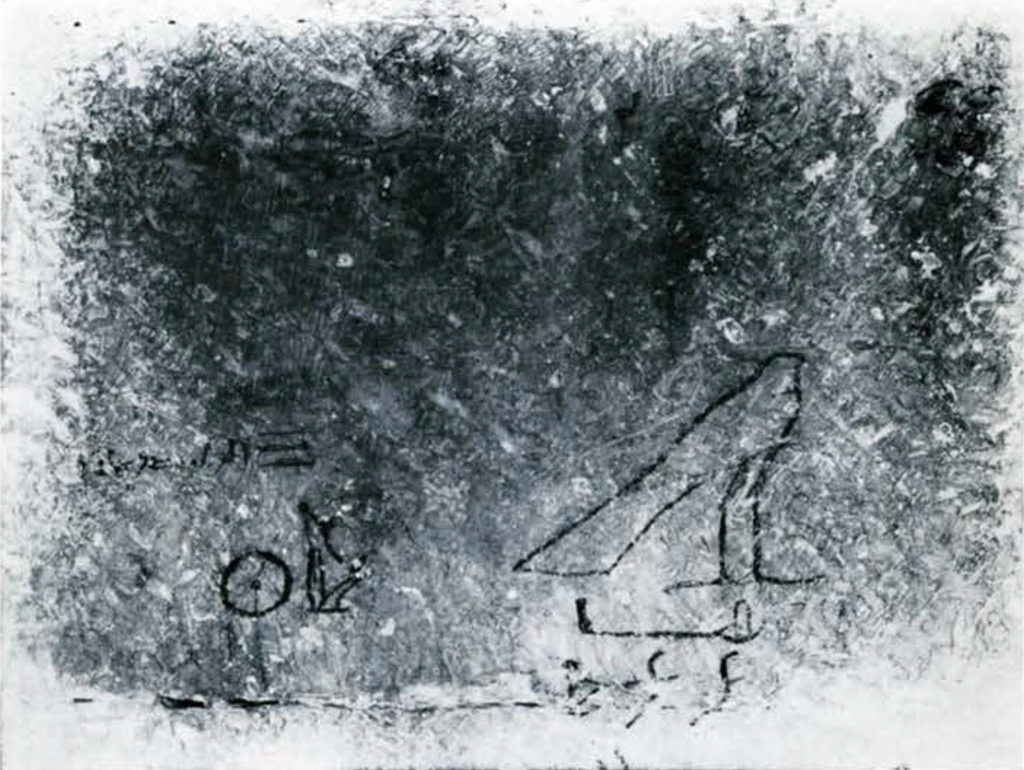
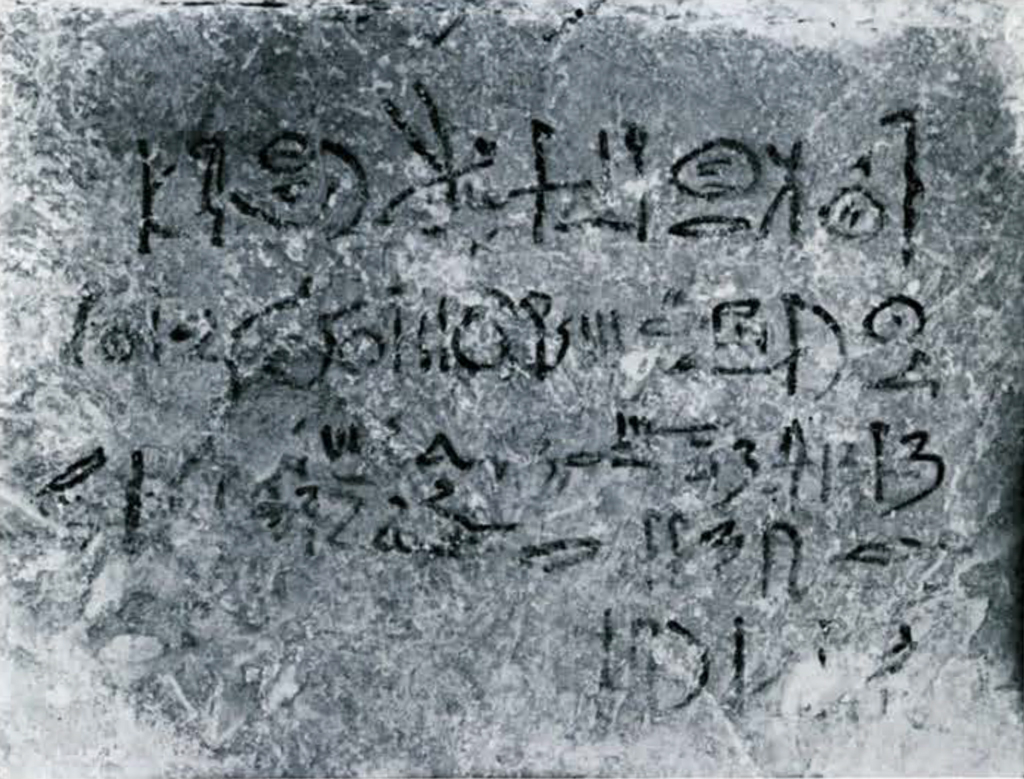
Image Number: 36183
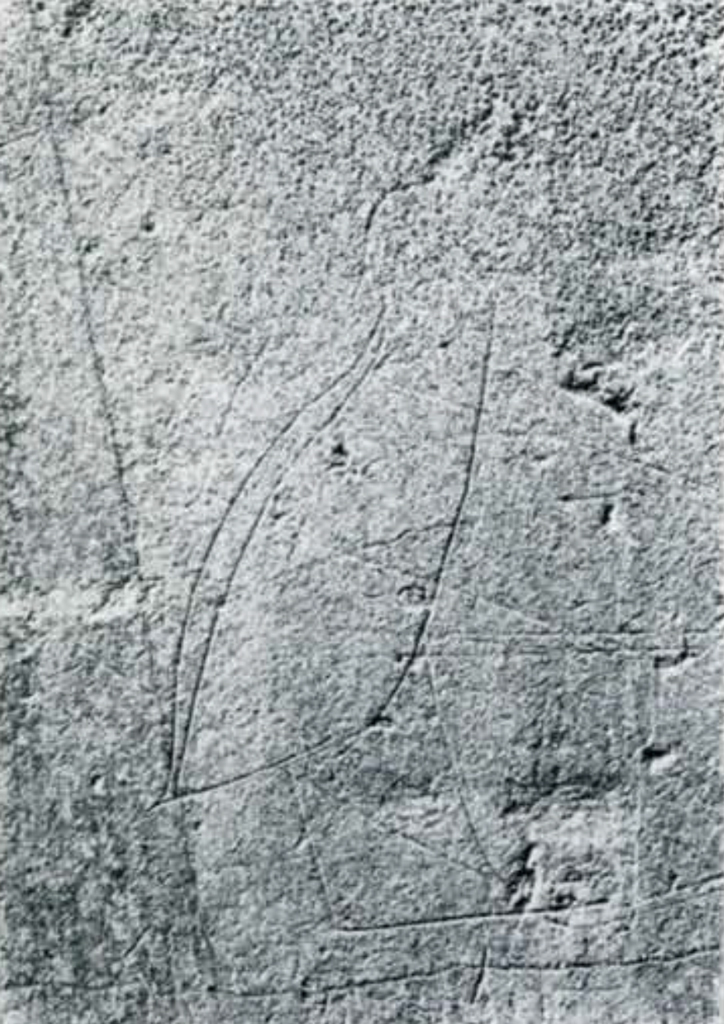
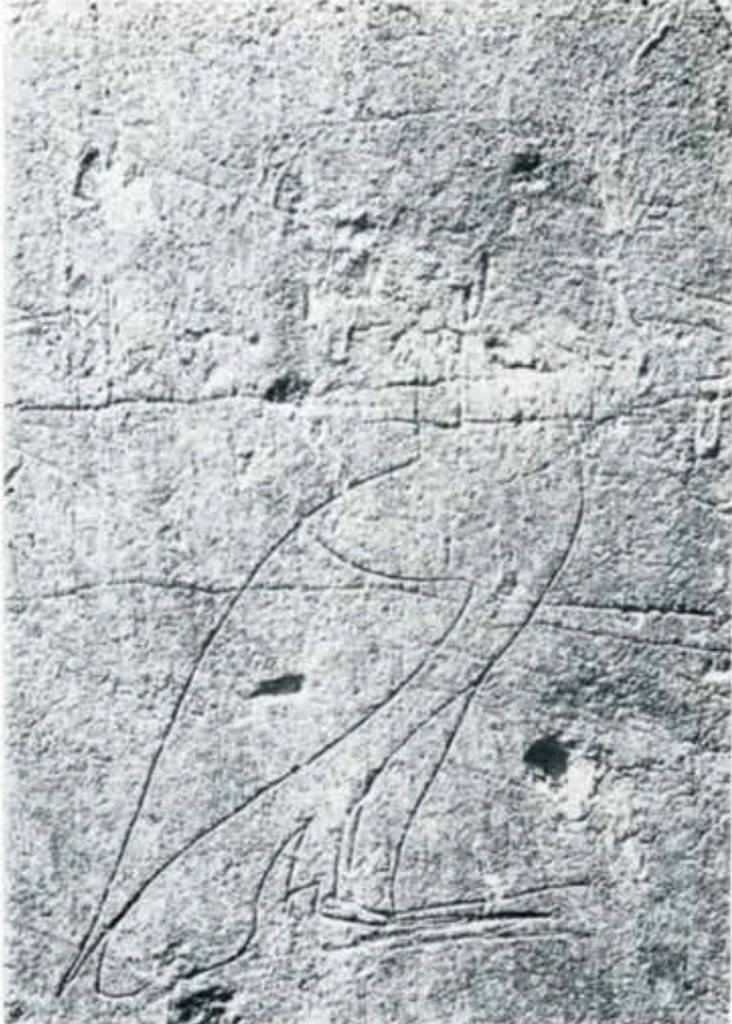
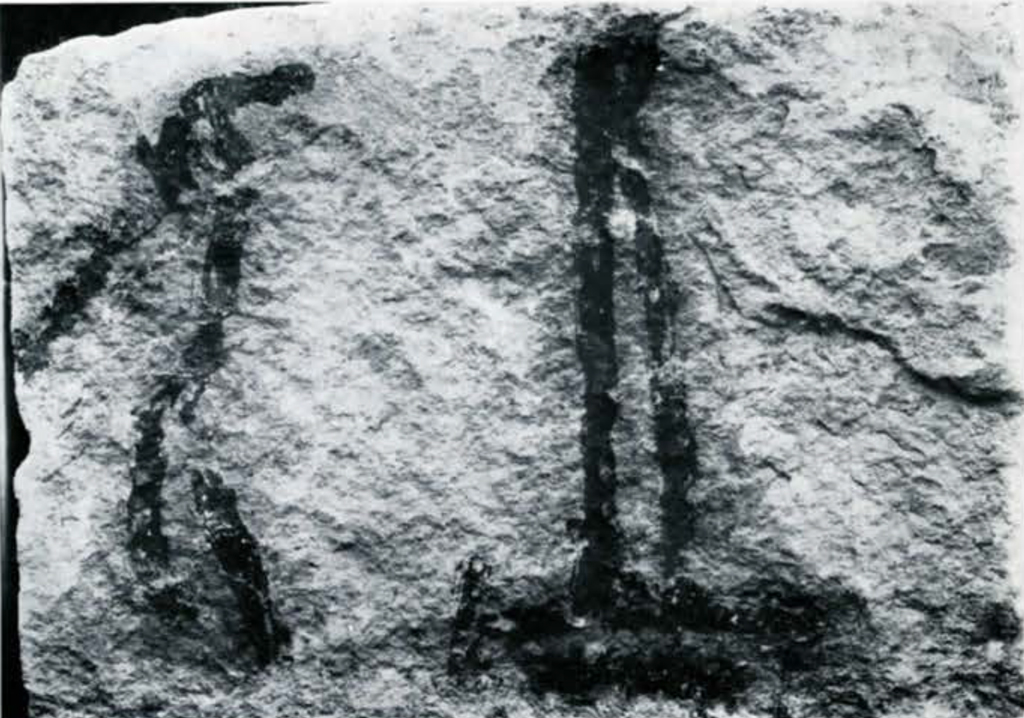
Image Number: 36032

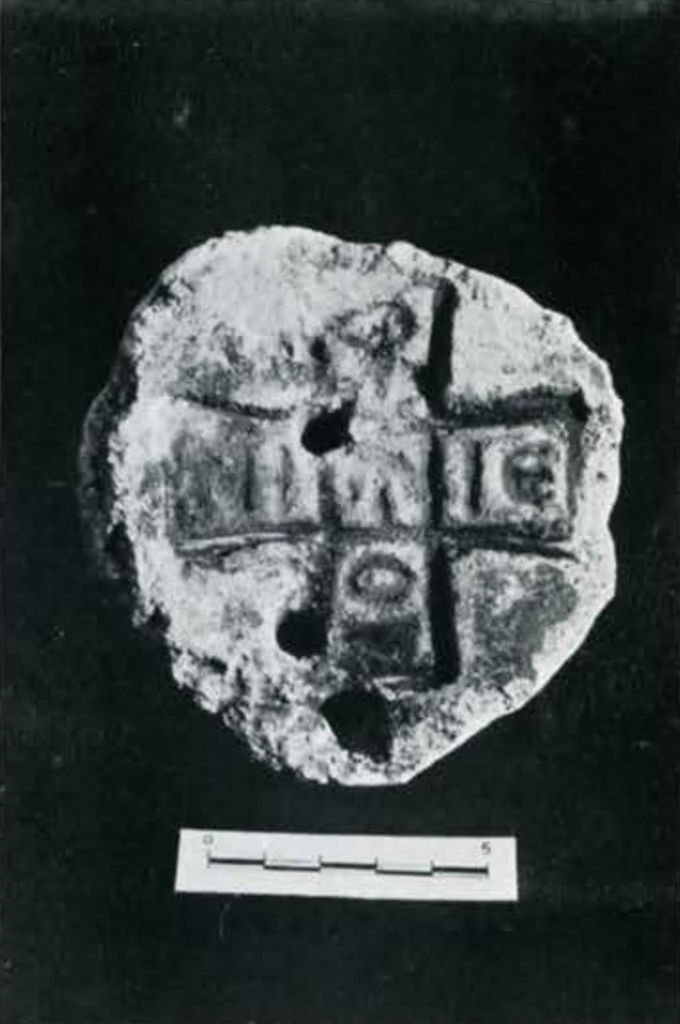
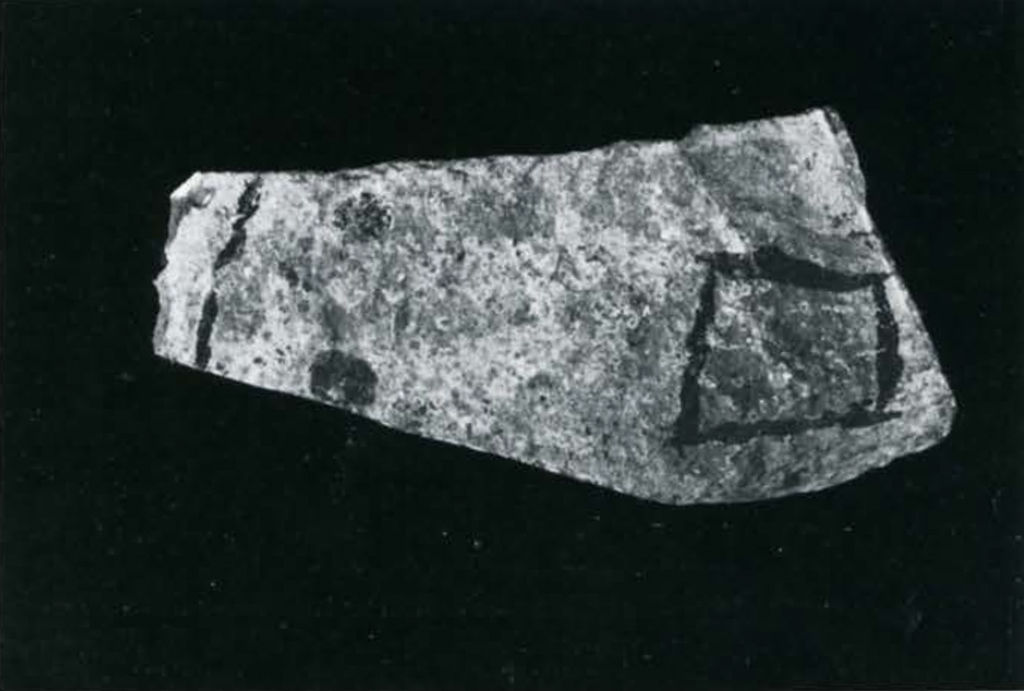
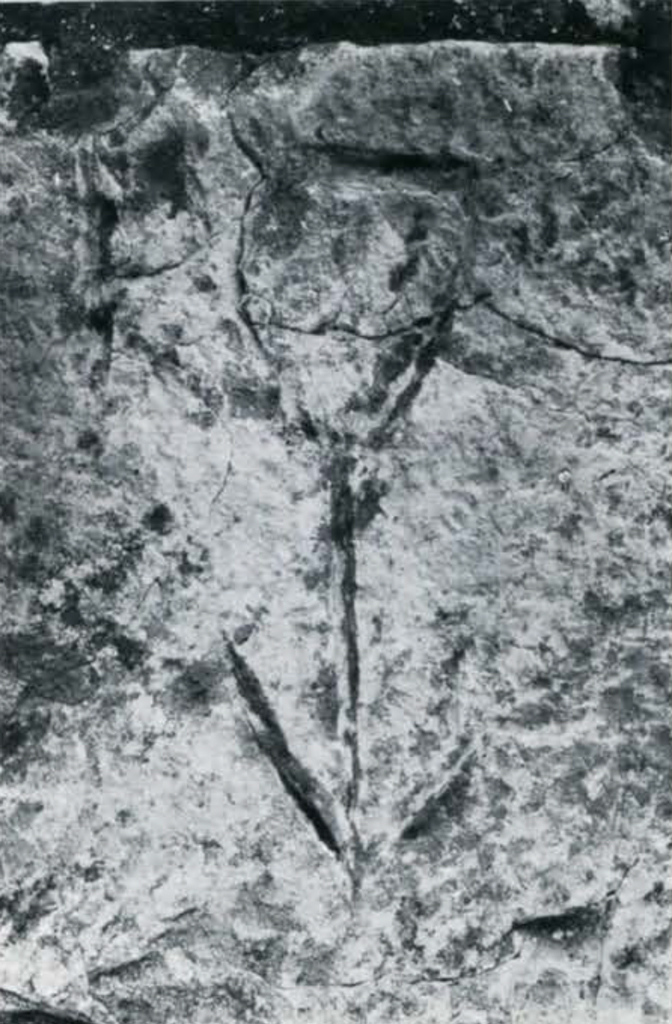
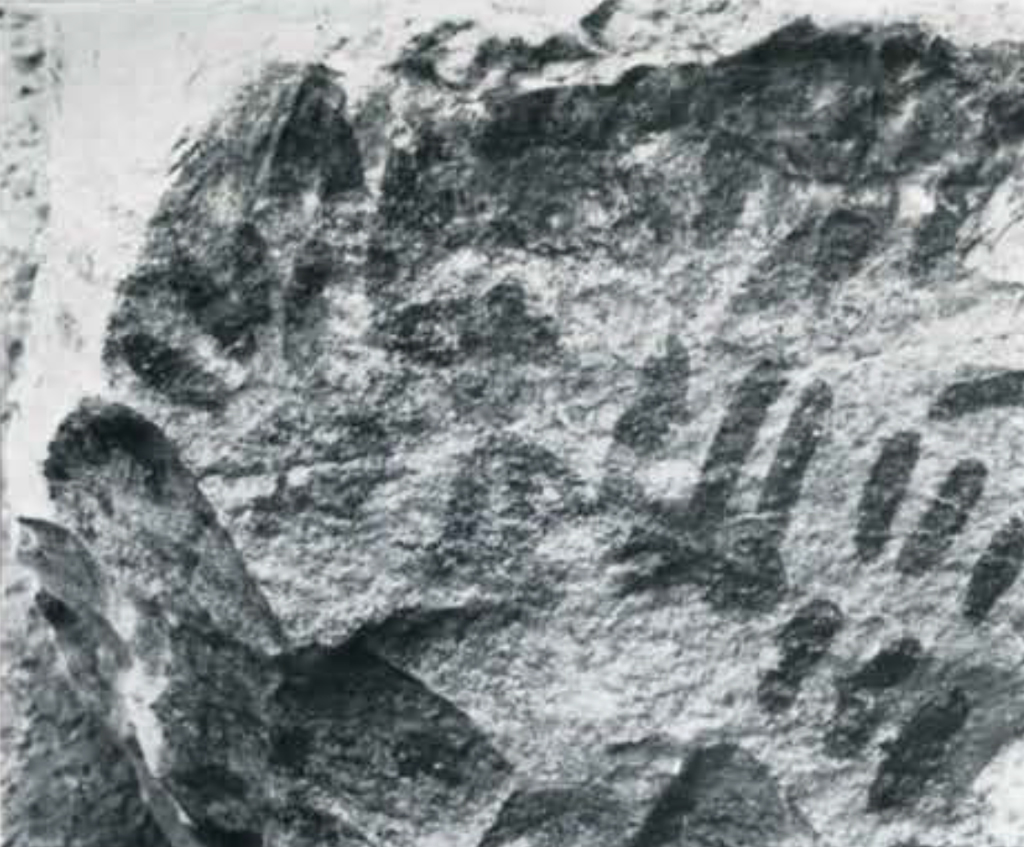

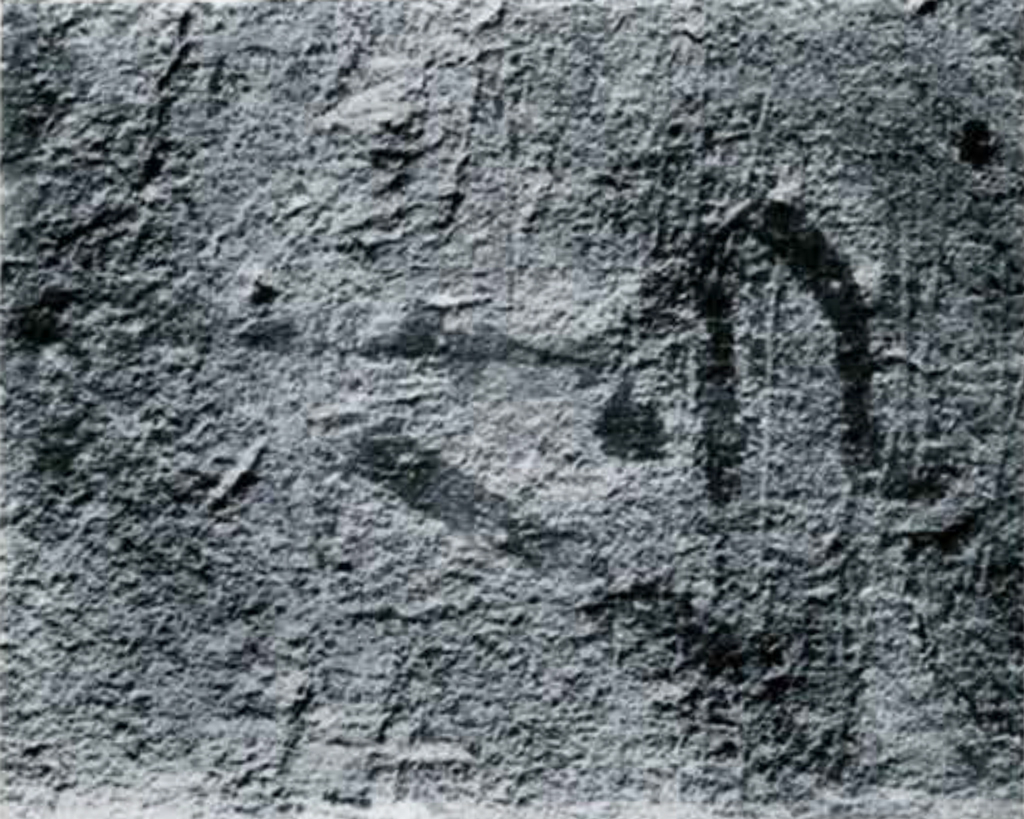
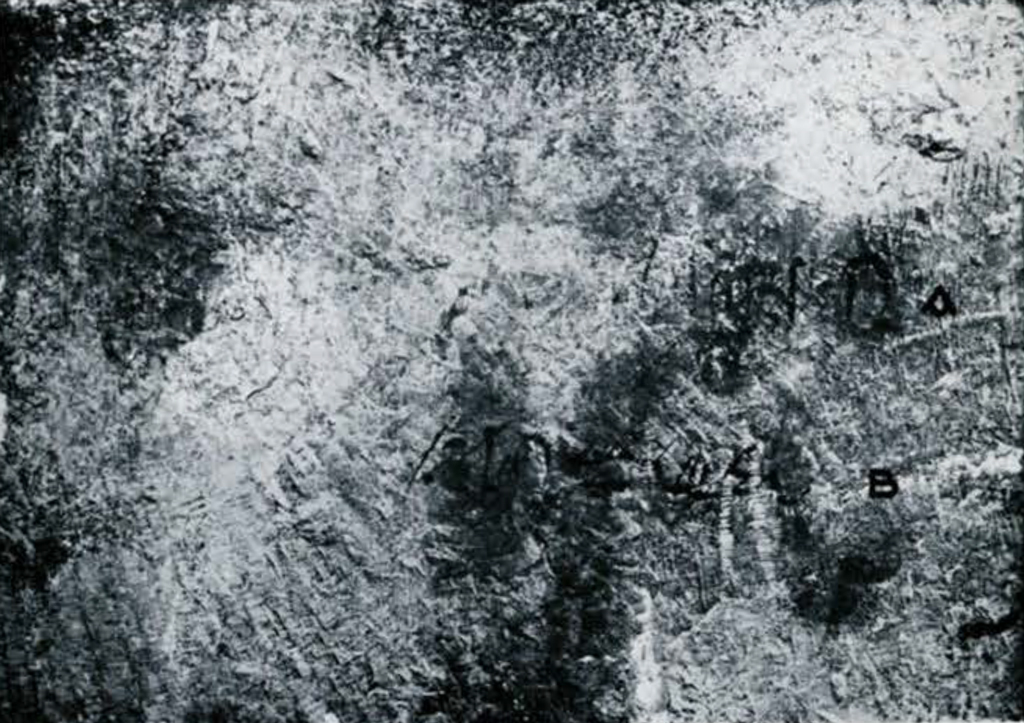
Image Numbers: 36105, 36106