’tis the season for…removing BJK dough

I had heard about this material, BJK dough, since graduate school but had never actually seen it on an object until coming to the Penn Museum. Now that I’ve encountered it, I know it when I see it. It’s often found as fills on ceramics in our collection that were treated in the 1970s and 80s. It’s brown, fibrous, and really hard. Sometimes it is painted but in some cases it is left unpainted because its brown, matte appearance worked well for filling archaeological ceramics (and other similarly-colored objects).

I first read about BJK and its predecessor, AJK, in this great JAIC article by Steve Koob, Obsolete Fill Materials Found on Ceramics. AJK was developed in the University College London (UCL) conservation lab in the 1960s, by mixing Alvar (polyvinyl acetal), jute, and kaolin in solvents, to create a putty. In 1980 Alvar was discontinued so was replaced by Butvar (polyvinyl butyral), to make BJK dough. Both AJK and BJK were used extensively in conservation labs during these decades to fill ceramics and for other gap-filling on objects. Some fills were made by creating a lattice-support with narrow strips. This terrific blogpost goes into detail about AJK and BJK and includes a recipe for making strips of dough for filling archaeological ceramics. This recipe is interesting for understanding the old treatment materials and methods, but just to be clear, is NOT recommended for conservation treatment any longer. We use materials that are now known to have better long-term aging properties, such as Paraloid B-72 bulked with glass microballoons.

Here are some examples of BJK dough that we’ve found on objects that are currently in the Artifact Lab:

31-17-318, painted ceramic vessel from Ur, before treatment (left) with painted BJK fills, and during treatment (right) with BJK fills removed. One of the removed BJK fills is pictured in the center.

73-5-557, Detail of iron sword from Hasanlu (Iran) with BJK fills (before treatment)

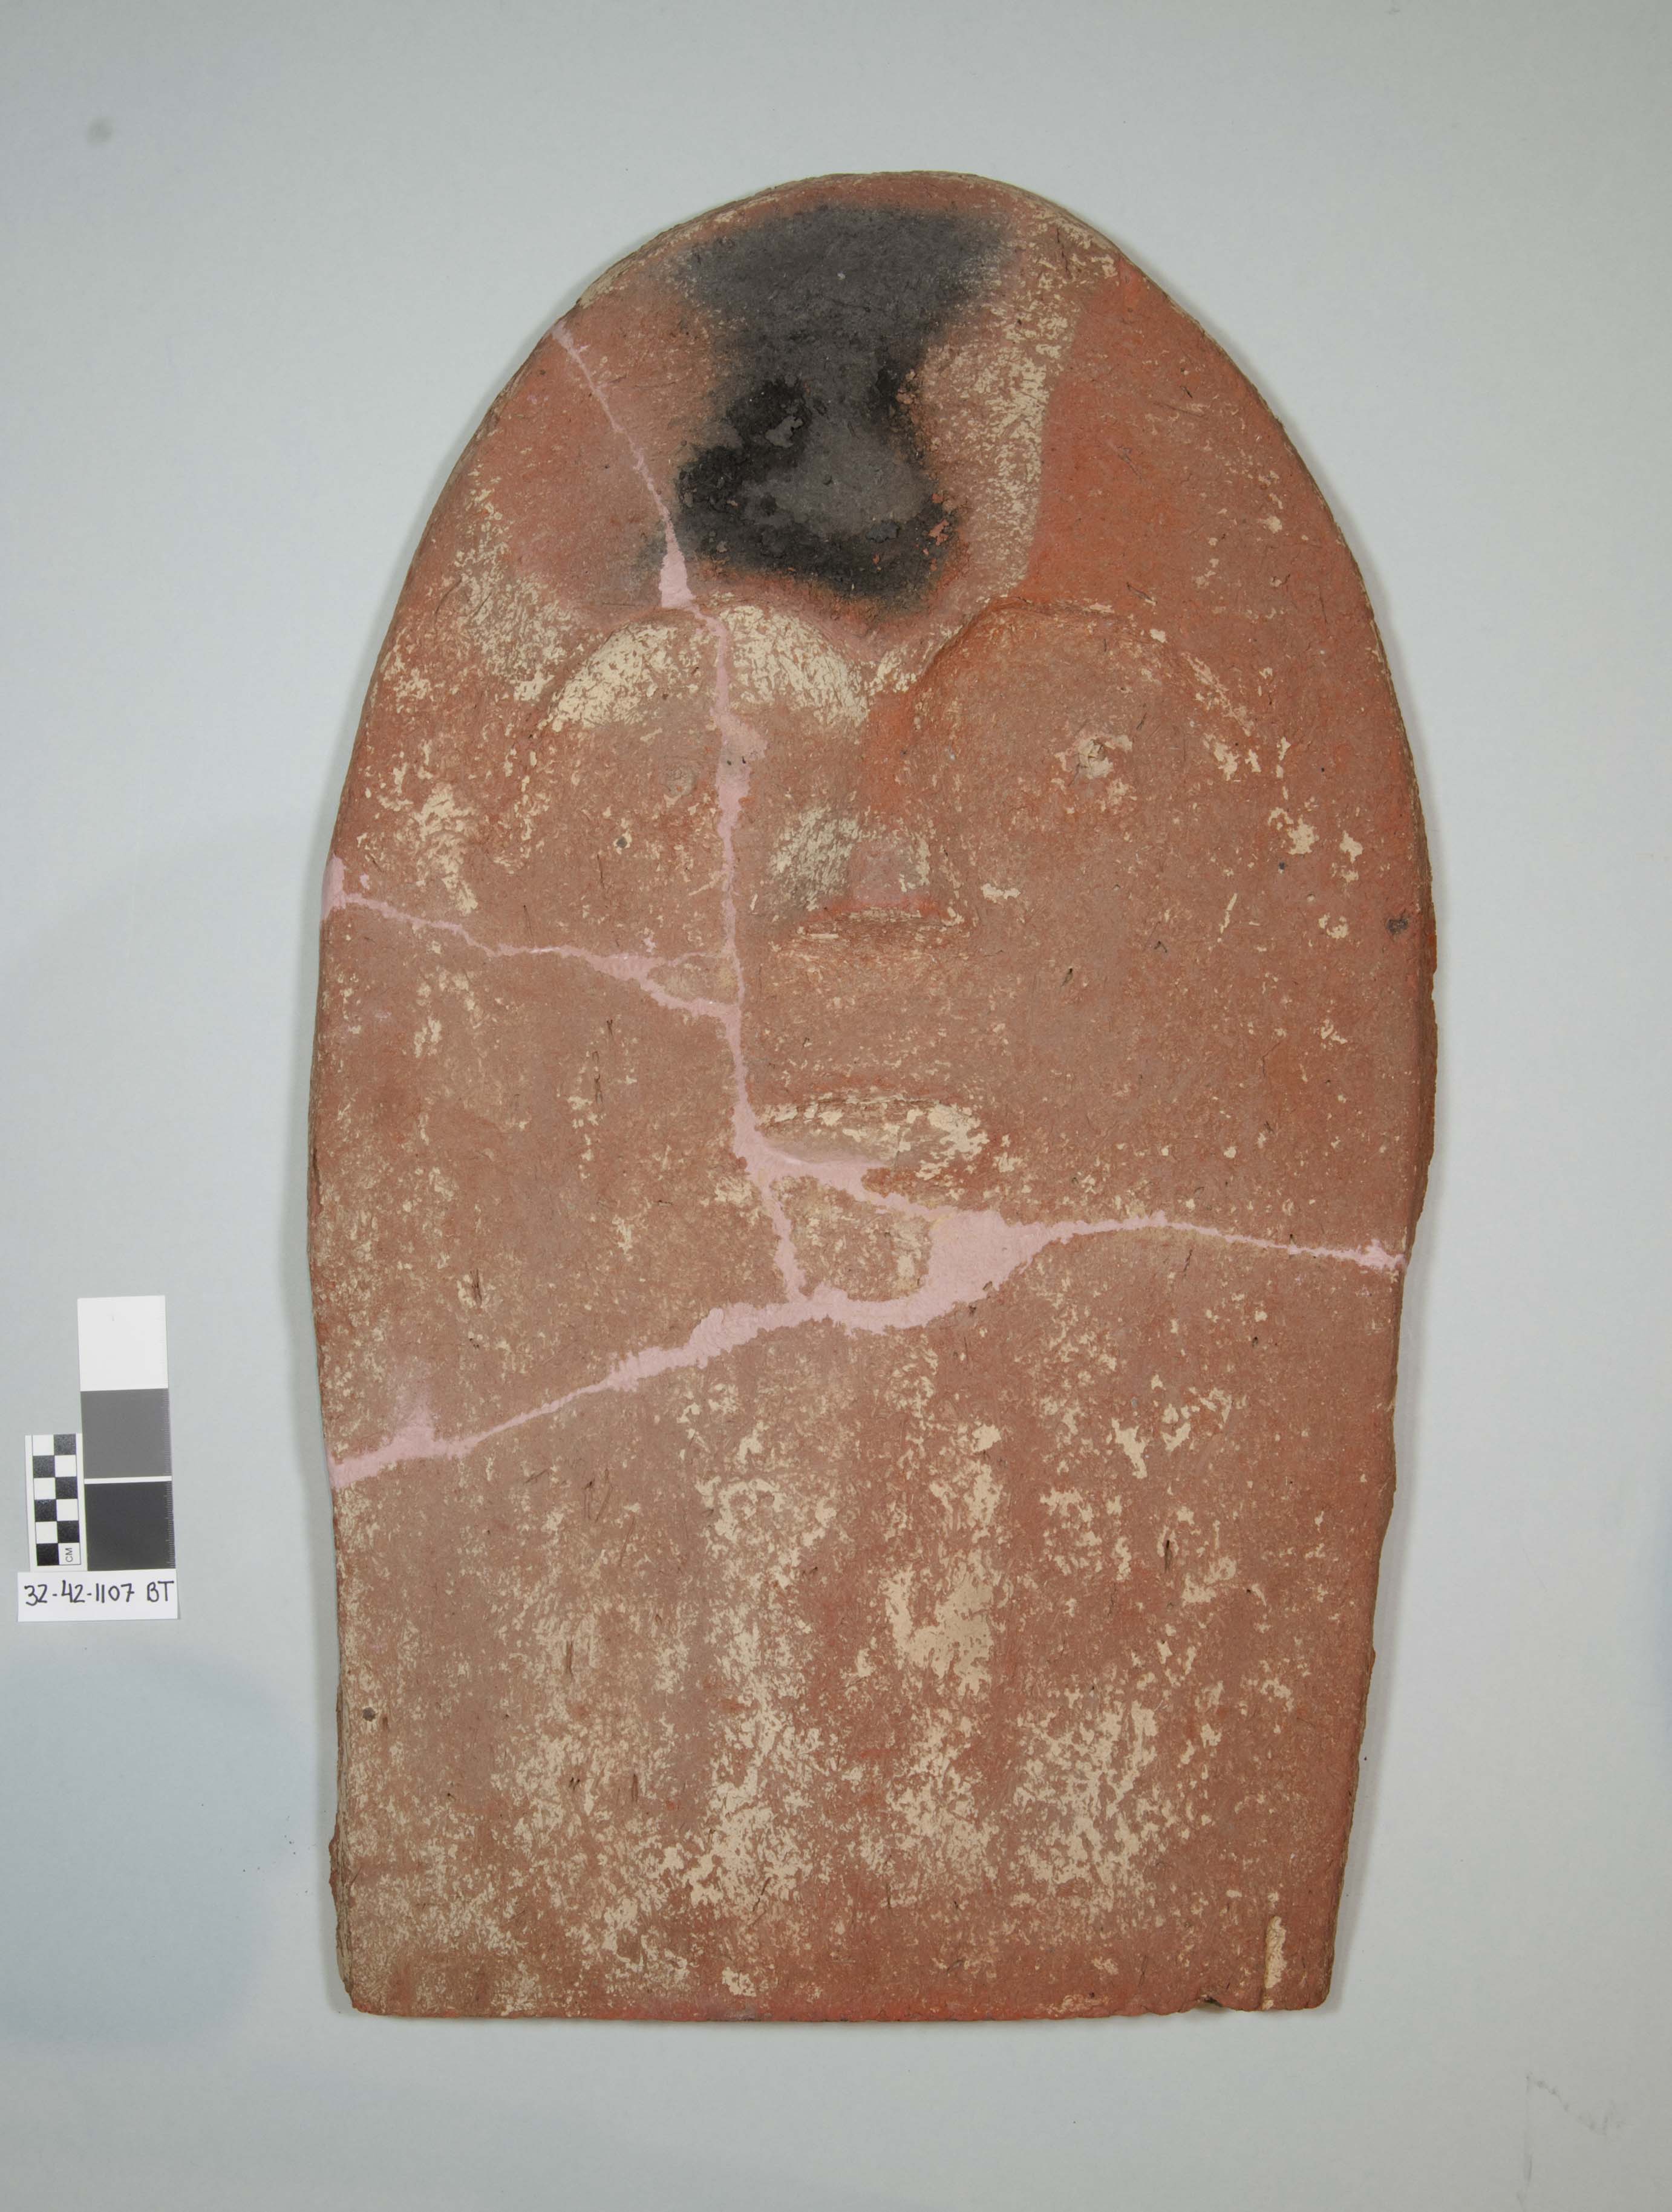
E8436, cup from Karanog, Nubia, Meroitic Period (ca. 100 BCE-300 CE) with large painted BJK fill. The black arrow points to a new crack that developed in the ceramic due to shrinkage of the BJK fill post-treatment.

Due to damage that we have observed on objects with BJK fills (see image above), and to prevent damage from occurring in the future, we often remove BJK when we find it on objects being treated in the lab. Fortunately, the BJK can be removed by poulticing with acetone, which causes it to become flexible and gummy enough to be scraped or gently pried away from the original object.

I think I can safely say that all of us in our department have done our fair share of picking off BJK from objects. Spending time undoing old treatments allows us to reflect on these past treatment choices and on our own decisions. We are very fortunate today to be able to learn from past treatments, to have decades of research and published observations to rely on for our own decision-making, and to have the technologies to allow us to better track condition of objects and materials over time.

As it is, this is a good time of year for reflection, but also to look forward to a new year ahead, and the certainty of new challenges and discoveries to be made. There will be no public access to the Artifact Lab from December 31 until April 8, but we will continue to update the blog as we work in the lab on new projects. Stay tuned, and Happy New Year, from all of us in the Conservation Department!

Ancient Egypt Open House

The museum is hosting an Ancient Egypt Open House today. This open house was put together for all local students who are taking Dr. David Silverman’s Introduction to Ancient Egypt and Its Civilization on Coursera, an online platform which allows students from all over the world to enroll in the course (more than 20,000 people have signed up for the first offering). But you don’t have to be enrolled in the class to take part in the open house, which will include a talk by Dr. Silverman, Egyptian gallery tours, a mummification workshop, a hieroglyph workshop, book signings, and a special open window session in the Artifact Lab. The full schedule is posted on the museum’s website – follow this link for more information. You can also read about the course and the Open House in the Inquirer article from earlier this week:

Penn online course on Ancient Egypt – The Philadelphia Inquirer

If the open house isn’t alluring enough, remember that this is one of the last weekends to visit the Artifact Lab before we go on hiatus at the end of the year. We will be closed temporarily from December 31 but we will reopen to the public on April 8, 2017. As usual, we have some pretty interesting things in the lab that you can see when you visit, including our Egyptian mummy Hapimen, a Graeco-Roman terracotta coffin lid, and several artifacts that have been selected for our new Middle Eastern Galleries, slated to open in 2018. Here are a few images to show you how our work is coming along:

A detail of Hapimen (E16220A), showing the damage to his wrappings and body, likely caused by tomb robbers. Conservator Alexis North is working to stabilize the damage and get Hapimen ready to go back on exhibit.

Graeco-Roman terracotta coffin lid from Meydum (32-42-1107) (before treatment)

Djed-Hapi’s cartonnage mask with a temporary facing applied (during treatment) (E3413D)

Conserving Egyptian mummies…and more

Update – this post contains outdated language. We no longer use the term “mummy” and instead use “mummified human individuals” to refer to Ancient Egyptian people whose bodies were preserved for the afterlife. To read more about this decision, follow this link.   

Recent visitors to the Artifact Lab may have noticed this new sign posted on one of the lab windows:

signdsc_0539

Since we opened in fall 2012, you might have occasionally caught us working on non-Egyptian things, but if you visit us now, you will definitely see us working on things from other parts of the collection, especially artifacts that we are preparing for our new Middle East Galleries. Right now, we are focusing a lot of our efforts on treating ceramics and lithics, most from Iraq and Iran.

We have tens of thousands of ceramics and lithics in this museum’s collection, but somehow, in my over 4 years here, I have gotten away with working on only a handful.

tessa4

Conservator Tessa de Alarcon reconstructing a ceramic vessel. This is a common sight in our main lab (behind the scenes) but not so much in the Artifact Lab…until now.

So this is how, after spending over 4 years working on mummies and coffins, working on a small ceramic vessel becomes a novelty. And that is why I am going to walk you through some of the fairly routine steps of treating a ceramic, because I’ve never gotten a chance to write about it on this blog before, and honestly, I’m excited about it.

This small ceramic vessel with a simple striped pattern was excavated in 1931 in Ur, which is a site in modern day Iraq. It dates to the Ubaid Period, so is at least 6000 years old.

31-17-318

31-17-318, before treatment (BT)

As you can see in the above BT image, it was previously broken and repaired. In order to get it ready for exhibition, those old repairs need to be removed. We don’t always remove old repairs (and we never remove repairs that date to when the objects were still in use), but based on observations of the vessel and referencing an old conservation treatment report, I knew that the repairs had to be undone –  if left in place those old materials are likely to fail and possibly cause more damage to the object. Another goal of the conservation treatment is to improve the appearance of the vessel, as there was excess adhesive and overpaint in areas and many of the joins were not well aligned.

Based on that old treatment report and tests in the lab, I knew that the old adhesive is soluble in acetone and that the material used to fill missing areas would soften in acetone enough to allow it to be removed. So the first treatment step, after documenting the piece fully, was to put it in an acetone vapor chamber:

cup-dtdsc_0042

An acetone vapor chamber isn’t anything fancy – in this case it was created with a plastic bag. I placed the vessel and 2 small containers of acetone in the bag and then clamped the open end to prevent the acetone from leaking out. Sometimes an object only needs a few hours in a vapor chamber before it can be taken apart. This little vessel required 24 hours before even one piece could be taken off. The whole thing was finally deconstructed after a week of sitting in the chamber on-and-off and poulticing and swabbing the joins with acetone.

During treatment, after the first piece detached

During treatment, after the first piece detached

During treatment, after about half the vessel was taken down

During treatment, after more than half the vessel was taken down

Success! All the pieces are finally apart, placed on images of the vessel in order to keep track of everything.

Success! All the pieces are finally apart, placed on images of the vessel in order to keep track of everything.

Once the pieces came apart, I had to swab all the joins with acetone to remove excess adhesive and fill material. I’m now at the point where I will start joining the pieces together again.

Swabbing a break edge of a ceramic to remove excess old adhesive

Swabbing a break edge of a ceramic to remove old adhesive

Stay tuned for more posts about our work on these objects, and our continued work on the Egyptian collection and other projects!

Symposium follow-up

Thanks to the hard work of so many individuals, including our incredible speakers, I think I can safely say that our symposium last month was a smashing success. Nina Owczarek wrote a nice summary post on the Museum blog that includes imbedded video footage of Head Conservator Lynn Grant’s introduction, which contains some terrific images of the Conservation Department and the Museum over the last 50 years.

In addition to 30 paper presentations, the symposium featured 4 short talks entitled “Penn Stories”, and a keynote lecture. Video footage of these 5 presentations is now available on the Penn Museum YouTube channel. Check them out by following this link: Engaging Conservation video clips


50 years of Conservation at the Penn Museum

2016 marks the 50th anniversary of the Penn Museum’s Conservation Department, which was founded in 1966 through the efforts and generous support of the Museum’s Women’s Committee. It is thought to be the first archaeology and anthropology museum conservation lab in the United States to be staffed by professional conservators.

Views of the Conservation Lab ca. 1968

Views of the Conservation Lab ca. 1968

To commemorate the establishment of the department, we are hosting a symposium from October 6-8, 2016: “Engaging Conservation: Collaboration Across Disciplines.” The Symposium will feature 31 paper presentations by conservators, archaeologists, anthropologists, and specialists in related fields, which will address topics related to the conservation of archaeological and anthropological materials and the development of cross-disciplinary engagement over the past half century. In addition to these presentations, there will be an evening keynote address by Dr. Brian Rose, Director of the Museum’s Gordion Archaeological Project in Turkey. The full schedule and abstracts can be found on the symposium website by following this link:

Engaging Conservation: Collaboration Across Disciplines

Views of the Conservation Lab ca. 2016

Views of the Conservation Lab ca. 2016

We look forward to seeing some of you in Philadelphia in October for this event!


A little tip

This week, I just have a quick “tip” to offer. A lot of the work that we do in the Artifact Lab involves repairing very fragile organic material and consolidating delicate painted surfaces, and these treatments often rely on the use of adhesives that take awhile to fully set (dry).

To ensure that the areas that we glue together set in just the right position, we rely on the use of gentle finger pressure while the adhesive dries. But instead of sitting there with our finger on an artifact for minutes, if not hours (totally impractical), the finger pressure we apply doesn’t involve our hands at all!

Let me introduce to you the finger weight:

2 finger weights applying gentle pressure to the painted surface of a cartonnage pectoral

2 finger weights applying gentle pressure to the painted surface of a cartonnage pectoral

These little weights are made by snipping off the fingers of nitrile gloves, filling them with the material of your choice (sand, glass microbeads), and then tying off the open ends with a small piece of thread. In our field, we use a wide variety of weights and clamps, many of them fancy and custom-made, but these simple, cheap finger weights are often just the ticket when it comes to finding the right amount of weight and pressure for a fragile, delicate surface or mend.

I can’t take any credit for these – I’m sure many conservators use them, but I was introduced to them by my colleague Alexis North, who has been making them for use in the Artifact Lab. Now she is going to know who is stealing all of the wonderful little weights she makes!

Coolness vs. cuteness

Update – this post contains outdated language. We no longer use the term “mummy” and instead use “mummified human individuals” to refer to Ancient Egyptian people whose bodies were preserved for the afterlife. To read more about this decision, follow this link.   

We have been carrying out our work in front of the public here in the Artifact Lab for nearly 4 years now. Despite the fact that visitors can peer in from various points around the room and watch us working for as long as they have the patience for it, it’s not always clear what we are doing, especially when the work is very detailed and only requires us to make the smallest of movements for hours on end (several of us have overheard museum visitors quietly whispering “is she real?”).

So even though we are “demystifying” our work by bringing it out in full public view, we sometimes have to rely on labels, signs, a slideshow we have running here in the lab, and, hey! this blog, to describe what it is we are doing.

For example, I have been working on this Ptolemaic pectoral cartonnage piece, and most recently started backing and filling losses and tears in the linen support. Most of what I’ve done so far is really difficult to see or appreciate, even though I’m working right by one of the lab windows.

Detail image before (left) and after (right) filling a loss

Detail image before (left) and after (right) filling a loss

These images above show a detail of an area that I backed and filled. There is nothing elaborate or dramatic about this work. As you can see, the fills are small and subtle, mimicking the surrounding areas of paint loss. These repairs were made by backing the losses with Japanese tissue paper and filling with a mixture of Klucel G, alpha cellulose powder, glass microballoons, and powdered pigments.

There are a few areas that I could not access from the front, so I decided to flip the piece over to continue the treatment. In order to protect some fragile areas while the piece is turned over, I temporarily faced them with small pieces of Japanese tissue impregnated with Paraloid B-72.

A detail of the upper half of the pectoral showing facing in progress

Below, you can see what the piece looks like from the reverse. Unfortunately, this means that for the time being, visitors will not be able to see the beautiful painted decoration.

Reverse of E352

Reverse of E352

But have no fear! We have other interesting things on view, and to keep us company as we do this detailed, subtle work. We have our mummy Hapi-Men, who is front-and-center in the middle of the lab, and for those visitors who may not see the “coolness factor” of the mummies, there is this little guy who is currently sitting right by one of the lab’s windows:

E11474: Ptolemaic cartonnage cat head from Abydos

E11474: Ptolemaic cartonnage cat head from Abydos

Because who can resist a cute kitten? We sure can’t, which is why we figure that if this adorable kitty is in the window, even if our work doesn’t appear particularly exciting at the moment, there will be something interesting for everyone to see (and the cat head actually does need treatment and a new storage support, so he is up here for a real reason too!).

A Complete View and a Complete Treatment: Conservation of the Roman Period Mummy Mask

Update – this post contains outdated language. We no longer use the term “mummy” and instead use “mummified human individuals” to refer to Ancient Egyptian people whose bodies were preserved for the afterlife. To read more about this decision, follow this link.   

After using humidification and four extra hands, the mask is now unfolded! This complete view of the object provides us a wonderful opportunity to look at the materials used in construction and allowed treatment to finally move forward.

Before jumping into treatment, I had the opportunity to perform Multispectral Imaging (MSI) on the mask, allowing us to analyze some of the pigments non-destructively and with great results.

E2462. From left to right: Visible light, Ultraviolet illumination, Visible induced IR luminescence

E2462.
From left to right: Visible light, Ultraviolet illumination, Visible induced IR luminescence

Under ultraviolet illumination, a bright pink fluorescence was visible (middle), indicating the use of a madder lake pigment in the cheeks and to accentuate the face and hands. I also used visible induced IR luminescence to pinpoint the use of Egyptian Blue pigment in the crown, jewelry, and green leaves (right, Egyptian Blue highlighted in pink). This is a material commonly found in Roman period Egyptian artifacts.

In addition to finding out some of the materials used, I also completed full documentation of the object. Although some of the surface is still intact, the paint layer is in poor condition with areas of flaking and powdering. There is also a large loss to the textile along with some smaller tears and holes.

E2462 During treatment detail of flaking paint

E2462 During treatment detail of flaking paint

As my first order of business, the paint needed to be stabilized. This paint, like many other Egyptian painted surfaces, is sensitive to water and adhesives can cause staining and darkening. This meant a lot of testing was required to find the perfect adhesive for the job.

Using both testing panels and small, discrete areas of the surface, I tested adhesives until I found funori, a seaweed-based polysaccharide. This material preserved the matte and light tones of both the paint and ground layers.

Amaris Sturm, summer intern, consolidating surface of E2462

Amaris Sturm, summer intern, consolidating surface of E2462

As treatments usually go, you sometimes get unexpected bumps along the way. As I was consolidating I discovered that the flesh tones in the face and hands were significantly more sensitive to the water-based adhesive. I quickly had to rethink my approach, ultimately using a methyl cellulose in 50:50 ethanol: water for the hands, face, and larger flakes in the yellow framing the face.

Once consolidation was complete, I moved on to the next hurdle: the molded mud plaster mask. A large gap is present between the fragmented mud plaster crown and the textile below. To support the plaster and its mends, I made a removable fill of carved Volara foam and Japanese tissue, all toned with Golden acrylic paints to make the supports more discrete.

Removable fills to support the heavy mud plaster crown in E2462

Removable fills to support the heavy mud plaster crown in E2462

Fragmented, actively shifting, and detached mud plaster was mended with a 40% AYAT in acetone applied by brush and syringe. Unstable and weightbearing cracks and gaps were filled with a 25% AYAT in acetone that was bulked with microballoons and toned with dry pigments. Fill material was applied with syringed, shaped with a brush and wooden skewer, and  smoothed with a little bit of acetone. A thin toning layer of acrylic paint was applied to fills to make them a warmer tone, but still distinguishable from original material.

Filling compromised gaps on E2462

Filling compromised gaps on E2462

And with that, the treatment is complete! The mask is now stable and will be returned to storage safe and sound.

E2462 Before treatment (left) and After treatment (left)

E2462 Before treatment (left) and after treatment (right)

  • Amaris Sturm is a second-year graduate student in the Winterthur/ University of Delaware Program in Art Conservation. She recently completed her summer internship in the Penn Museum’s conservation labs.

New Mask in the Lab

Update – this post contains outdated language. We no longer use the term “mummy” and instead use “mummified human individuals” to refer to Ancient Egyptian people whose bodies were preserved for the afterlife. To read more about this decision, follow this link.   

Amaris Sturm is a second-year graduate student in the Winterthur/ University of Delaware Program in Art Conservation. She is currently completing a summer internship in the Penn Museum’s conservation labs.

I’m excited to introduce a new addition to the objects in the Artifact Lab! This Roman period Egyptian mummy mask and shroud, likely from 220 – 250 AD and excavated from Deir el-Bahri in the late 19th century, will be one of my primary treatment projects during my summer at the Penn Museum.

E2462- Overall before treatment

E2462- Overall before treatment

Meant to be placed over the upper body of a mummy, this mask is constructed of multiple pieces of coarsely woven linen sewn into a long shroud.  At the top of the shroud is a hollow, molded mud plaster mask in the form of a man’s face with a jeweled crown. The entire front surface has a white ground with colorful painted decoration. Additionally, gilding is present on fragments of the crown.

Sadly, the mask was folded at some point in its history, obscuring most of the linen shroud. Although there are no records of the complete decorated surface and little is known about the history of the mask in our collection, other similar examples from Deir el-Bahri give great insight into what may be hidden beneath the folds.

Comparable mask in the Louvre collection

Comparable mask from the Louvre collection

Comparable examples, including this mask from the Louvre, show the continuation of the man’s white tunic with a goblet in one hand and a plant stem in the other. A lower register is likely present containing Sokar, a falcon-headed god, on a boat and flanked by two jackals. One jackal is visible on an exposed corner of the Penn Museum’s mask.

E2462- Crown before treatment

E2462- Molded mud plaster crown before treatment

Apart from being folded, the mask has other condition issues that will be treated over the course of my summer internship. The textile support of the crown has sagged, causing the mud plaster to break and crumble. Additionally, the exposed painted surface is flaking and the linen fabric has started to tear and unravel.

I hope to start treatment in this coming week and unfold the shroud, allowing us to better understand the construction, decoration, and condition of this mummy mask. Check back to see what it revealed and for more on the mask’s treatment!

Sources:

Panel Portrait of a Man. Louvre Museum. Accessed June 25, 2016. http://www.louvre.fr/en/oeuvre-notices/panel-portrait-man

Riggs, C. 2000. Roman Period Mummy Masks from Deir el-Bahri. From The Journal of Egyptian Archaeology, 86. Egypt Exploration Society. 121-144.

Examination and treatment of a cartonnage pectoral

Update – this post contains outdated language. We no longer use the term “mummy” and instead use “mummified human individuals” to refer to Ancient Egyptian people whose bodies were preserved for the afterlife. To read more about this decision, follow this link.   

We have had this object in the collection since 1890:

E352, overall before treatment

E352, overall before treatment

This painted cartonnage pectoral (E352) was made as a covering for the chest of a mummy, and dates to the Ptolemaic Period (ca. 200 BCE). We don’t have the mummy or any other items from the person’s burial, so we don’t know anything about who this belongs to other than that they were buried with this beautiful piece (and likely an equally nice mask, and leg and foot coverings).

This artifact was previously on display in our Secrets and Science gallery and is now in the lab for conservation treatment. It was displayed vertically for over three decades, but since it has come into the lab, we have removed it from the old mount to allow for a full examination, documentation, and treatment.

Multispectral imaging allowed us to identify the Egyptian blue paint used for all of the blue decoration:

An overall image of the pectoral in visible light (left) and a visible-induced IR luminescence image, where the Egyptian blue pigment appears white

An overall image of the pectoral in visible light (left) and a visible-induced IR luminescence image, where the Egyptian blue pigment appears white (right), and everything else is black

We have written about the unique luminescence of Egyptian blue before on this blog, and in the image on the right, above, we can clearly see where it was used to decorate this pectoral.

Conservation treatment so far has included consolidation of the flaking paint with methyl cellulose, carried out under the binocular microscope.

A detail of the pectoral, 7.5X magnification

A detail of the pectoral as viewed through the microscope, 7.5X magnification

I have also been filling small losses with a mixture of Klucel G and glass microballoons, and backing weak areas with Japanese tissue paper.

Here is a link to a mini-slideshow that shows a small section of the cartonnage under 7.5X magnification (the same section seen in the image above). The slidehow shows how I filled a tiny hole with the Klucel mixture, which then allowed me to readhere a tiny fragment of red paint. The change is subtle – see if you can spot where I reattached the paint flake!