Monumental but gentle

by Anna O’Neill, Julia Commander, and Jessica Betz Abel

Hello from the Penn Museum Conservation Lab Annex (CLA)! Since Lynn’s introduction, we’ve had a little bit of time to settle into our new, off-site facility and get started on some seriously big projects. Our primary task here is working on architectural elements that were part of the palace of the Pharaoh Merenptah, who ruled Egypt from Memphis from 1213–1203 BCE. We have doorways, windows, and other objects from the palace which will be displayed in the new Ancient Egypt & Nubia Galleries to give visitors the experience of being in an ancient Egyptian building. But first, we have to put them together!

The warehouse section of CLA, with pallets of fragments from the Merenptah palace complex.

We have four doorways that will go into the galleries, all of which are very large and in many pieces. They are made of limestone and intricately carved, with traces of inlay and paint. Our first project is Doorway 1, which will be about 12 feet tall once it’s all together. It’s never been displayed before, but it was partially treated in the past. Some fragments are joined together with adhesive and metal pins, and we can tell that some of the decorated surfaces were coated with a consolidant. The fragments are also very dark and dirty from almost 100 years in storage.

Doorway 1 is in thirteen major pieces, which were all on different pallets when they were moved to CLA. With a little bit of effort and a lot of maneuvering with pallet jacks, we grouped the fragments together. It was very satisfying to figure out how all the pieces fit together and form a door!

Doorway 1 coming together on pallets in the lab section of CLA.

Since we’re using Doorway 1 as our pilot project to figure out how we’ll treat the rest of the palace objects, we’ve spent a lot of time testing different conservation approaches. Since the doorway is discolored with dirt and one or more old coatings, we’ve been experimenting with gel cleaning and found two methods that work well for what we need – hot agar and Nanorestore gels® Peggy. We’ve talked about using other kinds of gel before.

Agar is a product of red seaweed and contains a polysaccharide called agarose. When it’s dissolved in water and heated, agarose forms long molecular chains – that means that when it sets, agar becomes a rigid gel that can be peeled up as a sheet without leaving problematic residues behind. The long agarose chains create pockets that hold solvents on the surface of the object, allowing them to work on grime or coatings without soaking in too deeply. You can add different cleaning solutions to agar, but plain deionized water gave us the results we wanted. We dissolved agar in deionized water and heated it in the microwave to form the solution, then poured it directly onto the surface of the stone and allowed it to cool. Applying it as a liquid means that the gel conforms well to the irregularities in the object and lets us get into all the nooks and crannies.

Action shots showing the application of agar to the surface of Doorway 1.

The Peggy 6 gel is made of poly (vinyl acetate) and comes as a thin polymer sheet. It feels a little like the gummy hands you can stick on windows – stretchy and flexible but strong. Like agar, the Peggy gel can be used with different cleaning solutions but we stuck with deionized water. The gel is laid on the surface of the stone to let the water do its work on the grime. Because the Peggy is a stretchy sheet, it can skim right over delicate carvings that might contain pigment. Another advantage of the Peggy gel is that it’s reusable – we just rinse it out in deionized water and use it again.

The Peggy 6 gel in action.

To clean Doorway 1 we used a combination of the agar and Peggy gels. Both gels soften the dirt and coating, and often looks pretty grimy when they’re peeled up. Once the gel is removed, the stone is wiped with cotton and more deionized water to remove even more dirt. We were pretty pleased with the difference between the cleaned and dirty surfaces, and using the gels meant that the process was much more efficient and gentler on the stone than using swabs.

Other parts of the treatment include reversing old repairs (or deciding when to leave them be), assembling fragments, and figuring out how to display the doorway in the gallery. We’ll check back in later with more monumental updates!

El cartonaje finalmente se relaja

por Teresa Jiménez-Millas

Durante el pasado mes, he tenido el privilegio de poder trabajar en un cartonaje egipcio, y ¡no menos es la suerte que tengo de poder escribir este artículo en mi lengua materna! Me han consentido mucho en este equipo.

Poco o nada sabemos de la procedencia de la obra, fue una donación a la colección egipcia del museo por parte del Sr. Thomas A. Scott en el siglo XIX, y es un estupendo ejemplar para estudiar tanto la técnica del cartonaje como el tipo de intervenciones que se hacían en el pasado.

La nomenclatura es una derivación del francés “cartonnage”, término usado en egiptología para hacer referencia a la técnica en la que finas capas de yeso se aplicaban sobre un soporte que podía ser fibra (lino) o papiro, permitiendo la flexibilidad suficiente para moldear y obtener las formas deseadas de la silueta del difunto, algo parecido al papel maché para que os hagáis una idea. Sobre este aparejo de yeso se elaboraban la policromía y el dorado.

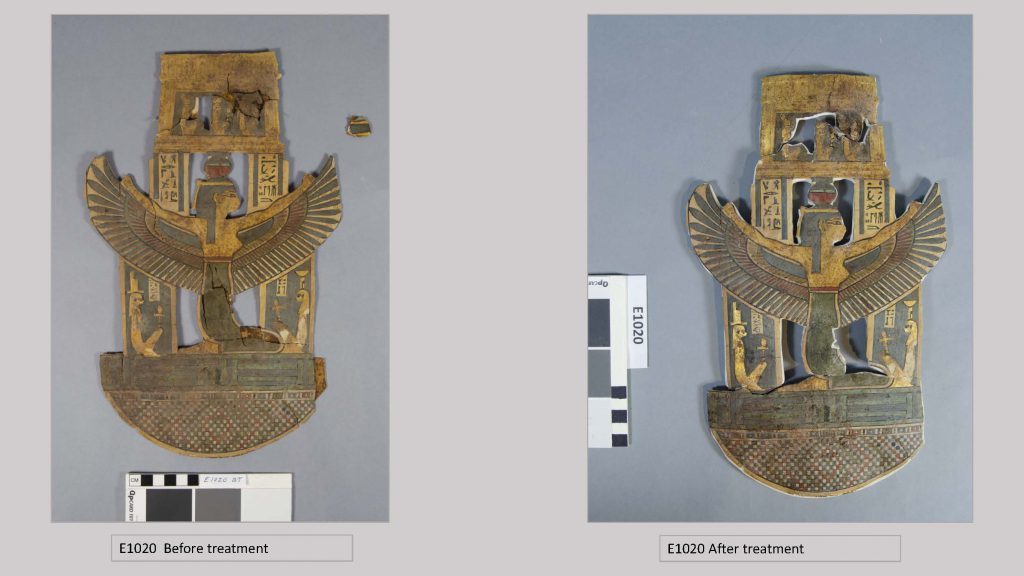
Esta pieza ocupaba la zona pectoral de la momia. La imagen representa una figura alada con el disco solar sobre la cabeza, posiblemente Nut, quien junto a su hermano Geb eran los padres de Isis, cuya historia es central en la resurrección de los extintos.

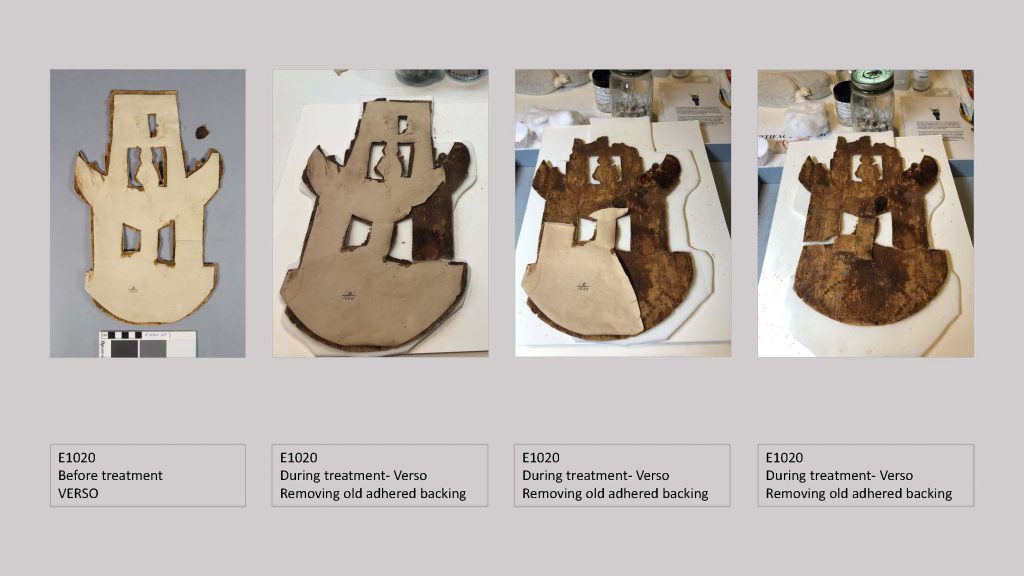
En cuanto al proceso de restauración de esta obra, lo primero que nos llamó la atención fue el soporte adherido al reverso, que no formaba parte del original, y por otra parte el gran número de fracturas y pérdidas que presentaba el anverso.

Por la tipología de esta obra sabemos que no era plana y que tenía cierta curvatura, pues su función era decorar y descansar en el pecho de la momia. En este caso, parece que la persona que intervino la pieza en el pasado no tuvo en cuenta esto y añadió un cartón con mucho adhesivo en el reverso, de manera que la pieza ¡quedó completamente aplanada!

En este tratamiento de conservación lo fundamental era eliminar ese soporte trasero para relajar la obra, pese a que esto supusiera que los fragmentos antes unidos quedaran sueltos y desprendidos. Este paso se hizo mecánicamente con la ayuda de un bisturí y bajo las lentes del microscopio.

Se quiso evitar cualquier contacto con un medio acuoso, pues ante una obra tan frágil cualquier fluctuación de humedad podría afectar negativamente al soporte, a las capas pictóricas y al dorado.

Con el paso de los días se pudo observar cómo cada fragmento iba recuperando su forma primigenia, recobrando cierta curvatura y relajándose. Esto determinó el resto del proceso, pues se decidió no forzar la unión de las diferentes áreas. Cada una presentaba en este momento un diferente perfil y tratar de reunirlas provocaría mucha tensión innecesaria.

Se consolidaron y protegieron todas las zonas por el reverso y se estudió la mejor manera de realizar un soporte para cada una de ellas que permitiese también su futuro montaje y exposición.

Tras muchas pruebas, preguntas y mucha paciencia de mis colegas, se decidió que lo mejor sería hacer tres soportes para las tres áreas con resina epoxídica de madera; de esta manera cada uno soportaría un fragmento, un planteamiento respetuoso para la obra que nos hace entender que el paso del tiempo y las intervenciones del pasado dejan su huella.

Photos showing various trials for constructing a support for the fragile cartonnage pieces. The support in the third image (far right, made of wood epoxy) was the winner.

Tengo que agradecer a Jane Williams, jefa de conservación y restauración del “Fine Arts Museum of San Francisco” por sus consejos y su ayuda inestimable para el tratamiento de esta obra que tanto respeto me causaba.

Con mucha gratitud por haber tenido la suerte de trabajar con tan generosas personas y haber aprendido tanto en este fantástico proyecto, ¡espero algún día poder ver este cartonaje expuesto en el museo!

Este proyecto ha sido posible en parte por el Instituto de Servicios de Museos y Bibliotecas.

Should one strike when the solder is hot?

By Tatiana Perez

I am an undergraduate Classical and Near Eastern Archaeology student at Bryn Mawr College and this past summer, I began as a conservation intern within the Penn Museum’s Museum Practice Program. I am continuing this work through an independent study in the Museum’s Conservation Department this Fall. During my time here, I have treated a group of Egyptian faience shabtis.

Egyptian faience shabti prior to treatment.

Shabtis are statuettes that were made to be placed within ancient Egyptian burials for the purpose of assisting the deceased in the afterlife. The shabtis I worked on are made of Egyptian faience, a material made from silica, alkaline salts such as plant ash or natron, lime, and metallic colorants. The faience could be hand-shaped or pressed into molds, that when fired, would self-glaze. Although faience was made in many different colors, it is most often associated with a bright blue/turquoise color (using a copper colorant) as seen in many amulets, beads, and figurines.

The specific group of shabtis I worked with this summer differed in size, shape, and color. Many were previously repaired and some of these old repairs were failing. Unfortunately, these objects had become disassociated from their accession numbers and records, so there is no information on their provenance or previous conservation treatments. I was tasked with documenting their condition, and treating those that were broken or in need of re-treatment, either to remove failing old adhesives or remending those that were previously mended but now broken. As adhesives age, especially those used in the early 20th century, they can become discolored, may shrink or expand, or may become stronger. All of these conditions pose problems to the objects that can affect their future stability and ‘health’.

Since no record of the treatments existed, I used various methods to determine what worked best to remove the adhesives that were used. First, I used UV light to identify the type of adhesives. After observing that it was possibly shellac or animal glue, I spot-tested the adhesives using a variety of solvents. I found that acetone, ethanol, and deionized water worked best, so I left the shabtis in acetone vapor chambers for a few hours to allow the adhesive to dissolve.

After the old joins were taken down, one particular shabti caught my eye immediately. This lighter green-blue shabti had metal adhering one of the joins, with some adhesive underneath as well. After consulting with various conservators about this unexpected find and with help from the handheld pXRF instrument, we found that it was lead solder that was used to join these pieces. This is a very unusual (and outdated) technique for mending pottery and as head conservator Lynn Grant said, it’s likely whoever treated it last “struck when the solder was hot”.  In other words, the person who last treated this object might have used the solder because it was nearby and ready to use. This conservation method was not the best way to mend the shabti and doesn’t reflect current methods we use. The body, or core, of faience objects is very porous and absorbs whatever adhesive is applied. When the solder was applied it seeped into the body of the body of the object, and made it very difficult to remove.

Lead solder between first and second fragment (top). 60X magnification of the lead solder (bottom).

Though this conservation treatment doesn’t affect our understanding of the shabti, it got me thinking about how conservation ethics and practices have changed over time. As stewards of cultural heritage, conservators have the important job of fixing objects in a way that is reversible and that doesn’t compromise the object’s cultural integrity or future use. Conservators do their best to maintain the integrity of objects, for both research purposes and to preserve a piece of the culture these objects came from for future study and display. This means that conservators must also apply these ethics to objects that were treated before these standards were enforced, and take caution to prevent any further loss of information no matter how small.

With the shabti group I worked on, I used a technique that is commonly used to repair porous or low-fired ceramics. Before using an adhesive to repair the fragments, I applied a low concentration adhesive solution on the break edges to create a less porous surface and to prevent the adhesive from seeping into the body of the faience. I then used a higher concentration adhesive to put the pieces together. This specific treatment is reversible and will ideally last a century or more!

Mending artifacts can be a slow process in which a conservator attaches one piece a day. While working on this small group of shabtis for many weeks, I’ve grown very attached to them. They are all unique pieces with their own quirks, and I can’t wait to see them back together and ready for future use.

Shabti group after treatment (left). Shabti after treatment (right).