Eyes are the Window to the Soul, Or So They Say

By Tessa de Alarcon

Typically, at the Penn Museum when we are working on objects, even for display, we prioritize stability over aesthetics. This means that we are often do less cosmetic work than would be done at an art museum when it comes to putting in fills and toning out areas of loss. However, I recently undertook a project where I went further than I usually do to recreate lost material. This blog post is going to walk through why that decision was made in this case as well as some of the mysteries that I found along the way

E1019 Before treatment. At this point the object was being tracked as E17632

The object in this case is an Egyptian cartonnage mask E1019. When it entered the lab it had a lot of condition issues, including the top of the head was partially crushed, it had been heavily treated before, and it was missing the inlays for its eyes and eyebrows. The missing eye inlays had been giving many visitors to the lab the creeps as the mask appeared to have dark empty eye sockets. Because of this, from the start I had been polling to my colleagues about what level of repair I should do to reduce the distraction of the missing inlays. I was not at this point considering replacing them, but was instead thinking about maybe toning out some of the other losses on the cheek to draw less attention to the eyes.

E1019 before treatment, a detail of the face and eyes.

When it first entered the lab the mask was being tracked as E17632 but over the course of the treatment, I found a different accession number on the interior, E1019. With the help of our curators, we were able to piece together that E1019 was the original accession number, and E17632 had been assigned to it later. When I looked up the record for E1019 in the museum collection database, I found the record included two eye inlays! I was so hopeful that this would mean that I could reintegrate two inlays, one into each eye. However, when I reached out to the curators to get more information, I found out that they are two parts of the same eye, the white part of the eye and a pupil/iris.

Eye inlays E1019.1, and E1019.2 before treatment

Well, this left a new set of problems. Especially since you can see here, the white part of the eye was not very white anymore since it was covered with a dark brown substance. I was left with a lot of options, leave the eye inlays out, reintegrate them as they are, or clean them and reintegrate them, and if I reintegrated them should I then also create a replica set for the other eye?

Before making any decisions, I checked to see if they inlays fit the eye sockets in the mask, which they did. The inlays turned out to be for the masks right eye. After that, I spent some time characterizing the dark coating on the white part of the eye inlay. This included UV examination and comparing how the coating fluoresced with the brown modern materials I found on the interior of the mask from previous treatments. The results were not as clear cut as I was hoping. It seems that there is more than one brown substance on the inlay based on the UV examination. With this data in hand, I reached out again to the curators with the options of leaving the eyes out, reintegrating them as is, or cleaning and reintegrating. The curators indicated that they wanted the inlay reintegrated, and that they would like a replica for the missing inlay as well so that she looked even as one eye seemed worse than no eyes. Together we decided to clean the eye inlay, but to keep samples of the substances on the inlay for future analysis.

E1019.1 white part of the eye inlay in visible light (top) and under 368nm UV radiation (bottom). The rectangular material is a piece of acidic board with brown residues on it that had been used on the interior of the mask as part of a modern restoration. The fluorescence on the front of the eye inlay under UV is similar though not as bright as the modern brown residues but the back of the eye the brown residues do not fluoresce.

Once clean, I set about making a copy for the masks left eye to be a close but not identical match. Based on previous experience I decided to make the new inlay set out of a two-part light weight epoxy called Wood Epox as it is easy to shape and can be sanded and carved. To start, I made a paper template of the shape of each inlay. I made sure to mark what I wanted to be the front of each so that the shape would be a mirror image of the original inlay. The white inlay is slightly curved, so I also created a form that would have the same curvature using foam.

The inlay, E1019.1 after cleaning (left), the paper template of the inlays (center) and the foam support mimicking the curvature of the inlay with the inlay in place during a test fit (right).

Next, I rolled out some sheets of wood epox, and using the paper template trimmed out the shape I needed for both parts of the eye. The pupil/iris part I let set flat, what let the one fore the white of the eye set in the form I had made so that it would have the same curvature as the original. Once cured I sanded them to finish, with the final stages being wet sanding so that the replica inlays would also have a natural gloss.

The inlays replicas curing with the white part in the curved support (left) and the original inlays (E1019.1, and E1019.2) laid out above the shaped and sanded replicas (right)

The final step before assembly and placement in the mask was the paint them to resemble but not exactly match the originals. I used gloss medium for the pupil/iris as this inlay was especially glossy and I could not get that level of gloss with polishing and painting alone.
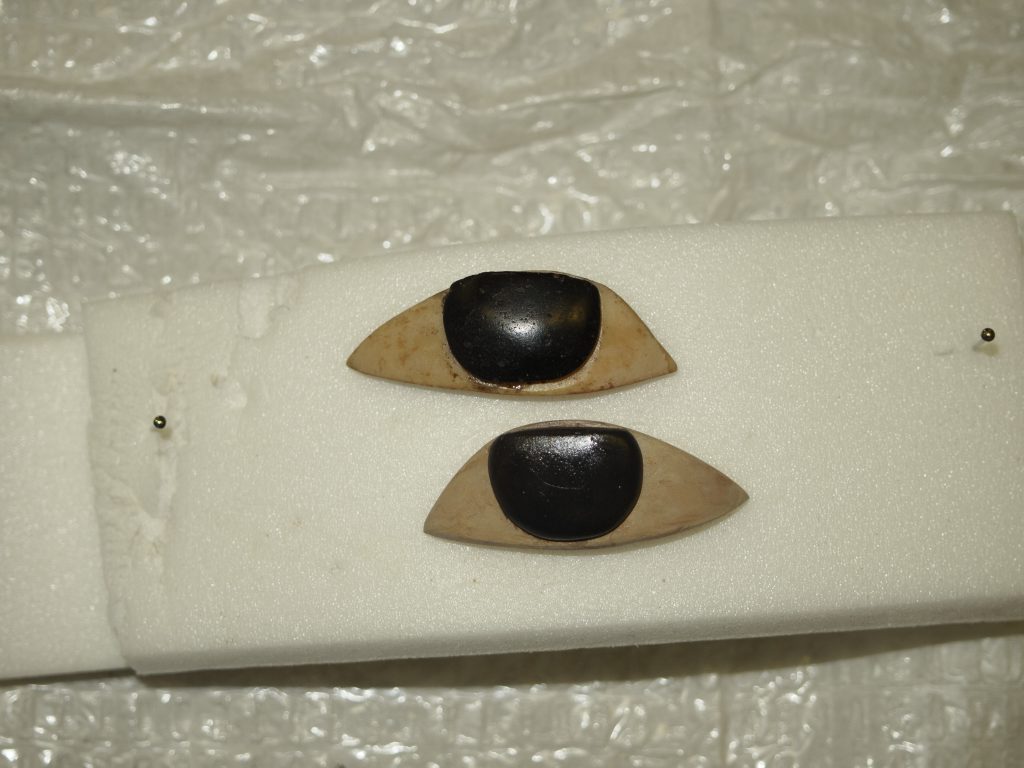
The original inlays (E1019.1 and E1019.2) laid out above the replicas after the replicas have been toned to be similar thought not identical to the originals

Finally, here you can see the end results after treatment. You will see though, that I have not attempted to recreate the inlays for the eyebrows. Because we had the one set of eye inlays, I had something to reference for making the replica set of inlays, however, there are still pieces missing which I had no frame of reference for. There were also likely inlays that went around the outside of the eye as well. These and the brows might have been made out of a variety of materials and without the originals for reference, there is no way to be certain about what their color and appearance would have been.

E1019 after treatment. The original inlays are in the masks right eye and the replicas are in the masks left eye.

A Puzzle without all the Pieces: Treating Papyri

By Jessica Byler

The condition survey of our papyri collection is complete – I counted almost 4,300 fragments of papyrus and vellum, more than we realized were there! The papyrus ranged in size from a few millimeters to 9 feet long. Now, I have moved on to treating a few of the papyri that will be on display in the new Egyptian galleries.

Many of the papyri are sandwiched between pieces of Mylar. Static from Mylar can lift off friable ink or even split the two layers of the papyrus fibers and damage the papyrus. In order to safely remove the papyrus, I use a MinION 2 Ionizing Blower to eliminate the static charge. After removing the papyrus from the Mylar, I can then remove old repairs, realign fragments and fibers that are out of place, and apply new tissue paper bridges. Using a light box can help me identify joins and keep fragments in alignment. Papyrus fibers have different thicknesses, widths, and orientations, so transmitted light from a light box reveals the unique fiber pattern.

Left: Removing papyrus (49-11-1) from a Mylar enclosure using an ionizing blower
Right: Using a light box to realign fragments

Let’s look at one papyrus I am currently treating: a Temple robbery papyrus (49-11-1), dated to the 20th Dynasty or 11th century BCE. Along with removing old materials that might harm or obscure the papyrus, a key reason I am treating this particular document is to make sure the joins are right. It is fragmentary and there have been several treatment campaigns to repair it using a variety of materials, including Scotch tape, Japanese tissue, and Document Repair Tape.

Temple robbery papyrus (49-11-1), before treatment

I removed the old repairs where possible and reassessed the location of the fragments. At some point, several of the fragments have become misaligned or detached. In several instances, the fragments were just slightly out of line and could easily be nudged back into place. However, I quickly noticed some issues with a long fragment on the far left (on the right in the photo of the back below), and a small rectangular fragment at the bottom.

Left: detail of the back of the right section before treatment
Right: Section under transmitted light from a light box, with red arrows pointing to the two fragments in the wrong spot

On the long fragment, there are ink marks either side of the join which do not meet up. If the fragment was in the correct location, you would expect the writing to extend over the break. On the smaller fragment, the color, curvature, and thickness were different than the surrounding fragments. Using transmitted light, it is clear the fibers of these fragments do not actually line up correctly. Although at first glance they might not look out of place, they clearly do not belong there.

Left: Detail of front, with red arrows pointing to ink which does not meet up
Right: Detail under transmitted light, with red arrows showing that the fibers do not line up

The long fragment has two lines of writing at the top, so the number of locations it could join was limited. The small fragment at the bottom did not have any writing on it, so it was harder to determine its orientation and position. To add to this complicated puzzle, these pieces also might not join to any of the extant fragments.

Left: Detail of back during treatment, with the two fragments, indicated with red arrows, properly aligned
Right: Detail of back during treatment, with red arrows pointing the two fragments, and blue arrows pointing to some of the new bridges; areas of white residue from the old materials is also visible

Thankfully, their proper locations were easy to find using a light box. As you can see in the detail photos above, the fibers of the papyrus were a perfect match. The tissue paper bridges I used were around the size of a grain of rice and are clearly visible but blend in nicely with the papyrus. The Temple robbery papyrus is now ready for display!

Temple robbery papyrus (49-11-1), after treatment

This project is funded by the Antiquities Endowment Fund (AEF).  The AEF is supported by an endowment established with funds from the United Stated Agency for International Development (USAID).

Conservation Confidential: Sphinx Gallery tales

Join Schwartz Project Conservator, Molly Gleeson, as she brings you up to date on what’s been happening in our Lower Egyptian Gallery for the last two years. Lots! Almost all of it pretty monumental. Molly will be available to answer questions via the Penn Museum Facebook page between 1 and 2 pm EDT on Friday, November 6.

Papyri Project

By Jessica Byler

This fall, I started a survey of our Egyptian papyrus collection thanks to an ARCE (American Research Center in Egypt) grant. The goals of the survey include preparing and rehousing the collection to be moved to a new storeroom, identifying unstable papyri that need to be treated, and getting some of the papyri ready for exhibit. The Penn Museum is in the process of redesigning the Ancient Egyptian and Nubian Galleries, and the curators have identified around 70 papyri they would like to include. Part of my job is treating and rehousing these papyri and making recommendations on their display.

E16423, a private letter in Arabic

What is Papyrus?

The papyri in our collection are mostly manuscripts. A sheet of papyrus is made of two cross-laminated layers of thin fiber strips made from the stems of the papyrus plant (cyperus papyrus). One layer of fibers is laid vertically, and the other is laid on top horizontally, creating a sheet with a grid pattern. Individual sheets were then overlapped and joined to create rolls. These rolls could be used as a single, long sheet or could be cut down as needed. The side with the horizontal fibers is called the recto (think “right side”), and the side with the vertical fibers is called the verso (think “reverse”). Scribes often wrote on the recto along the horizontal fibers, though some scribes wrote against the fibers or on both sides of the sheet.

A piece of modern papyrus through transmitted light
E2751, some vertical fibers are missing, revealing the horizontal fibers from the other side

Looking for a join helps identify the recto. Most joins are horizontal fibers to horizontal fibers, though some are horizontal to vertical. Look along the horizontal fibers and see if they continue across the sheet. If they do not line up or if there is a clear overlap, that’s likely a join.

E16323, horizontal to horizontal join. The red lines indicate the direction of the fibers and join.
E16411B, vertical to horizontal join. The red lines indicate the direction of the fibers and join.

Scribes used brushes or reed pens to write on the papyrus sheets. Inks were made from mixing ground up pigments into a binder. The most common ink was carbon black or soot bound with gum to make black ink. Scribes also sometimes used red ink made from red ochre, iron gall, and sepia, among other pigments. Some papyri are thickly painted with gypsum, metal oxides, and earth pigments.

E3068, a painted papyrus manuscript
83-1-1I, a manuscript with both carbon black and red ink

Penn Papyrus Survey

The Penn Museum has around 1200-1800 papyri featuring a wide range of personal, legal, administrative, literary, and religious texts in six languages: Arabic, Greek, Coptic, Hebrew, Demotic, and Hieratic. The collection spans around 4000 years, from the Old Kingdom to Islamic Egypt. These include Books of the Dead, Homer’s Iliad, and the Gospel of St. Matthew. There are also groups of small fragments which have not been reconstructed or studied. The Penn Museum’s collection of papyri has never been the subject of a concerted conservation campaign – until now.

Most of the collection is currently encapsulated in Mylar and stored flat in manila folders or sandwiched between two glass plates. I am surveying the collection at the object-level, one by one. I examine, measure, and record each piece, noting the structure of the papyrus, how it is housed, old mends or treatments, condition issues, and if it needs to be rehoused or conserved. I follow the examination and documentation with photography. Images are available on our Digital Collections webpage.  Hopefully with the new photos and documentation, this collection will be more accessible to papyrologists and scholars around the world.

Photographing papyrus using a copy stand

More Information

Eventually, the information on the Penn Museum papyri collection documented in this survey will be included in the Advanced Papyrological Information System (APIS) database, where only a small fraction of our collection is represented today. There are a number of great resources if you would like to know more about the structure and conservation of papyrus. The University of Michigan, which holds the largest collection of papyri in North America, is active in papyrological research and education. The Brooklyn Museum and NYU have both recently done similar projects and have great blogs about their collections as well.

This project is funded by the  Antiquities Endowment Fund (AEF).  The AEF is supported by an  endowment  established  with  funds  from  the  United  Stated  Agency  for  International Development (USAID).

Shades of the Past

By Julia Commander, Jessica Betz Abel, and Anna O’Neill

We’ve shared a few insights into the monumental limestone we’ve been treating at our Conservation Lab Annex (CLA). You may have noticed a consistent color scheme: tan. The surfaces of the doorways are intricately carved and decorated with faience inlay, although we mainly see a variety of neutral tones.

Doorway 1 in the lab

To get a sense of how these architectural elements would have looked when they were made in Memphis, Egypt around 1213–1203 BCE, it helps to understand the materials and their state of deterioration. Luckily, the Penn Museum Archives has extensive records from the 1920’s Memphis excavations, which provides some further clues about these objects.

Searching through archival materials, we found detailed notes about each object as it was excavated, as well as extensive watercolor illustrations. We can see brilliant colors in the drawings and notes referencing traces of paint and inlay material.

Archival illustrations of Merenptah columns

We even see that the doorways are illustrated with brilliant blue and teal colors.

Archival illustrations of Merenptah palace doorways

Some of the illustrations appear to extrapolate data from small traces of material. Do these colorful illustrations line up with what we’re seeing now in the material itself?

To explore a little further, we brought the Crimescope out to CLA to investigate using multispectral imaging. This technique has been discussed on the blog before, and we were particularly interested in infrared (IR) imaging of the faience inlay. While there are different types of faience material, some types related to Egyptian blue pigment produce the same luminescent response induced by visible light.

Searching for IR luminescence pointed us to a tiny area of inlay in the upper corner lintel fragment. The tip of one stripe glowed brightly, which corresponds to a pale green color that’s visible in normal lighting.

Visible light (VIS)
Visible-induced infrared luminescence (VIL)
Detail with VIS/VIL overlay

This result suggests that we’re seeing a deteriorated state of formerly bright blue/green/teal faience. While we did not see every trace of the degraded inlay light up in infrared imaging, this small hint corroborates what we’re seeing in the archival illustrations.

We plan to continue using multispectral imaging to explore decorated surfaces when we’re back at CLA. Stay tuned!

Beloved Objects

be Tessa de Alarcon

Like most other Philadelphia residents, the Penn Museum staff are adapting to working from home. As part of this, the Museum staff have recently been posting on the museum’s Instagram feed info on their favorite objects (pennmuseum #VisitFromHome). This got me thinking about the relationship between people and the things we interact with every day. The objects in the museum’s collection, while loved and cared for by the staff, also bear evidence of love and care from before they were in the museum’s collection. One such object recently came across my desk for treatment, E7517A and E7517B, a Nubian wooden box and lid from Karanog. I am not going to talk about the treatment today, so that I can focus on the care it received before it entered the museum.

E7517A and E7517B after treatment.

In the pictures above and the details below you can see that this wooden box has a variety of metal components, including copper alloy straps and a lock plate on the box, and staples on the lid as part of a repair to cracks and breaks through the wood.

The detail of E7517A, the box, on the left shows the lock plate and one of the metal straps, and the detail on the right of E7517B shows the staples on the lid.

Staples like these are a common repair both in antiquity and historically for a variety of materials and are not an unusual feature on objects in the museum’s collections (here are just a few other examples of both types of staples: AF5211, B9220, 2006-15-41, B20014). If you look closely though, you can see that the metal straps and the lock plate go over the inlays on the box. This suggests that these elements were not part of the box originally and were a later addition.

These components are also made from a variety of metals. I tested them using both a magnet to check for iron, and a portable X-ray fluorescence spectrometer (pXRF) and found that they are a range of metals including iron, copper tin alloys (bronze), and copper zinc alloys (brass). Also, parts that appear similar, like the straps are not made up of the same alloying components, some contain lead in addition to the copper and tin, and some have no lead. The staples are also a range of metals including iron, brass, and bronze.

When I started working on the box, I wanted to tease out when these metal components were added as they could have been either ancient or modern. With this type of question, I typically set up an appointment with our archives to look at the original field notes and field photography. However, in this case, much of the data on the excavations at Karanog is online, including pdf’s of the excavation publications. In the museum’s database I found that the box was from a burial: tomb G 445. Going through the publication, I was able to use the context information to find not only a description of where it was found within the tomb, but also a sketch of the burial, a photo of the box, and a detailed description of it in a catalogue of the finds. The box had been found in the burial with two individuals buried one above the other and was found next to their legs.

Drawing of tomb G 445 from Woolley, Leonard, and David Randall-MacIver. Karanòg: The Romano-Nubian Cemetery. Vol. 3. University museum, 1910: 44. The blue highlighting is an addition to point out the location of E7517A and E7517B in the burial.
Plate 22 from Woolley, Leonard, and David Randall-MacIver. Karanòg: The Romano-Nubian Cemetery. Vol. 3. University museum, 1910.

The textual information from the publication includes some important pieces of information: first that, “it had been considerably restored before being deposited in the tomb, brass binding had been added at the corners and the broken lid had been rudely mended with bronze rivets” (Woolley and Randall-MacIver, 44) and that “it remains in the condition in which it was found, no repairs to it having been necessary” (Woolley and Randall-MacIver, 71).  While the language used to describe these metal components seems to me a bit harsh, not only is it described as “rudely mended”, the lock plate is described as “a perfectly useless lock plate”, it does make it clear that these metal components are from when it was in use (Woolley and Randall-MacIver, 44, 71). It should also be noted that the metal identifications given in the publication were not done through analysis, so don’t match with the results I have from pXRF.

Because of the detailed information in the publication, I also know what was in the box when it was excavated: another smaller box (E7510A and E7510B) and two wooden spindle whorls (E7506 and E7507).  These are all shown in the image below.

Objects found inside E7517A: a box and its lid (E7510A and E7510B) and two spindle whorls (E7506 and E7507)

So, all together what does this information tell me about the history of this box? First, the repairs and modifications to this box happened during its use before it was put in the burial of the two individuals in tomb G 445. The fact that the metal components, even similar ones, have different compositions could mean a few things. It could be that it was repaired and modified using scrap metal with the components being made from different scraps, that the repairs occurred at different times and so with different metals, or both. If they were not made using scrap metal, it is possible that some of the straps may have had to be replaced at some point and that may be why some are leaded bronze and some are not. These straps do not appear to have a function and may instead reflect changes in taste. The function of the box may have also changed, and this may be why they needed to add the lock plate. The various metals for the repairs to the lid almost certainly resulted from various treatment campaigns, meaning that it was repaired, used, broken, and repaired again. In any case these modifications and repairs tell a story of care and use and suggest that this box was loved and treasured by the people who owned it. This may also be why it eventually was placed in a burial, perhaps as a particularly prized possession of one or both of the individuals in the burial.

This project was made possible in part by the Institute of Museum and Library Services.

Lessons Learned: You Cannot Treat Dry Wood Like Wet Wood

by Tessa de Alarcon

Documentation of conservation treatments undertaken in the lab is a very important part of what we in the conservation department do at the museum. One of the main reasons we document our treatments is so that conservators in the future don’t have to try to figure out what was done to an object. Instead those future conservators can read our reports and start off knowing the treatment history.  

An array of treatment reports, and log book entries, from the conservation department at the Penn Museum

We are also sometimes those future conservators, looking back at previous treatments. This means that not only can we see an object’s treatment history, we have the opportunity to evaluate and learn from the decisions made by conservators decades ago. Some of these treatments were successful, and some were not. Now we know to avoid those treatments that clearly did not work.

I recently completed a treatment on an object that is a good example of this process. E11151 is a carved wooden figure from Nubia. It was treated before I worked on it by a conservator in the 1970’s. The photo below is how the object looked when it entered the lab at the end of last year.

Before treatment image of E11151 taken in 2019

In the case of this object, it was noted in the 1970’s as having a slightly powdery surface. The conservator conducting the treatment decided to apply a consolidation method that is frequently used on waterlogged wood: immersion in a solution of PEG (polyethylene glycol). PEG treatments are still done today and are very effective at consolidating and stabilizing waterlogged wood before it dries out. But because of this treatment and others done at the museum around this same time period, we have learned that consolidation with PEG is not effective on dry wood, even if it once was waterlogged. E11151 was dry wood and did not come from a waterlogged context.

E11205, E11187, E11203, E11151
E11151 is on the far right.
This publication photo was taken before the object was treated in the 1970’s.

The photo above is a publication photo of the object before it was treated in the 1970’s. While there is no photography with the 1970’s treatment report, there is a sketch which suggests that the object looked similar to this photo when it entered the lab at that time. As you can see there are quite a few differences in the object’s appearance as it entered the lab in 2019 and how it looked before it was treated in the 1970’s.

Before treatment photo of E11151. The red arrow is pointing to an area of thick, white, and hard high molecular weight PEG and the blue arrow is pointing to soft and sticky low molecular weight PEG

Two different molecular weights of PEG were used on this object, a hard high molecular weight one that was used to consolidate the powdery wood and looked white on the surface where it was very thick, and a low molecular weight one that was used to join pieces of the object together and left the surface tacky and sticky. The sticky PEG also trapped a lot of dirt and dust on the surface of the object.

After treatment detail of the top of E11151

The detail above shows the top of the head of the object. The report from the 1970’s states that during treatment the object began to crack and fragment. PEG is typically dissolved in water or ethanol. Both solvents were used in the PEG treatment of this object. These two solvents can be mixed together and during a normal PEG treatment the wet wood starts with PEG in water and then moves to PEG in ethanol: this helps start the drying process. As the waterlogged wood is also already wet, the PEG can penetrate fully into the swollen wood. However, in the case of dry wood, these solvents (ethanol typically has some water in it) introduce moisture into the object, and it starts to swell as wood is very responsive to moisture. It then has to dry out again after the treatment, causing the wood to shrink. This is stressful for the object. This stress is what likely caused the cracking documented in the report and visible in the image above.

E11151, after treatment photo from the treatment completed in 2020

Here you can see what the object looks like now that I have finished my treatment. Consolidation is a very permanent and tricky to reverse treatment, even when adhesives that remain soluble, like PEG, are used. There is currently no way to remove the PEG from this object. All I have done is reduce the PEG on the surface by cleaning it with ethanol. I also used the previous documentation to figure out where small detached fragments went so that it looks more like it did originally. While the treatment that was undertaken in the 1970’s seems to be over-treatment as it caused new problems, some more severe than the problems the object had to begin with, I do also want to recognize that it is because of past experiments like this one that I know not to use PEG on dry wood.

Because wholesale consolidation is a fairly permanent and risky treatment, I think long and hard when I choose a consolidant. I also remain aware that there is a chance that someday, some future conservator, will deem some of my treatments mistakes as well. Hopefully my mistakes will be ones that they can learn from too.

To learn more about PEG treatments for waterlogged organic materials, check out these links:

Ellen Carrlee Conservation blog: High Molecular Weight PEG for basketry

Queen Anne’s Revenge blog: Waterlogged wood – Gotta bulk it up!

Cardiff University Conservation: Newport Ship Workshop

This project was made possible in part by the Institute of Museum and Library Services.