A Columnar Matter Part II: The Conservation Treatment of a 3rd Millennium BCE Mosaic Column from Al ‘Ubaid

By Marci Jefcoat Burton

As a follow up to my previous blog post, conservation treatment of the second of four sections comprising a mosaic column from Tell al-Ubaid, Iraq is well on its way! For a quick recap, the column is dated to 2400 – 2250 BCE (Figure 1). After centuries of burial, the triangular and diamond shaped shell, pink limestone, and shale tesserae (also referred to as tiles), were excavated in 1919 – 1924. The original wooden column interior did not survive the centuries of burial, so after excavation, the tesserae were mounted with plaster to four hollow cylindrical supports of metal mesh covered with burlap. After nearly 100 years, shifts in the internal support have caused structural instability to each section.

Figure 1: (left) Before treatment image of the four column sections stacked together to make a complete column. Image courtesy of The Metropolitan Museum of Art. (2003). Art of the First Cities: The Third Millennium B.C. from the Mediterranean to the Indus. The Metropolitan Museum of Art: New York) (right) Column section 2 detail, before treatment.

First step of treatment: Remove tesserae from the current support.

The plaster was softened with distilled water applied by brush, then carved away to expose the sides of the each tessera. The tesserae could then be separated from the plaster and burlap backing one by one (Figure 2). Like the first slice of pie, the first piece was the most difficult to remove. Once extracted, access to adjacent tesserae became easier.

Figure 2: (left) Removing plaster surrounding the tesserae with a scalpel blade. Plaster was first softened with distilled water. (middle) Carefully extracting a shell tessera from the plaster. (right) Shell tessera after removal from column section.

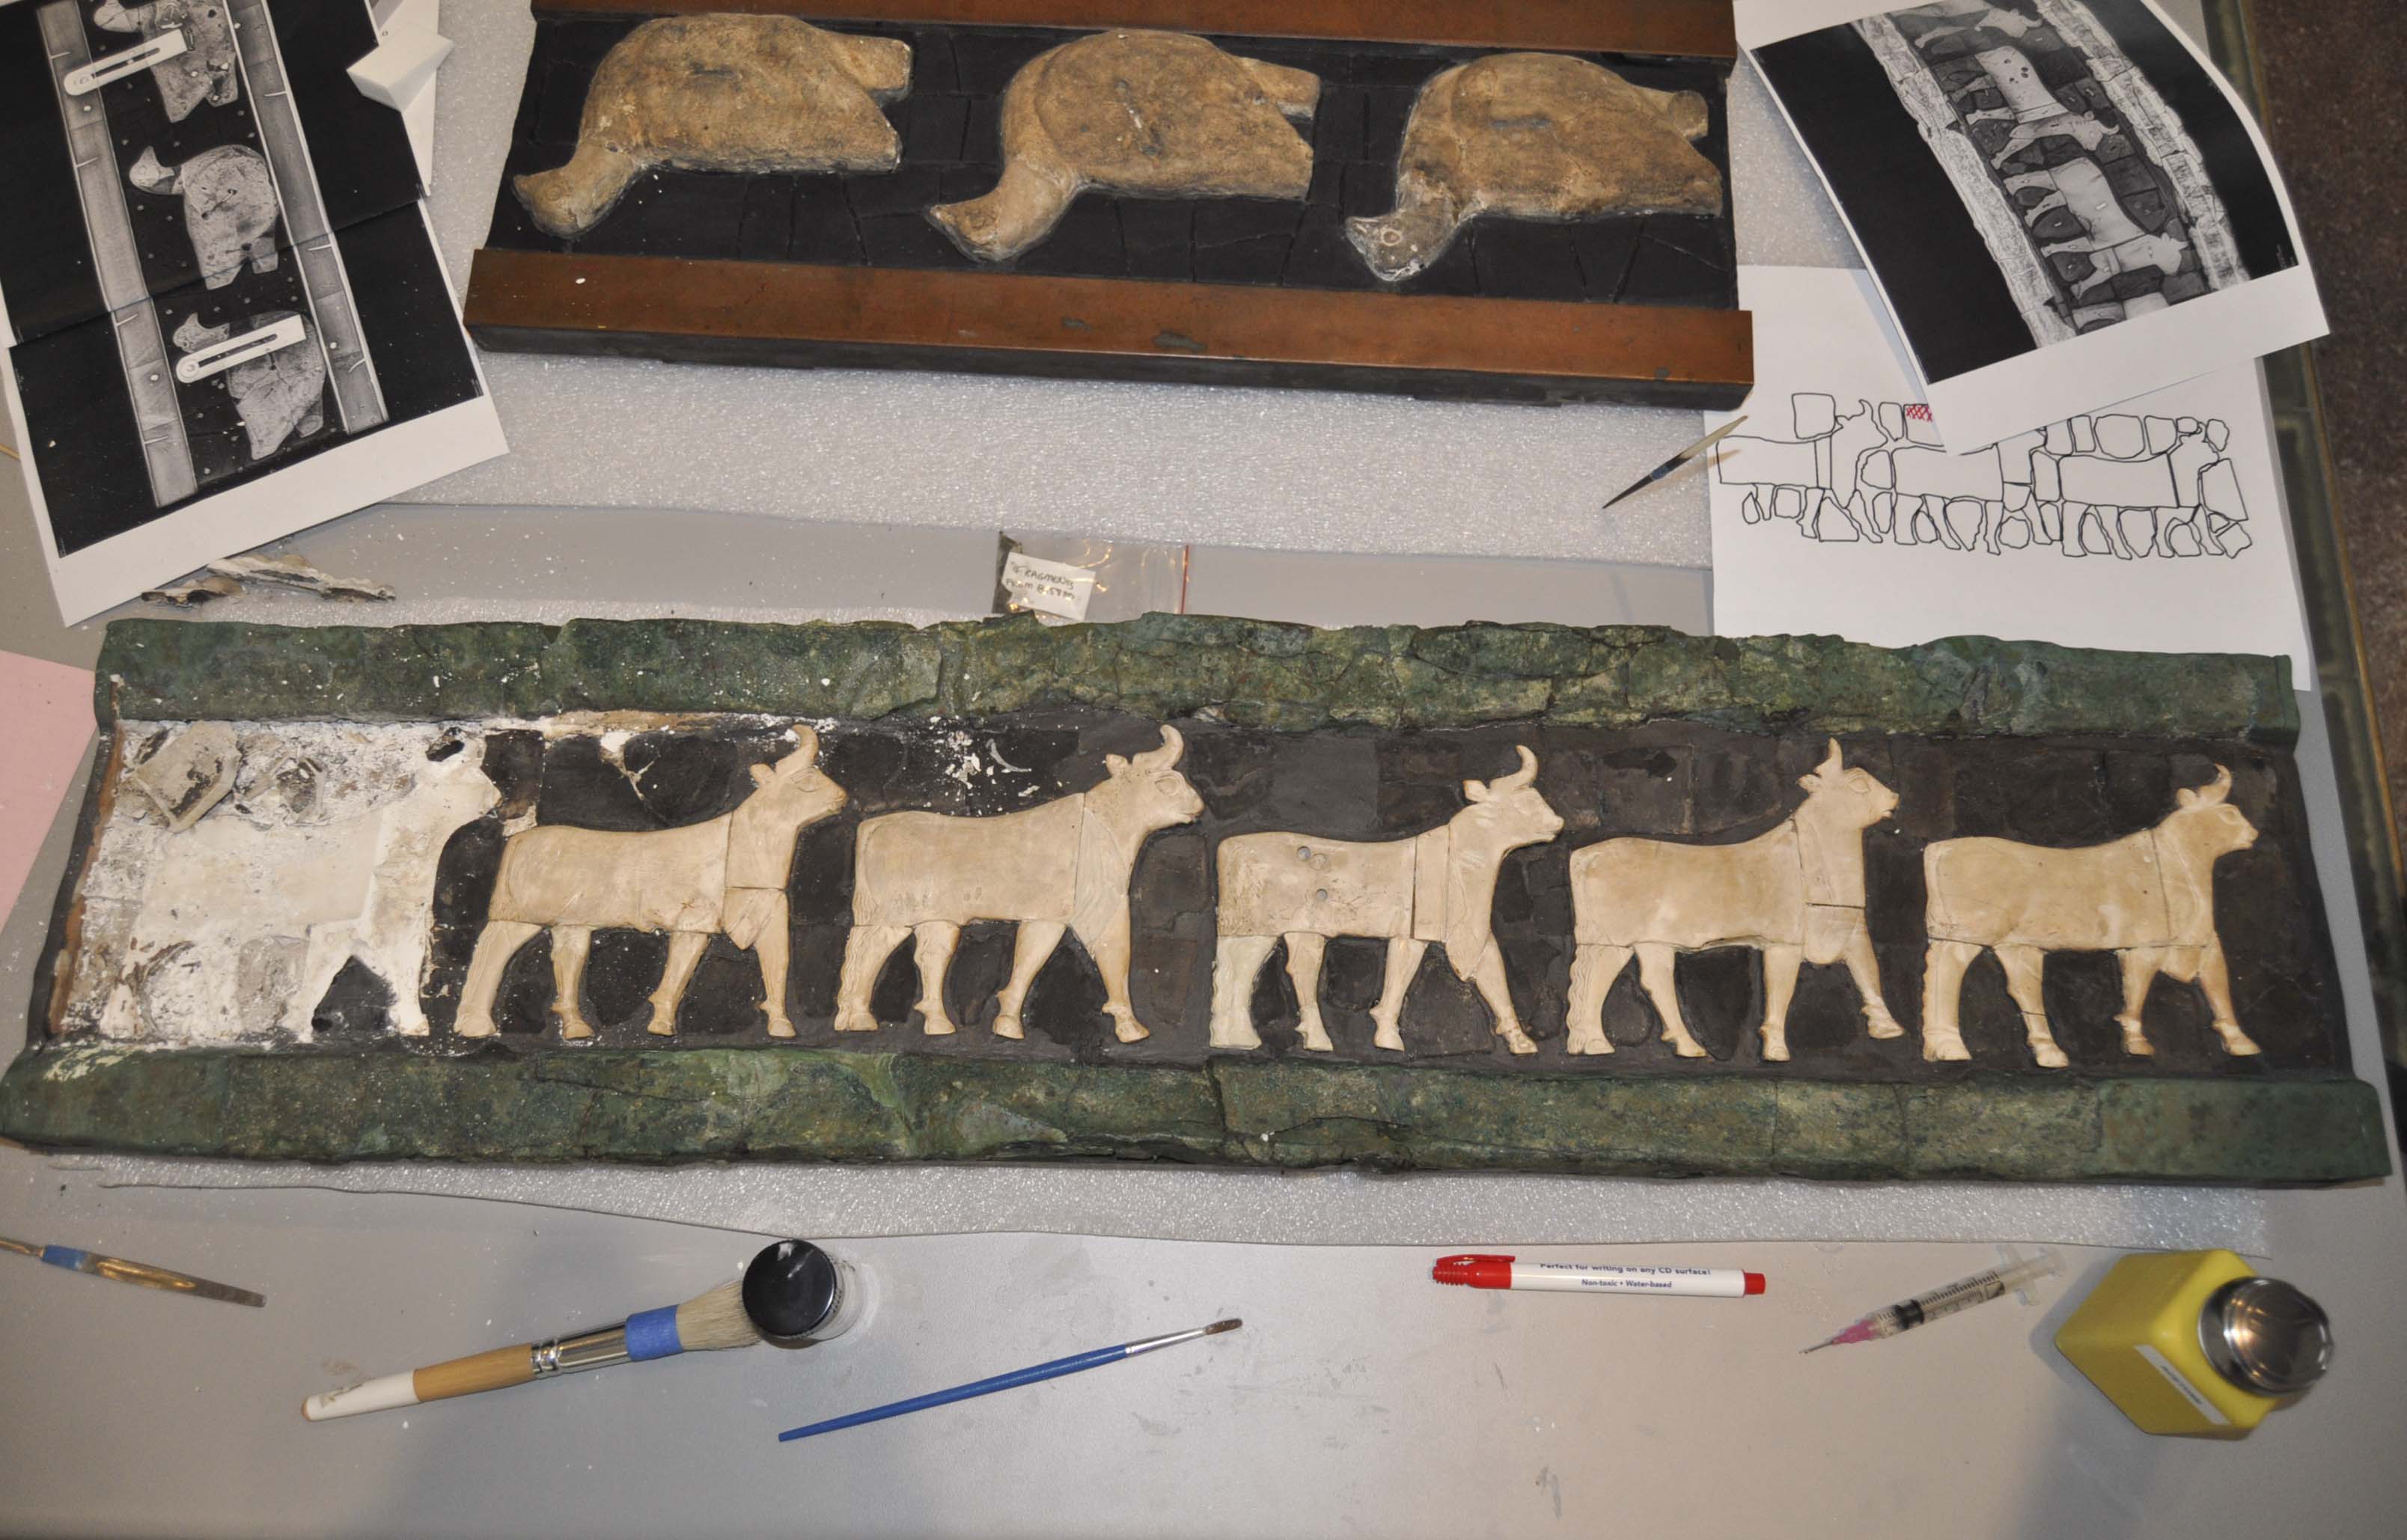
The tesserae were removed from the support and placed on an enlarged reference photo in a tray to maintain the order of composition (Figure 3).

Figure 3: All tesserae were removed from the support and placed on top of a rolled out image of the column section to maintain their original placement. All that remains on the exterior of the cylindrical support is a layer of grey plaster and previously filled areas. As a bonus, the Egyptian female child mummy named Tanwa can be seen in the background, just outside of the Artifact Lab window!

Second step of treatment: Cleaning

After removal from column section 2, all tesserae were covered with a layer of powdery plaster, which was removed with distilled water applied with hand-rolled cotton swabs. Medical scalpels were used to gently lift and remove thick remnants of plaster as well as adhesive from previous repairs. In addition, years of dark-brown dirt, dust and grime were removed with distilled water, and Stoddard solvent (a petroleum-derived organic solvent) was applied to the pink limestone and shell pieces to remove greasy grime trapped in the surface (Figure 4).

Figure 4: (left) Removal of adhesive and plaster remnants from a diamond shaped tesserae using a medical scalpel. (right) Shell tesserae being cleaned with distilled water. Note the dark grey-brown grime picked up on the cotton swab.

Third step of treatment: Repair

Once cleaned, tesserae that exhibited breakage such as cracks, detachment, and delamination were repaired with a thin layer of a semi-viscous solution of Paraloid® B-72 (ethyl methacrylate (70%) and methyl acrylate (30%) copolymer) resin in acetone. The majority of the shell tesserae experienced separation between the layers comprising the shell. Some even separated into several pieces, making their reassembly somewhat of a puzzle (Figure 5)!

Figure 5: (left) A triangular shell tessera delaminated (separated) into six pieces. (right) The same shell tessera with all pieces adhered together with Paraloid® B-72.

The shale was even more temperamental to remove from the column section (Figure 6). Shale is a soft sedimentary rock composed of mud, clay, and minerals, such as calcite and quartz. The inherent nature of the shale causes breakage and crumbling. Water can remove particles from the shale surface, therefore these pieces were cleaned with dry brushes and if needed, cotton swabs lightly dampened with distilled water.

The most resilient material was the pink limestone. While some pink limestone tesserae are weathered on the surface, most likely from centuries of burial, these tiles exhibited very little breakage and cleaned up nicely with distilled water and Stoddard solvent (Fig. 6).

Figure 6: (left) A diamond shaped shale tessera exhibiting a lack of cohesion, best observed around the edges, which caused cracks and areas of material loss. (right) A resilient triangular pink limestone tessera with a weathered surface, noted by the lighter, speckled locations. The pink limestone tesserae have strong cohesion and required very little repair.

After a month of cleaning and repair of the shell, pink limestone and shale tesserae, their overall appearance is quite transformative. The tesserae look brighter and truer to their original colors (Figure 7). This is especially the case for the pink limestone, which went from a dark peach-brown, to a brighter light-pink hue.

Figure 7: (left) Shell, pink limestone and shale tesserae after removal from the former support, and kept in their original arrangement. (right) All tesserae after cleaning and repair, ready for re-mounting to a new support.

…..What’s next?

The next phase of treatment for section 2 of the mosaic column is to mount the shell, pink limestone, and shale tesserae to a new solid cylindrical support. More information and updates on the column treatment progress will be featured in an upcoming post, so please stay tuned!

Laser cleaning a trio of birds

In addition to the frieze of 6 bulls (which we are still working on in the Artifact Lab), we are also treating a frieze of 3 birds, in preparation for our new Middle Eastern Galleries, scheduled to open in April 2018.

B15883, frieze of 3 birds before treatment

This is a section of a frieze from the site of Al-Ubaid, Iraq which was excavated by Sir Leonard Woolley in the early 1920s. The birds are the only original pieces of the frieze – the rest is a modern reproduction. The birds (possibly doves?) were carved from limestone and each has a pair of drill holes at their center which would have served as an attachment point. Copper alloy twists would have been used to secure the birds in antiquity – fragments of the original copper remain in one of them.

Due to structural stability issues in the modern reproduction, we needed to disassemble the entire frieze. Once the birds were removed, it was evident that their surfaces were very grimy, related to both the burial environment and time in museum storage. A variety of cleaning methods were explored and tested, but none worked better than using our laser.

One of the birds, after removal and before cleaning

The Conservation Department purchased a Compact Phoenix Nd:YAG laser several years ago, and we are still learning about all of its possible applications. We recently had a workshop with conservator and laser-guru Adam Jenkins, which helped us further develop some testing and health and safety protocols.

Essentially, the Nd:YAG laser works like this: the laser emits a beam of light, typically with a wavelength of 1064 nm (in the infrared), which selectively irradiates and removes unwanted dirt and surface coatings without damaging the object (a process called laser ablation). This type of laser cleaning works well for removing dark substances from light-colored objects, so trying it on one of the birds made a lot of sense.

Easy for me to say. I didn’t do this treatment – project conservator Madeleine Neiman did. So she gets all the credit for this.

After testing, Madeleine carried out her first laser cleaning treatment on the bird in the image below. Here she is getting set up to carry out the work:

And here is a shot of the bird after the surface was partially cleaned: (WOW!)

I think the process and results are best displayed in a gif, or a video, so I’m including the gif below, and here is a link to the video.

Go Madeleine! I think this was a really rewarding treatment to carry out. Please take note of all of the PPE (personal protective equipment) involved, including special eyeware and ventilation.

A lion relief from Nippur

Yesterday we received a new artifact in the lab: this terracotta lion relief from Nippur, Iraq.

B20014: the lion relief in fragments

Some may argue that this object could be a candidate for the Ugly Object of the Month club. Well, we like him, and one of our conservators pointed out that he looks a lot like one of these wonderful characters from William Steig’s Rotten Island.

Illustration from William Steig’s “Rotten Island”. Image courtesy of scienceblogs.com

This relief was excavated in the University of Pennsylvania’s Babylonian Expedition to Nippur in 1899. Like the Nippur slipper coffin currently on display in the Artifact Lab, it was previously repaired with metal staples and (at least one type of) adhesive, likely around the same time as the slipper coffin.

The staple-like wire tires used to repair the relief are visible in this view of one of the break edges.

More evidence of the old repairs on this fragment.

Getting this relief ready for exhibition in the Middle Eastern Galleries will not only require significant conservation treatment, but also a custom mount so that it can be displayed safely. We will provide updates as we work on this.

Update on one of the Al-Ubaid Friezes

The treatment of the two Al’Ubaid Friezes has progressed since the last post. This post is going to focus on what we have been doing with the marching bull frieze (B15880). This frieze is made up of shell pieces for the bulls (probably made from large conch shells) on a background of black stone pieces with copper alloy borders at the top and bottom of the frieze.

B15880, frieze of 6 bulls

The archaeologists who excavated these materials in the 1920’s set the mosaic into plaster over a wooden backing. Overtime, this support had started to flex, causing the plaster to separate from the wood. This lead to movement of the mosaic frieze casing pieces to loosen and detach as well as causing breaks in the stone. Over the years detached pieces were re-adhered using a variety of different adhesives depending on when the work was done.

Diagram of B15880 showing the 1920’s backing materials in relation to the copper, shell, and stone materials of the frieze.

Because of these issues the mosaic has now been removed from the 1920’s support. One of the perks of having the pieces free from the support, is that we can see both sides of each piece. While we knew from the X-ray that in antiquity they had been attached to the original support using copper alloy wire twists, we can know see those twists.

Detail of the shell showing the remnants of a copper alloy twist/fastener

Detail of the stone showing the remnants of a copper alloy twist/fastener

Now we are working to stabilize each individual piece. The shell bulls are in very good shape, so that has just been cleaning to remove the plaster, areas of over-paint, and adhesive residue. The stone pieces are, however, in much worse shape. We have been consolidating them to restore the cohesion of the stone, joining broken fragments, and cleaning to reduce plaster and old adhesives.

Image showing the progress on cleaning and stabilizing the mosaic pieces.

The next step will be to adhere the clean and stable pieces to a new backing with new grouting around them to keep them in place. Exactly what materials we will use and how that will be done is something we are still working on, but here you can see some of the test tiles that we are making to help make that decision!

Test tiles with bone beads and different possible grouting materials.


Two Al-‘Ubaid friezes

There will be a heavy rotation of objects from Iraq and Iran in the Artifact Lab as we work on objects that will be installed in our new Middle Eastern Galleries, scheduled to open in April 2018. Two of the newest pieces to come into the lab (but 2 of the oldest things in here) are these friezes from Tell Al-‘Ubaid, a site located west of Ur in Iraq, which date to the Ubaid period (ca. 6500-3800 BCE).

B15880, frieze of 6 bulls.

B15883, frieze of 3 ducks

These frieze fragments were excavated by Charles Leonard Woolley in 1924 as part of the British Museum/University Museum Expedition to Al-‘Ubaid. They both have been heavily reconstructed, displayed a lot, and loaned several times, so this is not their first time in the conservation lab. Due to some condition issues and because we are preparing them to go on long-term exhibition here at the museum, we have decided to deconstruct the old repairs and reassemble the friezes using materials that we expect will last longer and provide greater protection for the original pieces.

Conservation treatment of the frieze with the bulls began a week ago:

The bull frieze after 2 days of treatment.

One week later, even more progress has been made:

The bull frieze after 1 week of treatment.

Detail of the first bull freed from the frieze, 7.5X magnification. The bulls are made of shell and are in excellent condition.

Prior to treatment, the friezes were x-rayed to provide a better understanding of their construction and previous repairs, and to guide conservation treatment.

A digital x-ray radiograph of a portion of the bull frieze showing ancient methods of attachment (some are circled in red), modern nails (circled in blue), and a large fill made as part of a previous conservation treatment (circled in green).

Check back for updates on this exciting and complex treatment.


Conserving Egyptian mummies…and more

Update – this post contains outdated language. We no longer use the term “mummy” and instead use “mummified human individuals” to refer to Ancient Egyptian people whose bodies were preserved for the afterlife. To read more about this decision, follow this link.   

Recent visitors to the Artifact Lab may have noticed this new sign posted on one of the lab windows:

signdsc_0539

Since we opened in fall 2012, you might have occasionally caught us working on non-Egyptian things, but if you visit us now, you will definitely see us working on things from other parts of the collection, especially artifacts that we are preparing for our new Middle East Galleries. Right now, we are focusing a lot of our efforts on treating ceramics and lithics, most from Iraq and Iran.

We have tens of thousands of ceramics and lithics in this museum’s collection, but somehow, in my over 4 years here, I have gotten away with working on only a handful.

tessa4

Conservator Tessa de Alarcon reconstructing a ceramic vessel. This is a common sight in our main lab (behind the scenes) but not so much in the Artifact Lab…until now.

So this is how, after spending over 4 years working on mummies and coffins, working on a small ceramic vessel becomes a novelty. And that is why I am going to walk you through some of the fairly routine steps of treating a ceramic, because I’ve never gotten a chance to write about it on this blog before, and honestly, I’m excited about it.

This small ceramic vessel with a simple striped pattern was excavated in 1931 in Ur, which is a site in modern day Iraq. It dates to the Ubaid Period, so is at least 6000 years old.

31-17-318

31-17-318, before treatment (BT)

As you can see in the above BT image, it was previously broken and repaired. In order to get it ready for exhibition, those old repairs need to be removed. We don’t always remove old repairs (and we never remove repairs that date to when the objects were still in use), but based on observations of the vessel and referencing an old conservation treatment report, I knew that the repairs had to be undone –  if left in place those old materials are likely to fail and possibly cause more damage to the object. Another goal of the conservation treatment is to improve the appearance of the vessel, as there was excess adhesive and overpaint in areas and many of the joins were not well aligned.

Based on that old treatment report and tests in the lab, I knew that the old adhesive is soluble in acetone and that the material used to fill missing areas would soften in acetone enough to allow it to be removed. So the first treatment step, after documenting the piece fully, was to put it in an acetone vapor chamber:

cup-dtdsc_0042

An acetone vapor chamber isn’t anything fancy – in this case it was created with a plastic bag. I placed the vessel and 2 small containers of acetone in the bag and then clamped the open end to prevent the acetone from leaking out. Sometimes an object only needs a few hours in a vapor chamber before it can be taken apart. This little vessel required 24 hours before even one piece could be taken off. The whole thing was finally deconstructed after a week of sitting in the chamber on-and-off and poulticing and swabbing the joins with acetone.

During treatment, after the first piece detached

During treatment, after the first piece detached

During treatment, after about half the vessel was taken down

During treatment, after more than half the vessel was taken down

Success! All the pieces are finally apart, placed on images of the vessel in order to keep track of everything.

Success! All the pieces are finally apart, placed on images of the vessel in order to keep track of everything.

Once the pieces came apart, I had to swab all the joins with acetone to remove excess adhesive and fill material. I’m now at the point where I will start joining the pieces together again.

Swabbing a break edge of a ceramic to remove excess old adhesive

Swabbing a break edge of a ceramic to remove old adhesive

Stay tuned for more posts about our work on these objects, and our continued work on the Egyptian collection and other projects!