Treatment of a Huron cigar case

To prepare this jewel of a cigar case for exhibition, lifting and detaching moose hair and splits in the birch bark had to be stabilized.

Before treatment image showing the cigar case from the side, with arrows indicating lifting and detaching moose hair (red ) and splits in the birch bark (green)

A small piece of twisted Japanese tissue paper used to replace some of the missing threads


Some of the lifting moose hair was stabilized with dabs of 5% methyl cellulose. For the lifting moose hair around the edges of the case, much of this damage was exacerbated by the missing brown thread stitches. For these areas, after re-positioning the moose hair, I recreated the missing threads with twisted Japanese tissue paper fibers, toned with acrylic paint.


The fibers were adhered in place with Lascaux 498, an acrylic emulsion.

Before (left) and after (right) treatment images, with red arrows indicating the locations of the replacement stitches

Unstable splits in the birch bark were repaired from the interior with Japanese tissue and Lascaux 498. Additional support splints made of twisted Japanese tissue fibers were added to the exterior in one place on the lid.

Before (left) and after (right) treatment images of the lid. The red arrows indicate the location of the split and the repair splints used on the exterior.

The cigar case is now on exhibit in our Native American Voices gallery. I only learned after it was installed that it dates to 1850 – much older than I realized! Its age makes it an even more remarkable piece.

The cigar case on display in the Native American Voices gallery

Examination and treatment of a cartonnage pectoral

Update – this post contains outdated language. We no longer use the term “mummy” and instead use “mummified human individuals” to refer to Ancient Egyptian people whose bodies were preserved for the afterlife. To read more about this decision, follow this link.   

We have had this object in the collection since 1890:

E352, overall before treatment

E352, overall before treatment

This painted cartonnage pectoral (E352) was made as a covering for the chest of a mummy, and dates to the Ptolemaic Period (ca. 200 BCE). We don’t have the mummy or any other items from the person’s burial, so we don’t know anything about who this belongs to other than that they were buried with this beautiful piece (and likely an equally nice mask, and leg and foot coverings).

This artifact was previously on display in our Secrets and Science gallery and is now in the lab for conservation treatment. It was displayed vertically for over three decades, but since it has come into the lab, we have removed it from the old mount to allow for a full examination, documentation, and treatment.

Multispectral imaging allowed us to identify the Egyptian blue paint used for all of the blue decoration:

An overall image of the pectoral in visible light (left) and a visible-induced IR luminescence image, where the Egyptian blue pigment appears white

An overall image of the pectoral in visible light (left) and a visible-induced IR luminescence image, where the Egyptian blue pigment appears white (right), and everything else is black

We have written about the unique luminescence of Egyptian blue before on this blog, and in the image on the right, above, we can clearly see where it was used to decorate this pectoral.

Conservation treatment so far has included consolidation of the flaking paint with methyl cellulose, carried out under the binocular microscope.

A detail of the pectoral, 7.5X magnification

A detail of the pectoral as viewed through the microscope, 7.5X magnification

I have also been filling small losses with a mixture of Klucel G and glass microballoons, and backing weak areas with Japanese tissue paper.

Here is a link to a mini-slideshow that shows a small section of the cartonnage under 7.5X magnification (the same section seen in the image above). The slidehow shows how I filled a tiny hole with the Klucel mixture, which then allowed me to readhere a tiny fragment of red paint. The change is subtle – see if you can spot where I reattached the paint flake!

Consolidating a painted wooden shabti

This one-minute video captures what I did at work today, times about 250.

Shabti paint consolidation (click on the link to view the video)

To put it into context, I was working on this painted wooden shabti, which I’ve mentioned on the blog before.

The area blocked out in yellow is the area I'm working on in the video.

The area blocked out in yellow is the area I’m working on in the video.

Here is a still shot of the area I’m working on in the video, taken at 10x magnification using our binocular microscope:

IC800006The paint is actively flaking in many areas on this object. In the video, you can see me applying a 2% solution of methyl cellulose in water by brush to a loose flake of paint, and then after allowing the flake to relax, tapping it into place using a silicone colour shaper. It’s slow-going, but it’s working!


Treating fragments of a Middle Kingdom painted wooden coffin

If you’ve visited the lab in the last few weeks you may have seen me, head bent at the binocular microscope, working away on fragments of a painted wooden coffin from Abydos. These fragments (7 in total) were excavated in 1901 and have been here at the museum ever since. As I described in a previous post, these boards were severely damaged by termites prior to excavation, and the painted surface, while very well-preserved in some areas, was cracked, flaking, and barely attached in places, not to mention covered with grime.

One of the coffin fragments, which features a portion of a frieze of objects that includes two vessels with spouts and a bolt of clothing.

A before treatment photograph of one of the coffin fragments, which features a portion of a frieze of objects that includes two vessels with spouts and a bolt of clothing.

On the board in the image above, the paint was actually in decent condition. After cleaning the surface with bits of a kneaded rubber eraser, I stabilized the edges around the paint losses with a 2% solution of methyl cellulose in water. With the help of an intern, we sorted through a box of much smaller fragments that presumably had become detached from the 7 larger boards at some point, and we found two small fragments of wood with painted decoration which belonged to this board. These fragments were adhered in place with a 1:1 mixture of 5% methyl cellulose and Jade 403, an ethylene vinyl acetate emulsion.

E12505emends

In this image the red arrows point out the two fragments which were adhered in place after cleaning and consolidation.

Here is a view of that area from the back after mending those fragments:

e12505e_backbeforemendingThe termite damage is evident from the back, and as you can see, the wood is very thin in this area in particular, only about 1mm thick along the join edges between the small fragments and the larger board. The small loss to the right of the upper fragment is an area where the wood and painted surface have been lost completely.

Because the wood is so thin and fragile, I decided to provide some support to this area, by first adhering a piece of Japanese tissue paper over the loss from the back with a 5% solution of methyl cellulose.

e12505e_backmend

A detail of the Japanese tissue paper support adhered over the loss

I then filled the loss and the small gaps along the join edges of that upper fragment from the front, using a fill mixture made from 5% methyl cellulose, glass microballoons, and powdered pigment.

e12505edetail

A detail shot showing the fill from the front

Here is an overall view of the board, after treatment:

E12505Edt02_blogThe fill mixture I used worked nicely, and I’m now using it to stabilize the edges of some of the lifting paint on the other coffin board fragments where the painted surface is in worse condition. I will post photos soon showing what the coffin boards look like before and after treatment.


Completing the treatment of Tawahibre’s coffin

Things have been pretty busy around here lately, and I almost forgot to post some updates about several projects. One project in particular is the treatment of Tawahibre’s coffin. We have been working on this 2-part painted wooden coffin in the lab for the last year, and we recently completed its treatment.

As you may remember, when the coffin first came up here, it was covered with a thick layer of dust and grime, the paint was badly flaking in areas, several large pieces of painted gesso were pulling away from the wood support, and there were large cracks throughout.

Before treatment photos (clockwise from left): upper half of coffin showing layer of dust and large cracks and losses; large piece of painted gesso partially detached from top of head; large loss on wig, showing old animal glue adhesive from a previous restoration

Before treatment photos (clockwise from left): upper half of coffin showing layer of dust and large cracks and losses; large piece of painted gesso partially detached from top of head; large loss on wig, showing old, shiny animal glue adhesive from a previous restoration

After cleaning the surface with a brush and vacuum, followed by cosmetic sponges, I consolidated the paint with a methyl cellulose solution, filled in cracks and gaps using Japanese tissue paper and a mixture of methyl cellulose bulked with cellulose powder and glass microballoons, and then toned the fills with acrylic paint. This work is explained in further detail in previous posts, which you can find by clicking on the links included in blue above.

fillingcracks

A detail shot of the wig showing an area with several large open cracks before and after filling with Japanese tissue paper and methyl cellulose/cellulose powder/glass microballoons mixture

Based on a discussion with our Egyptian section curators, I also made some aesthetic fills to mask some large losses, including 2 losses on the wig. We chose not to fill the losses on the nose and chin because filling these losses would require too much guess-work as to the original contours of these features.

Large loss on wig before (left), after application of Japanese tissue paper layer (middle), and after application of fill mixture (right)

Large loss on wig before (left), after application of Japanese tissue paper layer (middle), and during application of fill mixture (right)

Detail of the head and wig before (left) and after (right) conservation treatment, with losses in before treatment photo outlined in red

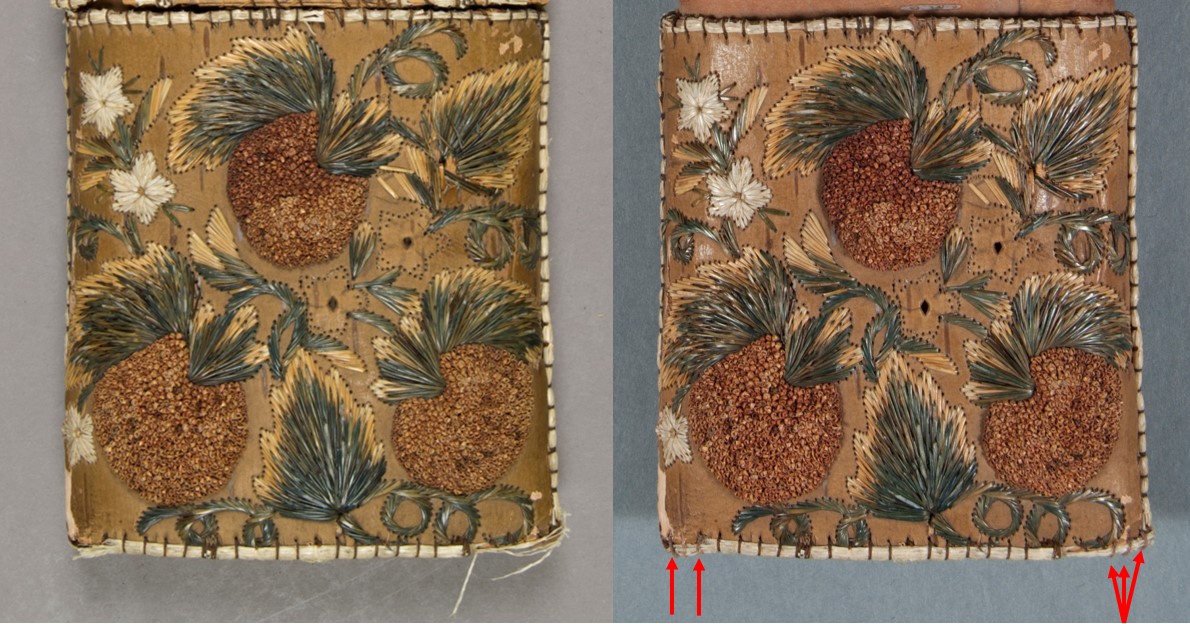
Detail of the head and wig before (left) and after (right) conservation treatment, with losses on the wig outlined in red. The larger loss on the right is the featured in the previous series of images.

I carried out similar work on the base of the coffin, and now both are complete:

Tawahibre's coffin lid before (left) and after (right) conservation treatment

Tawahibre’s coffin lid before (left) and after (right) conservation treatment

The coffin base before (left) and after (right) conservation treatment.

The coffin base before (left) and after (right) conservation treatment

As you can see, we chose not to fill many of the losses, focusing instead on stabilization.

This work will enable future exhibition of the coffin, and just as importantly, it will make further study of the coffin possible. All along there have been some discrepancies between the name that has always been associated with the coffin (Tawahibre, a woman’s name) and a previous translation in 1946 of the hieroglyphic text on the coffin (which identified the name of a male court official, the son of J-se(t)-N-Ese). There has also been some confusion about the remains once housed in the coffin, which were previously identified as male, but in a 1975 autopsy the remains were confirmed as belonging to a female in her mid-30s. A bit confusing, but hopefully we’re now one step closer to getting this all straightened out!


Fragmentary painted coffin from Abydos

If you are a member of the museum, you may have already seen some information about these painted coffin board fragments in the most recent issue of Expedition magazine:

E12505_2These fragments, which date to the Middle Kingdom (ca. 2000-1700 BCE), were excavated from the North Cemetery of Abydos in 1901 by John Garstang. The museum supported Garstang’s work through the Egypt Exploration Fund.

Despite the severe insect damage, the preservation of the painted details on these fragments is remarkable.

This fragment features 3 usekh collars, which were often reserved for nobility. Beside each collar is a mankhet, or counterpoise. The hieroglyphs above are the names of each of the collars, which are slightly different.

This fragment features 3 usekh collars, which were often reserved for nobility. Beside each collar is a mankhet, or counterpoise. The hieroglyphs above are the names of each of the collars, which are slightly different.

A detail of the usekh en nebti, the collar of the two mistresses that incorporates the uraeus and the vulture

A detail of the usekh en nebti, the collar of the two mistresses that incorporates the uraeus
and the vulture (7.5x magnification)

These coffin board fragments have never been exhibited, and our renewed interest in them is due to the fact that we are currently excavating tombs from the same time period in South Abydos, including the funerary complex of Senwosret III. You can read a lot more about this project in the recent Expedition issue and on the museum blog by following this link.

In order to exhibit the coffin fragments, they need some extensive conservation treatment. Their surfaces are dirty, the paint is cracked, cupped and lifting from the wood support, and is very fragile, and some of the boards are structurally unstable due to the extensive insect damage.

We are currently working on these boards in the lab, and we have made some good progress. We are cleaning the painted surfaces with a kneaded rubber eraser. The eraser can be shaped to a fine point, and working under the binocular microscope, it is possible to remove the dirt from most of the painted surface without disturbing the fragile paint.

We are using kneaded erasers (left) to clean the delicate painted surface of these coffin boards (right)

We are using kneaded erasers (left) to clean the delicate painted surface of these coffin boards (right)

Some areas of paint need to be stabilized before they can be cleaned. After testing a variety of adhesive solutions, I settled on my old friend methyl cellulose, a 2% solution of methyl cellulose in water to be exact, to consolidate fragile areas.

Paint consolidation is being carried out under the microscope with a fine brush

Paint consolidation is being carried out under the microscope with a fine brush

I am now working on testing some fill materials, both to stabilize the edges of lifting paint and also to stabilize the fragile wood. I will post an update as soon as I make some decisions and proceed with this part of the treatment!