Caring For Culture: Introducing Teens to Museum Conservation

By Lu Denegre

All photos by Emily Hirshorn

On June 4th, 2022, with the help of funding from the Museum Council of Greater Philadelphia, the Conservation and Learning Programs departments hosted “Caring for Culture”, a hands-on introduction to conservation for teens. We had a great time and got some good feedback, and look forward to welcoming another group of teens this year on June 3rd 2023!

(If you’re a teen in the Philly area, you can register here for this year’s workshop)

Last year, 24 students arrived at the museum for a day of activities. The workshop began with introductions and a presentation by Senior Project Conservator Molly Gleeson about the basics of museum conservation. What kind of work does it involve? Why do we do it and what can damage cultural heritage collections?  

Molly Gleeson addresses Caring For Culture Participants in Widener Auditorium, and a diagram of the Agents of Deterioration (from A Guide to Risk Management of Cultural Heritage (p. 27), ICCROM, 2016).

Next, participants were led in smaller groups on a tour of the Museum’s conservation lab spaces by Head Conservator Lynn Grant. They got to see the X-Ray room, the photo studio, prep room, and main lab. Lynn and Graduate Intern Nylah Byrd spoke about the different treatments a large wall painting, a cartonnage mask, and a stone sculpture have undergone. These objects will be included in the upcoming reinstallation of the Ancient Egypt and Nubia Galleries and have collectively required different types of imaging, storage mounts, cleaning, and structural and aesthetic fills. 

Lynn Grant leads a tour of the conservation lab
Nylah Byrd talks about the treatment of a cartonnage mask

For rest of the morning, the groups were led into the galleries by a member of the conservation department to do some documentation of their own. Each participant chose an object in the galleries to condition report and diagram. Condition reporting is one of the first things you learn as a conservator and is the first important step in assessing an object’s needs before starting treatment. This activity offered opportunities to look for real life examples of condition issues, agents of deterioration, preventative conservation steps, and mountmaking.

Participants observing a strategy for a large fill on an object in the Middle East Gallery
Completing condition report worksheets for an object chosen in the galleries

After a sunny lunch in the Warden Garden, participants came back in for some hands-on activities. Groups rotated between three stations: cleaning, close looking, and ceramic reassembly. These stations introduced some of the beginning skills needed by a conservator in training. 

At the cleaning station, teens learned to roll their own cotton swabs to gently remove grime from the surface of a dirty tile. They also applied warm agar gel to learn how we loosen up and remove grime without using too much water on more sensitive objects or more stubborn dirt. 

A participant swab cleans a dirty tile

At the close looking station, teens used a Dino-lite digital microscope to get up close and personal with some study objects. A UV light setup showed that the way materials fluoresce differently under Ultra-Violet light can help identify unknown substances. 

Conservator Julia Commander guides participants through using a Dino-lite microscope

At the ceramic reassembly station, teams worked to puzzle out the correct location of sherds and reconstruct a ceramic object. Small sandboxes, blue tape, and clamps to hold everything in place are essential tools for gluing a ceramic back together. 

If students tried their hand at each table and still had time to spare, there were also individual activities on color matching and inpainting prepared for some down time. 

We were happy to see such enthusiastic attendance of this program last year and hope we get to meet some more future conservators at the workshop next month! If you or someone you know would like to participate, you can find more info and register here for this year’s workshop!

We aren’t making mummies…or are we?

One question I hear occasionally from visitors in the Artifact Lab is “are you making mummies?”. I always think that this is a funny question – there is one thing that we have plenty of at the museum, and that is objects in our collection. There is no need for us to make our own…or is there?

What's going on here? What could these possibly be for?

What’s going on here? What could these possibly be for?

We do sometimes make mock-ups of artifacts, for testing purposes or for exhibit or educational use, and I wrote a bit about this in my very first blog post on the Penn Museum blog, way back in September.

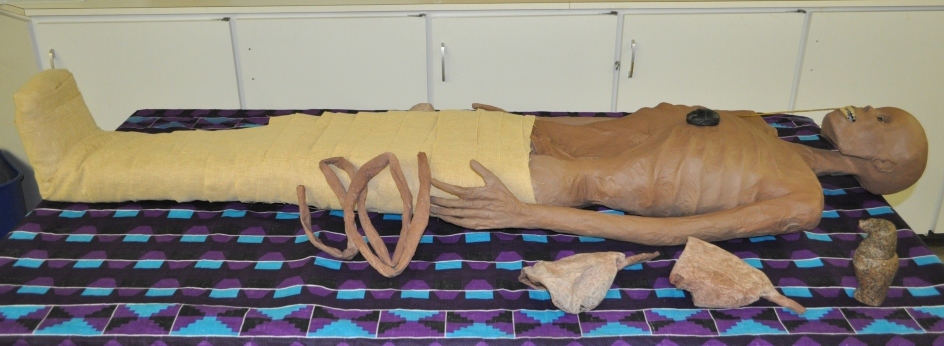
And now I can no longer say that the museum is not making mummies. While we may not be making mummies in the Artifact Lab, we do have someone on staff who has been known to make a mummy, or two, in his career. This someone is Ben Neiditz. And rather than saying much more about this, I thought I’d ask him a few questions, and post our Q&A on the blog. So read on to learn more about Ben’s fascinating, and super creative, work.

Real mummy or fake? You decide!

Real mummy or fake? You decide!

Hi Ben. Can you tell us a bit more about yourself and what do you do at the museum?

I am a sculptor, designer, and builder and I work in the Exhibits department designing and building a range of different exhibit elements including casework, interactives, furniture, and artifact replicas.

How did you get into making artifact replicas?

Well, I studied sculpture and I am still making artwork outside of the museum, but my first replica for the museum was for the Secrets of the Silk Road exhibit. We were prevented at the last minute from displaying the two mummies that were the centerpiece of the show and so I created two replicas. As luck would have it, I had been making desiccated corpses as part of my own sculptural practice and so I was well prepared to make replica mummies in the required time frame (very fast!). Most recently I made a set of replica codices for the exhibit Maya 2012: Lords of Time and I have just finished making another replica mummy – including a set of desiccated organs – that will be used in educational workshops about Egyptian mummification. 

Tell us more about this recent mummy project! How did you make the mummy and what materials did you use?

I started by casting a skull: I covered it in paper mache, let it dry and then cut off the paper shell and reattached the parts.

The "skeleton" of Ben's mummy

The “skeleton” of Ben’s mummy

I used skeletal and anatomical diagrams, photos of real mummies and my own body as reference for scale, proportion and texture. For the body, I started with a wood armature that I then “fleshed out” with paper and cardboard.

The body of the mummy taking shape

The body of the mummy taking shape

I coated the whole thing in paper mache and then I painted and textured the exterior with celluclay, dirt and wood glue to get the desired skin texture.

The "skin" in process of being applied (left) and a detail of the evisceration on the mummy's left side (right)

The “skin” in process of being applied (left) and a detail of the evisceration (right)

Do you have anything else interesting to share? What was the most interesting thing you learned from this?

I went to check out the mummification workshop in which the aforementioned mummy is used. This particular iteration of the workshop was being presented to a group of 6th graders and it was great! The kids get to poke brains made from jello and learn all about the system of religious beliefs that surrounds Egyptian mummification. I learned that in order to be admitted to the afterlife, your heart is put on a scale balanced against a feather. If your heart is too heavy, indicating a life lived wrongly, it is devoured by a crocodile-lion-hippopotamus and you are denied entry into the underworld.

Real mummy or fake? You decide!

The final product-the complete mummy with all of his organs and a scarab amulet placed on his chest.

Thanks Ben! What a cool project. The mummy looks great, and as Ben mentioned, it is already being put to use for workshops here at the museum. The mummy has been dubbed “Mr. Ulysses Penn” (or Mr. U Penn). He will be featured in the next “Mummy Makers” workshop, which will take place on June 5th.